• Skip to secondary menu
  • Skip to main content
  • Skip to primary sidebar
  • Skip to footer
  • The Pressure Canning Cookbook
  • Blog
    • Subscribe
    • Welcome!
  • Perfectly Preserved Podcast
  • About
    • ADW Manifesto
    • Work With Me
      • Read
  • Shop
    • My Account
    • Cart
    • Checkout

The Domestic Wildflower

Handmade Food & Craft Tutorials for Beginners

  • Courses
    • Free Canning Basics
    • Everything Canning Course
    • Steam Canning Workshop
    • Free Homemade Cocktail Mixers
    • Wildflower Mixology
    • Crochet Basket Workshop
  • Can & Preserve
    • Never Canned?
    • Steam Canner Equipment Bundle
    • Shrubs Course
  • Sew
  • Cook
  • Craft
    • Crochet Step-by-Step Guides
      • Crochet Basket
      • Giant Yarn Throw
      • Thick & Thin Throw
  • Living
    • Creativity Challenge
    • Clean
    • Kids
  • Rentals

Jenny Gomes

Pickled Pearl Onions

April 8, 2017 by Jenny Gomes 4 Comments

This post will share a recipe for a beautiful, fast preserve that is perfect for use in a steam canner which maximizes it’s time-saving benefits and is also well suited for a water bath canner too! Read on for a savory, quick preserve.

Pickled pearl onions are an ideal recipe for steam canning, so I’ll include instructions for both steam canners and water bath canners.

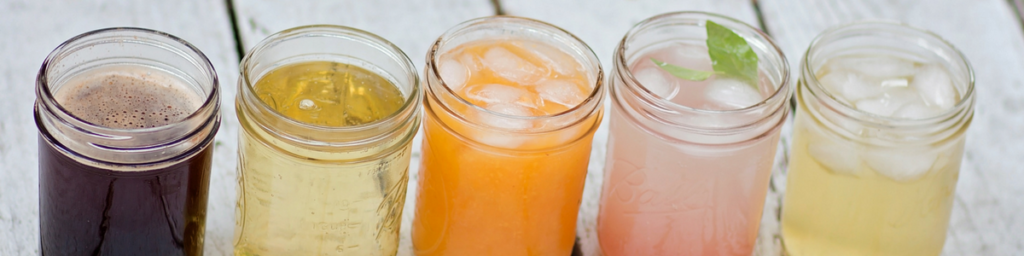
They are delicious on poached eggs, in salads, as part of an hors-d’oeuvres plate, and in a cocktail like a Bloody Mary. They are my favorite on poached eggs on toast with cheese, avocado, tomato, bacon…try it. You won’t be sorry.

If you are new to steam canning but the idea is intriguing, watch this video here to help you get started!

Get the steam canning mini resource guide to help you understand the benefits of steam canning versus water bath canning!

Bring a large pot of water to boil up to 24 hours before you plan to can these onions as they need to bring in a saltwater bath for several hours before canning. I’ve gotten away with as few as six hours soak-time. 

Put 2 ½ pounds of pearl onions (white or red) in boiling water for 2 minutes. Strain and pour into an ice water bath to cool.

When cool to the touch, slice off the root end of the onion, about a quarter of an inch, and squeeze from the opposite end to the external layer remains in your fingers and the skin-free pearl onion squirts out. Reassemble the onion if the layers separate. Put the skinned onion in a bath of cold salt water- 4 cups cold water with ½ cup salt. Let the onions rest for several hours.

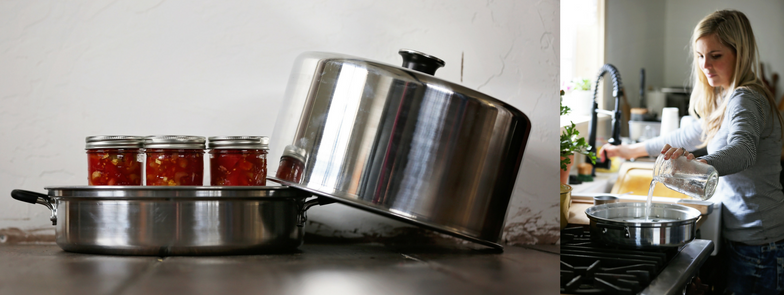
Water bath canners: Starting 30 minutes before you plan to make the brine, fill water bath processing pot with water and jars (about 6 wide mouth half-pints) and bring to a boil. Assemble jars, new lids, and rings on a towel covered countertop with a funnel and jar lifter nearby. Bring a saucepan filled with new lids and rings to a simmer and have lid lifter handy. Proceed to the Prepare the Brine step below when the water has come to a boil.

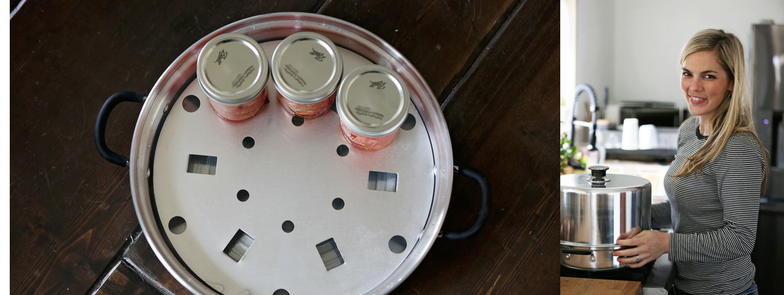
Steam canners: Add the required 2 ½ quarts water to the steam canner and turn on to medium-high. Assemble jars, new lids, and rings on a towel covered countertop with a funnel.

Prepare the brine:

Mix together

1 teaspoon salt

1 ½ cups white wine vinegar, 5% acidity, which I prefer for its mild flavor which really lets the spring flavor of the onions shine, but you can use any vinegar as long as it is 5% acid.

1 teaspoon mustard seeds

1 teaspoon dill weed (so pretty with the white onions!)

Add drained, peeled onions and bring to a boil and gently stir.

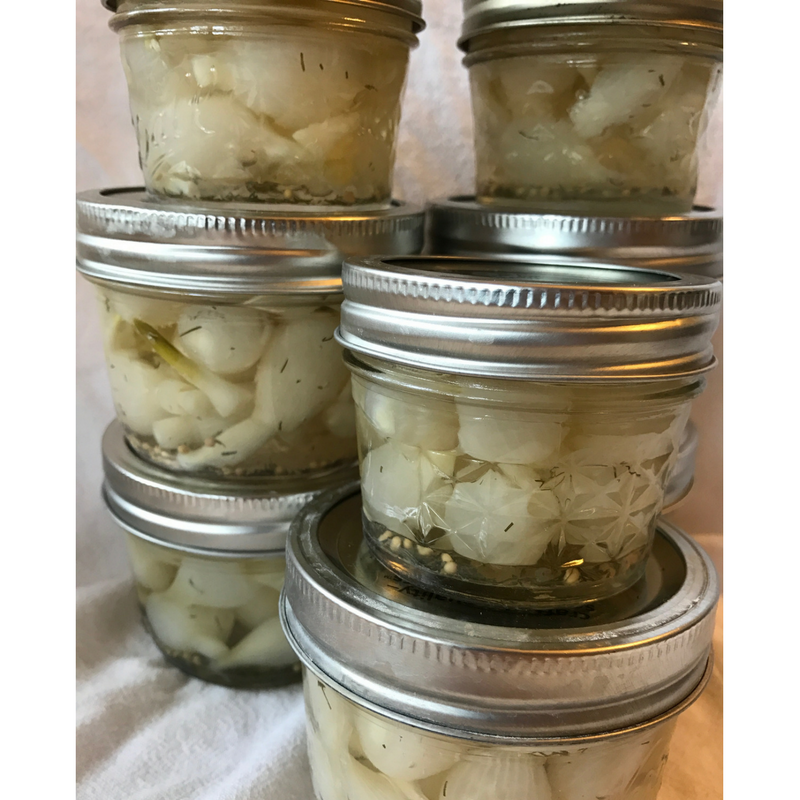
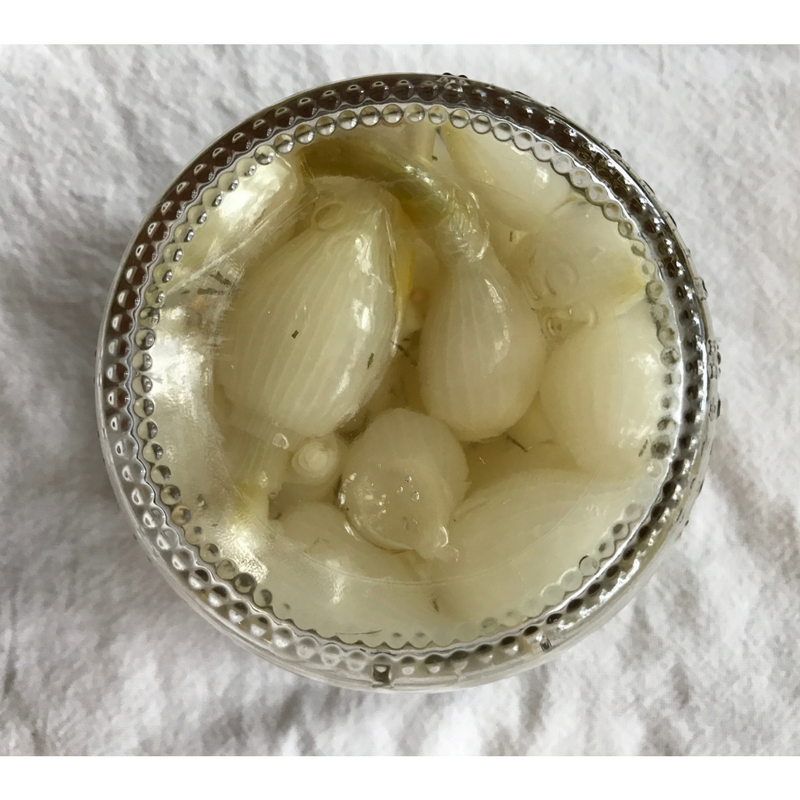
Fill jars with funnel each jar one time, leaving ¼ inch headspace, aiming for the jar to be full of onions that are submerged in the brine. Put on new lids and rings and tighten just as tight as you’d tighten a bathroom faucet.

Steam canners: Place the jars on the rack about a quarter inch apart. Put the lid on the steam canner with the vent facing away from you but where you’ll be able to see the column of steam pouring from it. Turn the head up to high and monitor as the dial on the thermometer moves to the green or starting mark for your elevation. Adjust the temperature as needed to prevent the steam canner from boiling too vigorously; medium-high is probably just right. Start the 10 minute processing time when there’s a column of steam pouring from the vent that’s about 6-8 inches and the dial indicates you are in the green/go zone. Remember to adjust for elevation by adding 5 minutes of processing time for every 1000 feet of elevation you are canning above sea level.

When the time is up, you can let the lid remain on the pot indefinitely. When it has cooled significantly, the teakettle-type whistling has stopped, use hot pads to lift the lid open AWAY FROM YOU so the steam pours out the back of the pot away from you. Set the lid aside and either wait till the jars are cool to the touch to place on the towel covered countertop or use a jar lifter to move them to the counter.  

Water bath canners: Use the jar lifter to put one jar back into the water bath process pot at a time. Bring the water back up to boil, and set the timer for 10 minutes, adding 5 minutes for every 1000 feet of elevation you are canning above sea level.

Steam Canning Pickled Pearl Onions A Beginner Canning Tutorial | Read this great post that shares the recipe and process for canning these spring time pearl onions in a super fast steam canner or in a water bath canner.

When the time is up, remove each jar carefully using the jar lifter to the towel covered countertop.
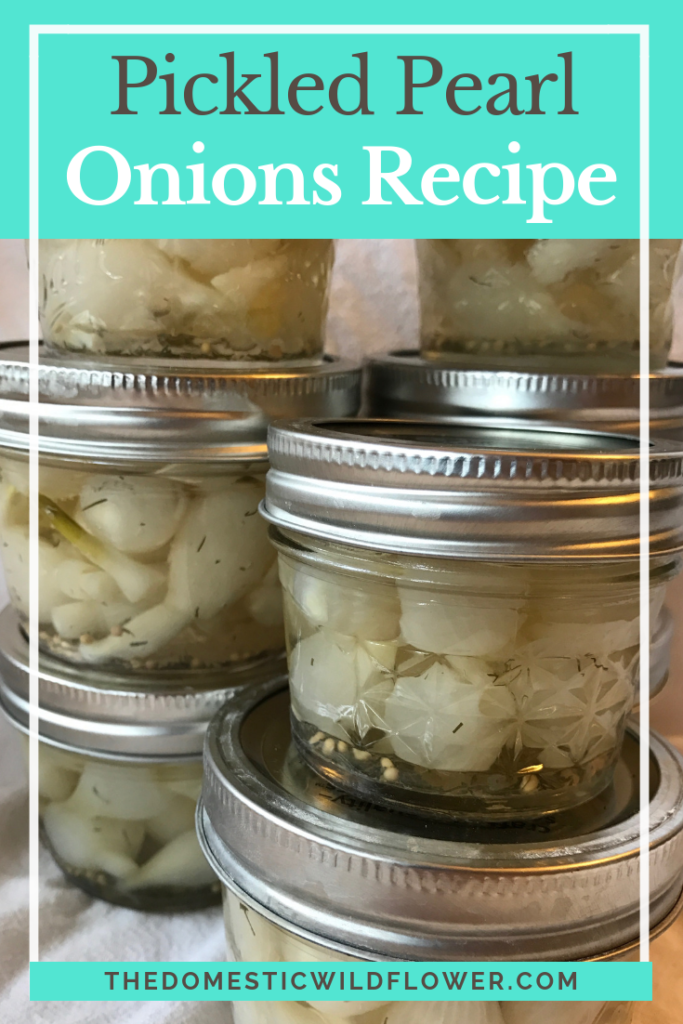
ALL: Label cooled jars and store. Note: If you used red pearl onions in this recipe you’ll be happy to see that your product is a beautiful shade of pink. Store this in a cupboard out of light to help that color hold but know that it fades over time. The white onions stay a pretty white.

Steam Canning Pickled Pearl Onions A Beginner Canning Tutorial | Read this great post that shares the recipe and process for canning these spring time pearl onions in a super fast steam canner or in a water bath canner.

Wildflowers, I’m so thrilled to share with you my new video workshop that will show you exactly how to use the steam canner to prepare healthy, home-cooked foods FAST.

Canning is cooking in advance, and STEAM CANNING is the fastest way to do that.

In the Steam Canning Workshop, you’ll learn

  • how to use the steam canner

  • how to know which recipes to choose

  • the complete steam canning process, from start to finish

Differences between water bath canning and steam canning

You’ll be able to make wholesome foods like

  • pickles

  • hor ‘d oeuvres

  • jam

  • syrups

  • salsa

  • tomato sauce

  • whole fruit in syrup

  • relish

  • fruit butter

And so much more…

And you’ll be able to have these delicious foods prepared exactly as you’d like- with no worries about allergens, additives, processed junk, or dangerous chemicals.

The best part? This workshop is the most affordable I’ve created and at the lowest price, it will be! Grab it now for only $45 

Yes! I Want Instant Access!

Filed Under: Can

How to Maximize Your Steam Canning Time to Can Faster

April 7, 2017 by Jenny Gomes Leave a Comment

This post will share with you some valuable tips for maximizing a steam canner by choosing recipes that are particularly well suited to steam canners, and which to skip. Read on for the post, Wildflowers!

How to Maximize Your Steam Canner Time to Can Faster | Read this post from The Domestic Wildflower to learn which kinds of recipes to choose that make the most of the advantages of a steam canner so you can preserve faster!

Here’s the video I whipped up for you to tell you about how to make the most of your steam canner, and if you are intrigued, I’d love you to grab the Steam Canning Fact Sheet below the video!

Grab the free Steam Canning Fact Sheet & Equipment List here!

So, remember to choose recipes that have fewer ingredients to prepare, fewer steps to process, and shorter cook time. Recipes that are mainly whole or mostly whole fruit or veggies with hot brine (vinegar, salt, water) or syrup (sugar, water) on top are the fastest of all. Also, remember that the processing time IS THE SAME AS WITH A WATER BATH PROCESS; the time savings with a steam canner is ALL in the prep time saved. No more waiting around for a huge pot of water to boil!

I’m just so thrilled with my steam canner and I’ve been working on a set of recipes that will help you maximize the steam canner too! You can get yours from Amazon through this photo that is affiliate linked!

An affiliate link just means I get a teeny, tiny percentage of a commission if you make a purchase and it doesn’t affect your checkout total at all; it just keeps your favorite blogger in business:) 

Let me know in the comments, Wildflowers, what else you’d like to know about these amazing, time and energy savers!

Filed Under: Can

Steam Canning Strawberry Syrup

April 3, 2017 by Jenny Gomes Leave a Comment

This post will teach you how to make strawberry syrup and can it in the fastest way to can out there- the steam canner.

Steam Canning Strawberry Syrup

Strawberry Syrup

Strawberry syrup is, of course, great on breakfast foods but it is very versatile in the beverage realm and after I read the suggestion for strawberry margaritas in “The All New Ball Book of Canning & Preserving” and I felt silly for not using the syrup that my kids love on Saturday morning in one of my favorite grown-up drinks.

I don’t strain with cheesecloth because I personally don’t care about things like tiny strawberry seeds and I am not interested in perfectly clear syrup. Feel free to strain of course as you wish.

To make the syrup, I will share my adaptation of the recipe from The All New Ball Book of Canning & Preserving.

Strawberry Syrup Canning Recipe

You will need

3 ½ pounds of strawberries, stems removed

3 cups of water

6 cups of sugar

½ cup bottled lemon juice (I really like lemon + strawberry, but if it isn’t your favorite flavor, you can safely use a ⅓ cup.

Have ready 5-pint jars, new lids, and rings.

You need a Victorio Steam Canner, which will come with the funnel AND jar lifter.

Prepare your countertop with a towel (on which you will rest the hot jars), funnel, and ladle. Have a large bowl or a second preserving pan and a small-holed colander or sieve set on top of the bowl ready to strain the strawberries from their juice. If you desire perfectly clear syrup, have 2 layers of cheesecloth at the ready as well.

Combine the strawberries and water in a preserving pan and bring to a simmer for about 20 minutes. Heat using the medium-low setting.

Pour carefully the strawberries and accumulated juice into the colander to drain. You can let it sit for up to two hours if you are patient and if you are me, you can use a spoon to gently encourage the berries to release more juice. You will get about 6 cups of juice as a result. The solids can be enjoyed with yogurt, or you can make delicious strawberry butter. I demonstrate how to make these two recipes at the same time in my canning course at www.startcanning.com.

Turn the steam canner on low.

Return the strawberry juice to the preserving pan and add the sugar and lemon juice. Stir to dissolve and heat to a full boil for a minute or two, stirring carefully.

Fill one jar at a time with the syrup, using the funnel and ladle, leaving a 1/4 inch headspace. Put on a new lid and ring and set on the steam canner rack. Repeat with remaining jars.

Put the lid on the steam canner and turn the heat up to medium-high. Start the timer when the dial indicates the steam canner is ready and process for 10 minutes at sea level, remembering to add 5 minutes for every 1000 feet you are canning above sea level.

When the time is up, turn the heat off and let the steam canner cool. USING GREAT CAUTION, use oven mitts to lift the steam canner lid AWAY from you and set it aside. When the jars are cooled significantly further, use either a jar lifter (required for water bath canning) or your fingers to lift the jars off the rack on the place on the towel covered countertop. Label sealed, cooled jars and store.

Just now learning about steam canning? Well it is the latest and GREATEST advancement in the canning world and it will make canning so much faster; the steam canner is ready to can in just 5 minutes instead of taking up to 30 or more minutes to come to a boil. 

Watch this YouTube Video where I’m sharing the main differences between steam canning and water bath canning!

Dive into the Steam Canning Workshop here!

Enroll Now!

This workshop will teach you how canning is WAY faster than you thought possible!


Canning is FAST, easy, and practical for modern, busy home and this course will teach you exactly how to use a steam canner to save you TIME and money.

You’ll learn how to COOK IN ADVANCE and preserve delicious, ready-to-eat, healthy foods QUICKLY in a steam canner.


In addition to learning you how to use this newly, USDA & National Center For Home Food Preservation approved steam canner, you will learn how to make and can a super special cranberry lemon jam that is gift-able, & perfect for beginners.

This lesson also demonstrates TWO different ways of processing for a super smooth jam.

Steam canners use just 2 1/2 quarts of water, as opposed to the 4+ quarts required for water bath canners.

This is a huge advantage for those canners who:

-Live in an RV or sailboat- store canned foods in a dark, cool spot!

-Suffer from an illness or disability that makes it difficult to lift over 10 pounds

-Used to be able to can but cannot due to surgery, health, or living conditions

-Are conserving energy- solar or propane users especially!

-Are canning below 7000 feet elevation

-Live in a small space- hello tiny houses!


Strawberry jam or carrot pickles (which are just a few of MANY quick recipes) would be DONE in under 20 minutes!


Steam canners are an affordable alternative to a water bath canning set up.


Steam canners are about $40, but you don’t have to purchase a separate trivet or wire rack, or a jar lifter… but the greatest savings is TIME.

Steam canners come to a boil in 5 minutes (you’ll see exactly how fast in the video!) and a big enamel canning pot comes to a boil after 30 minutes at LEAST…if not longer!

This course will teach a brand new beginner OR an experienced canner how to use this new time saver to add more wholesome, homemade foods to their diet in under half the time of a traditional water bath canner.

If you love strawberries, you’ll love my Canning Strawberries Recipe Book!

Enroll Now!

Filed Under: Can

Violet Sugar

April 3, 2017 by Jenny Gomes Leave a Comment

This post will show you how to take the edible violet flower and mix it with plain granulated sugar for a floral sweetener that will dress a dessert with sophistication and springtime color.

Violet Sugar

In my post about identifying wildflowers (the real flowers, not you awesome readers) I mentioned a great resource for foraging and finding edible flowers. This is the resource I suggest to help you dive into the world of dressing your dishes with flowers.
I know I usually don’t post on Wednesday, and lately I have only been posting once a week, but I thought I better get with the program and share this violet sugar post because the blossoms required are only around for so long and I didn’t want this post to find you after it was possible for you to pick some.

I’m not one to try new things just because they are trendy. I tried these sugared flowers because I thought they’d be a very simple preserve (they were) that would be inexpensive (check!) and would make a plain dessert or beverage super fancy (absolutely!).

Not only were they all these things, but they were also very easy and the process is applicable to other edible flowers.

Get the book, grab a jar, and head outside.

I picked about a quarter cup of wild yellow violets. Because these beauties attract butterflies and bees, (super important pollinators) I picked one blossom from each plant that had two or more flowers on it. I tried to pick in moderation to leave some blooms to attract the bugs that do the critical work of pollination.

Violet Sugar: Edible, Giftable, Sweet & Simple | The Domestic Wildflower click through to read how to make this simple and sweet preserve to give and share!

I left as much stem as I could behind to eliminate having to snip them off in the kitchen and in about 10 minutes, I had about a quarter cup of flowers.

Inside, I dumped the violets out onto a white countertop with a bright light above. Because I saw tiny black bugs leaving the flowers, I knew they had to be rinsed. Had I not seen any, I might have skipped the wash because I’m really impatient.

I rinsed in a gentle stream of water in a colander. After they had drained, I blotted them dry with a kitchen towel.

You can choose as large a jar as you would like, but I chose the tiny jam jars because I had such a small quantity of flowers.

I layered a little sugar, then a layer of flowers, then more sugar, over and over until the jar was full of sugar and the flowers were covered.  Screw on lid and store in a cool, dry place.

The result is sugared flowers and flowered sugar that can be used to adorn a cake, freeze into ice cubes, sweetened tea, and more. The flowers can be separated with a wire strainer in short order, should you just want the flowers, say, for arranging atop pillows of fresh whipped cream or something lovely. Violets, in particular, are a somewhat delicate flower. Hearty rose petals would have held up better, and I will try that in a few months. The violets are vibrant color and are a little rumpled, but still lovely. By layering them in the very giftable tiny jam jar, you could actually layer them and give them with no steps in between.  What a sweet gift! 

Violet Sugar: Edible, Giftable, Sweet & Simple | The Domestic Wildflower click through to read how to make this simple and sweet preserve to give and share!


One way I discovered how to use this pretty sugar is when rimming glasses for cocktails.

I have a big-time sweet tooth, and as much as I love a salty sip from a margarita glass, a fresh tasting cocktail with the festive sugar rim is right up my alley. This floral sugar is perfect; dip the rim of your wide mouth pint jar (or any cocktail glass!) in a little dish of coordinating fruit juice (citrus and apple are my faves), and then dip the now sticky edge into the violet sugar. Let the flowers stick if they will, and no worries if they don’t; you can use them to garnish the drink instead! Let the sweet edge firm up and then pour your cocktail.

I absolutely love helping you think of ways to add more handmade and homemade into your life, and when it is your turn to host guests I want you to feel ready! I created a full-fledged video course that teaches you in 15 quick, professionally edited videos (no time wasting silence or chit chat here!) how to make farmer’s market fresh cocktails like these:

Shrubology: Refreshing homemade fruit & vinegar syrups for cocktails | The Domestic Wildflower This ebook explains how to make these old fashioned fruit and vinegar syrups that are easy to make, versatile in cocktails where you can add or skip the alcohol and make homemade cocktails perfectly attainable, even if you don't cook! Grab the ebook now and learn how to make these sweet tart gems! Did I mention they are "no cook"?

I want to help you become the hostess you have always dreamed of being in the Wildflower Mixology Course.

Learn more here!

Filed Under: Cook

Differences Between Water Bath Canning and Steam Canning

April 2, 2017 by Jenny Gomes 1 Comment

This video will explain the differences between using a water bath canner and a steam canner and will show you how a steam canner can save 30 minutes or more per batch, weighs just a quarter of a full-size traditional canner, and are ideal for a beginner. Read on, Wildflowers!

Differences between Steam Canning and Water Bath Canning | Read this post to learn the important differences between water bath canning and steam canning and see that steam canning can save up to 30 minutes or more per batch and weighs just a quarter of a traditional water bath canner, and is ideal for a beginning canner.

This post may contain affiliate links. That just means that if you click on them an end up making a purchase, I get a tiny commission, which has no effect on your checkout. It just helps your favorite blogger stay in business 🙂 

Steam canners have been around a while, but they haven’t been approved by the USDA or the National Center For Home Food Preservation for much longer than a year. This is what they look like:

They are a really awesome pot with several distinct and inarguable advantages that we can use to preserve high acid foods and this video will explain several of the key differences.

I have created a video workshop that teaches everything you’d need to know to preserve healthy produce with this amazing canner!

Enroll Now!

This is the fastest way to can. Period.

They are safe to use for beginners, and are a great addition to the skill set of an intermediate canner too.

In addition to learning you how to use this newly USDA approved steam canner, you will learn how to make and can a super special cranberry lemon jam that is gift-able, & perfect for beginners.

This lesson also demonstrates TWO different ways of processing for a super smooth jam.

Steam canners use just 2 1/2 quarts of water, as opposed to the 4+ quarts required for water bath canners. 

This is a huge advantage for those canners who: 

-Can in an RV

-Suffer from an illness or disability that makes it difficult to lift a heavy pot of water

-Those living on a sailboat

-Used to be able to can but cannot due to surgery, health, or living conditions

-Those conserving energy- solar or propane users especially!

-Those canning below 7000 feet elevation 

In fact, the time savings are greatest for those canning shorter cook and shorter process time recipes, and those below 1000 feet elevation. 

Strawberry jam or carrot pickles (which are just a few of MANY quick recipes) would be DONE in under 20 minutes! 

Differences between water bath canning and steam canning

Steam canners are an affordable alternative to a water bath canning set up.

Steam canners are about $40, but you don’t have to purchase a separate trivet or wire rack, or a jar lifter… but the greatest savings is TIME. 

Steam canners come to a boil in 5 minutes (you’ll see exactly how fast in the video!) and a big enamel canning pot comes to a boil after 30 minutes at LEAST…if not longer!

If you want to learn how to can, but haven’t because you were worried that you wouldn’t have time, this is the workshop for you. I want you to enroll right here!

Yes! I Want Instant Access!

If you already know how to water bath can, you will find this is a wonderful, time saving technique to add to your repertoire.

If you have never canned, this is a great choice for you because it is completely beginner-friendly, safe, easy, and FAST.

I can’t wait to see you in the course! 

Differences between water bath canning and steam canning

Filed Under: Can

  • « Go to Previous Page
  • Page 1
  • Interim pages omitted …
  • Page 35
  • Page 36
  • Page 37
  • Page 38
  • Page 39
  • Interim pages omitted …
  • Page 66
  • Go to Next Page »

Primary Sidebar

Categories

Follow me here, there, & everywhere!

  • Email
  • Facebook
  • Instagram
  • Pinterest
  • RSS
  • Twitter
  • YouTube

Search

Get The Pressure Canning Cookbook

Get 10 Free Recipes Now!

Best Chicken Coop

Footer

Get Started Pressure Canning

Shrubology Ebook

Shrubology: Refreshing Homemade Fruit and Vinegar Syrups for Cocktails
Make easy, no-cook fruit & vinegar syrups for cocktails & mocktails! This ebook shares crowd pleasing recipes and simple to understand ratios so you can make a shrub on your countertop any time- without a recipe. Dive into these Prohibition Era drinks today!

Copyright

Copyright 2019
The Domestic Wildflower
www.thedomesticwildflower.com.
All content created by Jennifer Gomes unless otherwise noted.

Copyright © 2025 · Lifestyle Pro on Genesis Framework · WordPress · Log in