• Skip to secondary menu
  • Skip to main content
  • Skip to primary sidebar
  • Skip to footer
  • The Pressure Canning Cookbook
  • Blog
    • Subscribe
    • Welcome!
  • Perfectly Preserved Podcast
  • About
    • ADW Manifesto
    • Work With Me
      • Read
  • Shop
    • My Account
    • Cart
    • Checkout

The Domestic Wildflower

Handmade Food & Craft Tutorials for Beginners

  • Courses
    • Free Canning Basics
    • Everything Canning Course
    • Steam Canning Workshop
    • Free Homemade Cocktail Mixers
    • Wildflower Mixology
    • Crochet Basket Workshop
  • Can & Preserve
    • Never Canned?
    • Steam Canner Equipment Bundle
    • Shrubs Course
  • Sew
  • Cook
  • Craft
    • Crochet Step-by-Step Guides
      • Crochet Basket
      • Giant Yarn Throw
      • Thick & Thin Throw
  • Living
    • Creativity Challenge
    • Clean
    • Kids
  • Rentals

Cook

How to Make Sugar Free Beef Gelatin Marshmallows

March 3, 2023 by Jenny Gomes Leave a Comment

This post contains affiliate links.

This post will share how to whip up your own no sugar, monkfruit sweetened beef gelatin marshmallows. I make this big batch every few weeks and store them in the fridge so I always have one handy for my morning coffee and afternoon chai. It is a great way to add in gut-healthy beef gelatin to your diet and have your coffee sweetener in one white, fluffy package.

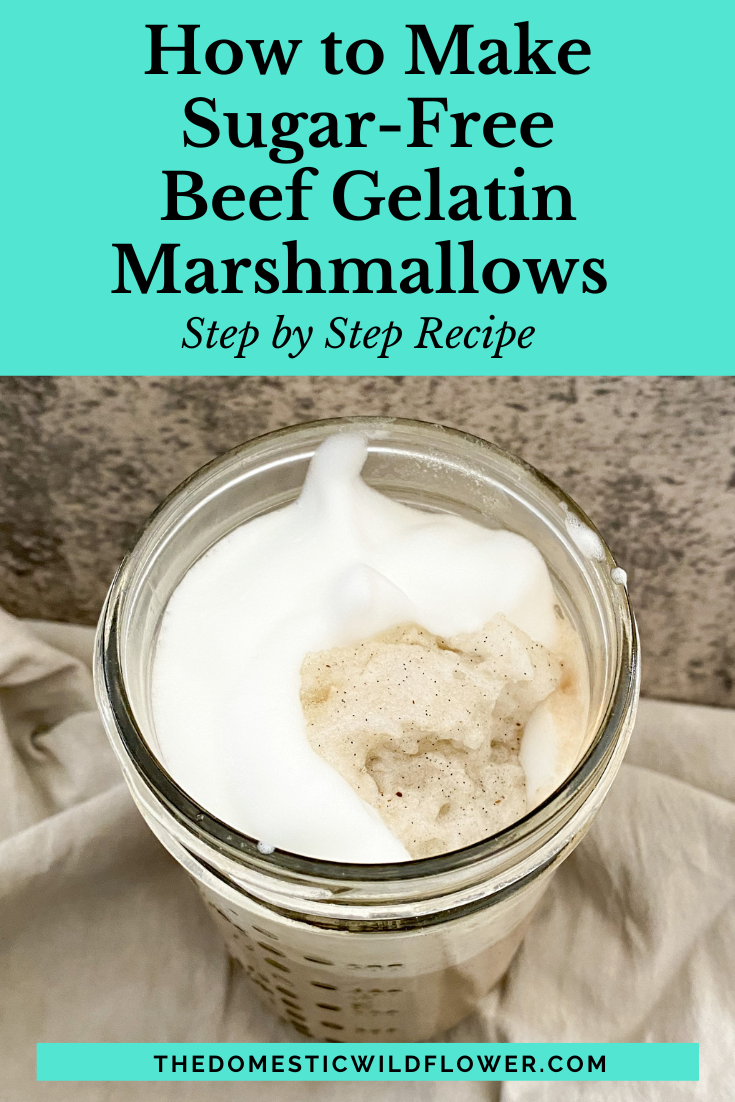
The monkfruit makes for marshmallow that has less volume than a standard sugar marshmallow, and they aren’t bright-white. 

The addition of vanilla paste is optional but gives a powerful flavor oomph. 

A few drops of optional peppermint cinnamon essential oil give the marshmallows a ton of flavor as well. 

The gelatin starts to set pretty quickly so you’ll want to be sure you have all ingredients assembled and measured before you add the gelatin to the water. 

Combine 2 cups lakanto monkfruit sweetener with 1 cup water, bring to a boil for 10 minutes, whisking often. When this comes to a boil, combine in a mixer:

2 cups water

6 tablespoons beef gelatin

1 optional teaspoon vanilla paste

This will give the gelatin time to absorb the water. Turn the mixer on with a whisk attachment on lowest setting if the gelatin starts to look globby or set. 

Boil the sweetener mixture for 10 minutes. Pour the mixture into the gelatin mixture slowly. Add one teaspoon vanilla bean paste and/or a few drops of high quality cinnamon or peppermint extract if desired.Turn the mixer on high and whisk steadily until mixture is white and fluffy, about 15-18 minutes. I put a towel over the mixer to keep the splatter contained. 

While the mixer is going, it will feel like nothing is happening or that it isn’t working. It takes many minutes for them to begin to fluff up. Regular sugar marshmallows really puff up dramatically and these puff significantly but not to the degree that real sugar ones do. You can make this recipe in exactly the same way but replace the monk fruit with real sugar and it works out the same but with greater volume and brighter white.  

Once the mixture is white and fluffy and you’ve mixed for over 10 minutes at least, it is done. 

Pour the mixture onto a wax-paper covered baking sheet and use a spatula to spread the cloud-like mixture somewhat evenly over the sheet. Cover the mixture with another sheet of wax paper, pressing the edges to seal. Allow mixture to set for several hours or overnight. 

Remove the top sheet of wax paper and cut marshmallows with a sharp knife. Place cubes of marshmallow into a container to be stored in the fridge. These keep for 3+ weeks. 

Filed Under: Cook

Best Crumble Recipe

July 15, 2020 by Jenny Gomes Leave a Comment

The best crumble is one that is fast. This best crumble recipe is prepared entirely in the food processor so you have fewer dishes to wash and less time spent preparing the crumble topping. Read on for the best crumble topping recipe!

Best Crumble Recipe

Crumbles are like a crisp or cobbler, and this particular crumble recipe is crisper than some because of the quarter cup of ground nuts incorporated into it. If you have no nut allergies, the nuts add great flavor and a little crunch to make a crumble that’s close to a crisp. If you do have a nut allergy, this recipe is not for you. I also like the nuts for the nutrition they add.

You will need:

¼ cup walnuts and/or almonds – I used a mix of walnuts and almonds and like that combination a lot. Straight walnuts or almonds are also great. 

6 tablespoons cold salted butter cut into chunks

¾ cup all purpose flour 

¼ cup sugar

¼ teaspoon salt

How To Make The Best Crumble Recipe

Butter an 8×8 dish for baking or cast iron skilled (8 inch across is what I use with 2 cups of fruit fill- see below) and preheat the oven to 425 degrees.

Add the nuts to the food processor and pulse till finely chopped or ground fine depending on your preference.

Add the remaining ingredients and pulse until incorporated; the crumble topping will be a bit like damp sand – clumped together in small, pea-sized pieces. 

Add your fruit filling (see below for suggestions on fruit fill) to the baking dish (2 cups is the minimum, and I’ve done as much as 4 for a very fruit-heavy crumble) and top with the crumble topping. 

Bake uncovered for 30 minutes or until the topping is golden and fruit is bubbling. 

Best Crumble Filling

The way to make this fast crumble recipe even faster is to use home-canned pie filling. This Strawberry Rhubarb filling is my favorite for using with this crumble topping recipe. It’s not a true jam at all; it’s a loose filling that doesn’t have a ton of sugar. Try it!

Strawberry Rhubarb Jam Canning Recipe

I’ve also made this recipe with 1 cup homemade jam and 1 cup fresh fruit; 1 cup raspberry jam and 1 cup fresh raspberries.

Want to learn to can your own crumble filling? Join my Free Canning Basics Course!

Free Canning Basics Course

Filed Under: Cook, Uncategorized

Best Apple Press

October 10, 2019 by Jenny Gomes Leave a Comment

An apple press is an investment that will yield healthy, homemade apple and other fruit juice for decades if selected with care. The best apple press is one that is easy to use, one you can share with friends, easy to clean, and affordable. Read on for the best apple press! 

The Best Apple Press | Read how to choose an apple press, which apple press is the best, and how to make perfect homemade apple juice!

This apple press was gifted. All opinions remain my own. 

An apple press is a device that crushes apples in order to release their juice. The juice flows from a spout or opening into your receptacle and then you can refrigerate or can it. An apple press is ideal for people who have a lot of apples and/or want to drink a lot of apple juice. 

As our family ranch has had many apple trees that produce well for years, I’ve always thought we should have a press because we can only eat so much applesauce in a year’s time and lots of apples ended up wasted- even the bears don’t eat them all. 

An apple press came to the top of my interest list as my sister and I both now have kids of our own. Kids love juice, and homemade 100% juice is something I’d like to make for them. 

I started shopping and saw that there’s a lot to choose from. An apple press varies from another in terms of capacity (the one I chose has 5 gallon capacity) and the mechanism in which the apples are crushed/how much person-power will have to be exerted to crush them. 

I chose the Macintosh apple press from Pleasant Hill because 1. It is affordable 2. It came with an all stainless steel model so I wouldn’t have to reseal the iconic wooden slats (sorry, but I’d never do that) 3. It was easy to clean 4. Is easy to use. 

It is very important to note here that the more expensive press available from Pleasant Hill allows for the Maximizer Apple Grinder to be mounted natively in a super-handy way on top of the press. The press that I got is wonderful, and I love it, BUT the Maximizer Apple Grinder does NOT mount natively to the Macintosh Apple Press and I didn’t realize that. This is an important consideration that I discuss fully in this post here, but in short, you want to think about your workspace set up before deciding on which press you want.

I wanted a press that wasn’t giant. I wanted to be able to put in the back of a pickup and take it places if I wanted to crush apples on-site if it made sense to do so. 

I wanted one that was easy to clean. The Macintosh apple press is easy to take apart and put back together. I loved this part of the press- it is lightweight enough even when full of apple pulp to easily pull off the main red frame and go dump in the chicken yard or compost pile. I love too that the bottom tray is separate from the sides, which both are easy to separate and clean.

I wanted a capacity that was on the smaller side because sometimes, you might want to only press a five gallon bucket of apples. I didn’t want to dirty up a huge capacity press if I only had a small amount of apples. 

There are electric presses that are a lot more expensive but I have no shortage of one husband, friends, and family that will help share muscle power in crushing the apples so I didn’t consider getting the more expensive ones for that purpose.

Final Thoughts on The Best Apple Press

Now that I have this press, I see 1. How great a new, high quality press is. This press will last a lifetime. It is easy to clean (how many times can I mention that?!), easy to use, and so effective. 2. I could have perhaps got the bigger, more expensive one so that the Maximizer Apple Grinder mounted natively to the top and the whole set up would have been still easy to clean, heavier, less mobile, but a lot more efficient in a workspace sense. It would have been as handy as a shirt pocket, as they say.

The Macintosh Apple Press is easy to turn- I’m a medium to smallish sized person, and I don’t lift weights or do CrossFit for fun. I have heavy kids that I like to lift up but that’s the extent of my upper body strength training- that and daily yoga. It was easy to press the apple pulp with this press.

The best apple press is one that fits your needs. Consider capacity, how easy it will be to clean and care for, mobility, and price. 

The Best Apple Press | Read how to choose an apple press, which apple press is the best, and how to make perfect homemade apple juice!

If you’re shopping for an apple press, Pleasant Hill Grain has a great Buying Guide that compares different presses HERE. 

One element you’d expect perhaps would be the yield a press promises to deliver. That’s actually dependent upon getting a separate, but indeed important tool called an apple grinder. I got the Maximizer Apple Grinder, and you can read more about that here. 

Pair the Maximizer Apple Grinder with the Macintosh Apple Press for homemade apple juice- use this recipe! 

Want to make the juice but aren’t sure about canning? Join my Free Canning Basics Course! I’ll share valuable lessons straight in your inbox that will help you get started canning the easiest way! 

Overrun with apples? Read the 3 Easy Apple Recipes for Beginners Post– In is is my applesauce recipe, the apple shrub recipe, and the BEST applesauce muffins!

3 Easy Apple Recipes that anyone can make!

Filed Under: Cook

Maximizer Apple Grinder

October 10, 2019 by Jenny Gomes Leave a Comment

This post will share why you need an apple grinder for making homemade apple juice. Read on why the maximixer apple grinder will triple or quadruple the juice output when making homemade apple cider or juice! 

Maximizer Apple Grinder | Why you need an apple grinder to make homemade apple juice and which grinder is the best!

This post is not sponsored but the Maximizer Apple Grinder was gifted. All opinions remain my own.  

When I was shopping for an apple press with which I plan to press apple and grape juice, I saw that most presses recommend you get an apple grinder. I thought, “Geez, another thing?!” It turns out you don’t have to have an apple grinder, but you’d be silly to not get one. 

An apple grinder, specifically the Maximizer Apple Grinder which I ultimately chose, triples if not quadruples the juice output. 

That means you get at least three times as much juice by putting the apples through the Maximizer Apple Grinder first! 

Honestly, if it was a 10% increase, I’d probably skip it. But 4x your output?! That’s a HUGE difference! 

The apple grinder makes all your apple growing and/or picking efforts yield so much more juice. If you’re bothering to put them through the press in the first place, it would be a mistake to skip grinding them. 

The Maximizer Apple Grinder basically rough chops the apples so they can be dumped as a pulp into the press and the juice is much more available. Running the press is much easier, too! 

It’s absolutely worth it to get a Maximizer Apple Grinder and I love this specific one because it’s all metal, and easy to use. You can grind the apples into a bucket, or directly into the press- the Maximizer Apple Grinder allows for both. It’s an heirloom quality grinder that my kids can use with their kids. 

The Maximizer Apple Grinder needs to be mounted to a wall (a corner of a building) or to a table with a hole in it. Or, it can be mounted natively to the more expensive apple press.

These things are very important considerations when choosing how to set up your apple pressing station.

What we ended up doing was mounting the Maximizer Apple Grinder to an old sewing machine table that used to have a sewing machine that flipped down and out of sight (the machine is long gone). That table had the hole in the middle for the apple pulp to fall through and was fairly sturdy (it needs to be really sturdy because the Maximizer Apple Grinder is really heavy and grinding it generates a ton of motion).

This was not my idea. My dad is a really handy guy and it was his idea. He’s a rancher and that means he’s great at making something useful out of something that he’s kept around “just in case.”

This is my dad. To his back is his gun safe and to his right is his fully operational beer fridge- notice the taps. He’s making me an apple press table out of a sewing machine table and he’s not annoyed at all that this cat is in his work space. That’s the kind of guy he is 🙂

I won’t be including specific directions for how Dad made this table because I’m not a DIY blogger but he used 2 1×6 scraps for the far side of the Maximizer Apple Grinder to be mounted to.

This sewing machine table was a great work around. It took several hours to decide how we’d do it, and do it (with me doing little more than holding screws and affirming that yes, that would work).

I honestly think that it is worth seriously considering purchasing the more expensive apple press that the Maximizer Apple Grinder mounts to natively because this sewing machine table project was more than I expected in terms of hassle and isn’t without drawback.

The Maximizer Apple Grinder is SO EFFECTIVE (seriously pulping those apples in seconds!) that the pulp doesn’t fall gently from the bottom- the pulp is flung out and in the first run my Dad and I did, we had apple pulp all over the floor of the woodshed because the bucket to collect the pulp was too far below.

This discovery affirmed that mounting the Maximizer Apple Grinder to a wall would have required we mouth some sort of removable bucket directly beneath…and I don’t know what that would have looked like or how we would have done it so it was effective and easy.

Final Thoughts on the Maximizer Apple Grinder

Overall the Maximizer Apple Grinder is a well built (my husband exclaimed, “this is hell for stout!”) and will last a lifetime. It mounts natively to this press https://pleasanthillgrain.com/maximizer-fruit-apple-cider-press-stainless-basket which is not the press I got. It can be mounted to a wall or a table with a hole in it, and either option better be sturdy as all get-out. Getting an apple grinder is not an optional add on if you get an apple press- they are a must! The amount of juice that poured effortlessly from the press because the apples were pulped first was incredible.

Do you need to use pickling salt? Read this post to find out when to use it and when you can skip it!

My great grandma Nona planted the apple trees I’ll be picking for use with this grinder and press. She wrote to her brother, living out of state, and asked that he send her starts for apple, pear, apricot, plum, raspberry, cherry, and more. Those trees are still growing on the family ranch with very little care from my dad other than water. Pretty amazing, right? 

Apples for applesauce and apple butter- kid pleasers and easy to can!

Pair the Maximizer Apple Grinder with the Macintosh Apple Press for homemade apple juice- use this recipe! 

Want to make the juice but aren’t sure about canning? Join my Free Canning Basics Course! I’ll share valuable lessons straight in your inbox that will help you get started canning the easiest way! 

Overrun with apples? Read the 3 Easy Apple Recipes for Beginners Post– In is is my applesauce recipe, the apple shrub recipe, and the BEST applesauce muffins!

3 Easy Apple Recipes that anyone can make!


Filed Under: Cook

Bug Gummies

October 2, 2019 by Jenny Gomes Leave a Comment

This recipe is for creepy crawly, black as night gummies made from fruit juice and gut-healing beef gelatin for a fun treat that you’ll want to make year round. Think birthday party, science-themed get together, and more! Read on for the Bug Gummies recipe and complete tutorial! 

This post contains affiliate links.

Gummies are easy, simple, and fast to make. They are so fun to make, I know you’ll want to hang out in the kitchen with me, watch me make them, and start out on the right foot so your first (and every!) batch is a complete success! I have a fun video mini lesson inside the Free Homemade Gummies Course you can jump into here- join me! You’ll get exclusive gummy recipes and video lessons on how to get perfect gummies no matter what mold you have. And it’s free!

Jump in and watch STEP BY STEP as I make gummies on video. I share in detail exactly HOW to make these nutritional powerhouses. It’s a free mini course and you’ll get access to 3 super helpful videos that show you

the equipment

the ingredients

and the process

of making healthy homemade gummies. Dive in here!

Halloween Gummies Recipe | Make amazing creepy crawly Halloween gummies with this easy recipe!

The trick to making these black as sin Bug Gummies is adding a secret ingredient. Note, you don’t HAVE to add it, but it definitely makes the gummies opaque, and completely black. You can’t taste it and it creates a fantastic effect that’s sure to delight. 

The ingredient that makes these gummies SO black is activated charcoal. 

That’s right. Just a few teaspoons and it turns grape juice (a lovely purple on its own) into a wonderful ebony. 


Note: Enjoying too much activated charcoal can potentially cause some medicines to be absorbed and could render them ineffective. Consult your doctor if you or your child takes medicines that could be affected by activated charcoal. I read this article on
Women’s Health for more information on this topic. I think that in moderation for a healthy person who is not taking daily medicine, activated charcoal is fine, but please consult a professional.

Tools You Need For Making Bug Gummies

You’ll need a saucepan and a whisk (crucial for mixing in the gelatin- you can see how I do it in the Free Homemade Gummies Course) but most importantly, of course, are the Bug Molds. These are made of silicone and can’t believe how well the bugs pop out of them (even the spider legs!).

Pro Tip: You MUST let the gummies cool till they are cold, preferably in the fridge, in order to get the centipede legs and spider legs out without tearing. Press up from the bottom of the mold and press the outside edge of the mold first- the legs on the spider for example- and then the middle of the shape to loosen. They will pop right out!

Bug Gummies Recipe

You Will Need:

1 cup grape juice

2 teaspoons activated charcoal

3 tablespoons sugar (optional but makes the faint taste of the charcoal completely disappear)

1/4 cup beef gelatin

How to Make Bug Gummies

Combine the 1 cup grape juice with the charcoal and the sugar in a saucepan.

Whisk over low-medium heat (a 3 on a electric stove that goes to 8, for example).

When the mixture is hot, and nearing a simmer (not quite simmering yet, but getting close, and steam is rising from it) SLOWLY start to whisk in, bit by bit, the 1/4 cup gelatin. Turn the whisk over, reverse direction, and whisk with vigor to discourage lumps. The grape juice mixture will be sweet, fragrant, black, and starting to look thicker. Remove from heat.

Using included droppers from mold set, fill the bug mold.

Pro Tip: Set the mold on a perfectly flat tray (not a plate that has curved edges) to fill.

When the bug mold is filled, place in a very cool place like the fridge until gummies are very firm, likely 30 minutes or so.

If you have extra, you can pour the remaining gummy liquid into a silicone ice cube tray or cupcake mold, or in a glass casserole dish to cool.

OR you can keep it warm on the stove, stirring often, until the first batch of gummies are cooled and removed from the mold. Repeat process.

Bug Gummies Recipe & Step By Step Tutorial! Make these fun bug gummies for the insect lover in your life. They have very little sugar, a secret ingredient that makes them as black as night, and the post links to the best bug mold ever!

How to Store Bug Gummies

These aren’t shelf stable and should be stored in the fridge and if so will keep for months. These are a great thing to make ahead of time and enjoy all year long!

I made these for the first time and didn’t tell my kids. I packed them in their lunch as a fun October surprise. Imagine their faces when they saw black centipedes and spiders in their lunchbox!

Halloween Gummies Recipe | Make amazing creepy crawly Halloween gummies with this easy recipe!

You will also enjoy

Elderberry Gummies! Get the recipe here.

Healthy Elderberry Gummies Recipe

Filed Under: Cook

  • Page 1
  • Page 2
  • Page 3
  • Interim pages omitted …
  • Page 9
  • Go to Next Page »

Primary Sidebar

Categories

Follow me here, there, & everywhere!

  • Email
  • Facebook
  • Instagram
  • Pinterest
  • RSS
  • Twitter
  • YouTube

Search

Get The Pressure Canning Cookbook

Get 10 Free Recipes Now!

Best Chicken Coop

Footer

Get Started Pressure Canning

Shrubology Ebook

Shrubology: Refreshing Homemade Fruit and Vinegar Syrups for Cocktails
Make easy, no-cook fruit & vinegar syrups for cocktails & mocktails! This ebook shares crowd pleasing recipes and simple to understand ratios so you can make a shrub on your countertop any time- without a recipe. Dive into these Prohibition Era drinks today!

Copyright

Copyright 2019
The Domestic Wildflower
www.thedomesticwildflower.com.
All content created by Jennifer Gomes unless otherwise noted.

Copyright © 2025 · Lifestyle Pro on Genesis Framework · WordPress · Log in