• Skip to secondary menu
  • Skip to main content
  • Skip to primary sidebar
  • Skip to footer
  • The Pressure Canning Cookbook
  • Blog
    • Subscribe
    • Welcome!
  • Perfectly Preserved Podcast
  • About
    • ADW Manifesto
    • Work With Me
      • Read
  • Shop
    • My Account
    • Cart
    • Checkout

The Domestic Wildflower

Handmade Food & Craft Tutorials for Beginners

  • Courses
    • Free Canning Basics
    • Everything Canning Course
    • Steam Canning Workshop
    • Free Homemade Cocktail Mixers
    • Wildflower Mixology
    • Crochet Basket Workshop
  • Can & Preserve
    • Never Canned?
    • Steam Canner Equipment Bundle
    • Shrubs Course
  • Sew
  • Cook
  • Craft
    • Crochet Step-by-Step Guides
      • Crochet Basket
      • Giant Yarn Throw
      • Thick & Thin Throw
  • Living
    • Creativity Challenge
    • Clean
    • Kids
  • Rentals

Blog

1 Way to Ensure You Always Have Workout Clothes

April 16, 2015 by Jenny Gomes Leave a Comment

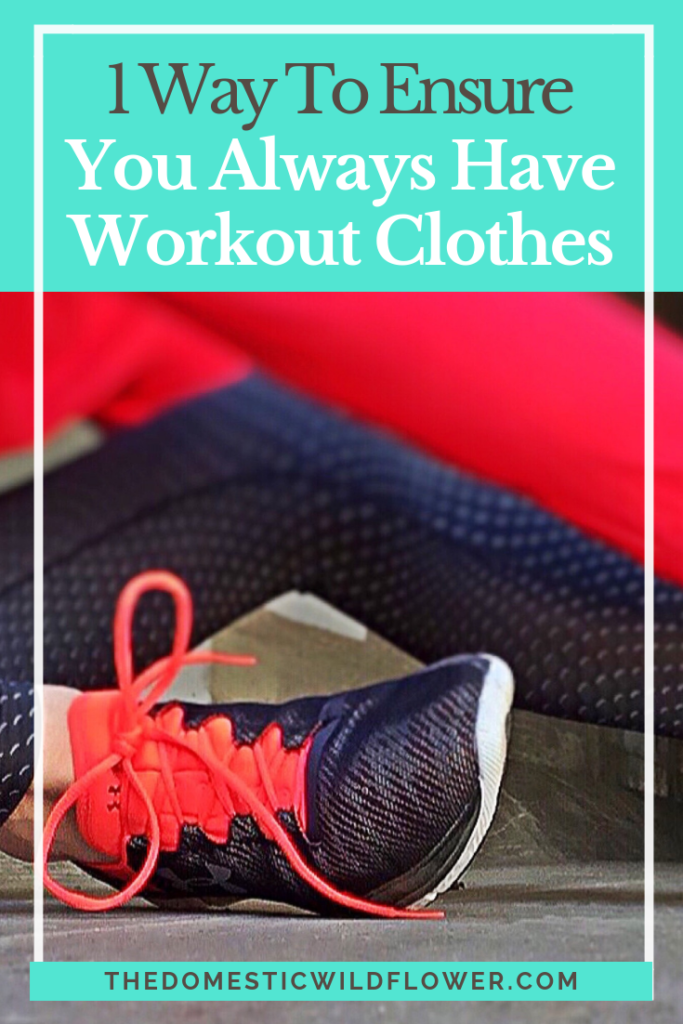
When I started teaching yoga it was the first time in my life I was on a genuinely regular schedule of exercise outside the home. It was also at a time when I was working at two different schools in two towns and my yoga class was in a different town altogether, and I had two small children. To say I was a bit scattered is an understatement. By divine intervention and a vanity-driven fear of not having the right thing to wear, I came up with a good system for always having yoga clothes.

On Sunday night (or maybe Saturday, or maybe Monday-I’m a work in progress) I get out the totes, bags, and sacks I have collected, sewn, or otherwise acquired and I put them to good use. I have 2 classes a week, so I grab 3 bags (one for an extra). I put one outfit in each bag after I have checked the weather. I try to gather items by type, from the ground up, so I set out 3 pairs of socks, 3 pairs of yoga leggings, 3 sports bras and 3 tanks. I put a hair tie on each pile (provided I can rustle up 3 of the mysterious creatures) and if I get that far, high five to me. If the house is still standing at this point I might make my outfits match, which earns a high five and a low five- I’m on organization fire!

If I have an extra minute I check the toiletry bag that I put in the tote bag I will use earliest in the week and replace cotton swabs, deodorant, bobby pins, etc. You could have a toiletry bag for each tote and make their contents fit your needs of course, but yoga isn’t too sweaty of activity so I don’t need much in mine. By using a toiletry bag for the little things you might need to freshen up, you keep the small items corralled nicely. The toiletry bag can be transferred at the same time you might transfer your shoes if you are, say, a runner. Once you form the habit, it will become automatic.

The MOST IMPORTANT STEP: Put the bags in the car. Or by the front door, or wherever you will surely remember them. But really, if it is possible, walk them out to the car. This step has been crucial for me. Put them in the car. Then you are ready to rock the workweek!

1 Way to Ensure You Always Have Workout Clothes

Whatever your system is, dear readers, please share below! How do you avoid having to skip exercise because of forgotten gear?

Filed Under: Yoga

How To Enjoy Mineral Springs

April 14, 2015 by Jenny Gomes Leave a Comment

I love hot things. I love hot showers, hot drinks, warm blankets, and I love soaking in hot water. While a leisurely bath is not something I make time for at home, a soak in a mineral bath is a super relaxing and by going away from my home I can actually enjoy it and not be busy thinking about how I should get out of the bath and start the dishwasher.

There are mineral springs and hot springs all over the US and I encourage you to seek one out. I go to this place not far from me near Weed, CA http://www.stewartmineralsprings.com/. If you don’t know of any in your area, I suggest checking this website, http://www.spaindex.com/special-features/hot-springs-and-mineral-springs/  which is NOT an inclusive list, I admit, but it is a good place to start.

Or, you could Google either “mineral springs” or “hot springs” and see if Google is smart enough to find one near you. Let me know what you find!

A mineral spring is simply a spring of water (water that comes forth from the ground, often in a non-glamorous, non-geyser-like fashion) that has a high proportion of dissolved minerals. If you visit an establishment where you pay to soak in mineral water, you are soaking in heated water that has come up from the ground with minerals in it that can do a variety of beneficial things. I am in no way an expert, nor do I have a degree in anything science-y but I can report the claimed benefits and you can take it or leave it. The minerals can exfoliate the skin, so much so that many places have a statement of caution against soaking too long because your skin can become irritated. I experience this nearly every time I go because I love soaking and I get all cozy and relaxed and invariably soak too long. The minerals are said to aid in muscle relaxation and I don’t doubt that to be true either lest Epsom Salts wouldn’t be a bath additive.

A hot spring is a water coming forth from the ground (potentially in a glamorous and geyser-like fashion- think Yellowstone National Park) often heated by subterranean volcanic activity. There are of course establishments where you can soak in this naturally hot water and enjoy many of the same benefits. Soaking in a hot spring is on my list of things to experience and once I do, I promise to report back, dear readers.

Before I went to the mineral springs for the first time, a friend wisely cautioned me, “It is NOT like going to a spa.” True, some places are in new, modern buildings with many spa treatments and facilities. Others, like the ones I have been to and enjoy, are clean but old and funky and frequented by folks who aren’t necessarily subscribing to mainstream culture.

If you go, by all means, bring a friend, water, some flip flops, your own towel, and an open mind. Many establishments have saunas, cool showers, and other amenities to rotate through after you soak. Inquire at the front desk about your options. At Stewart Springs, the rotation includes a sauna and either a rinse in a cool shower OR a jump into a creek. As in a flowing body of water fed by melted snow, as cold as 40 degrees. The dip in is fast but exhilarating. Don’t skip it! Soaking in the hot mineral water is twice as delicious after the polar plunge.

Before your soak, remove your jewelry (minerals in the water can react with the metal and tarnish it pronto) and put your hair up lest the minerals react with your natural or purchased hair color. Set your cares aside and enjoy yourself!

In the comment section below, tell me your mineral or hot springs experience! Where’s a great place to go in your area?

Filed Under: Living

I Funny Story about Dulce de Leche OR 1 Important Difference Between Sweetened Condensed Milk & Evaporated Milk

April 13, 2015 by Jenny Gomes Leave a Comment

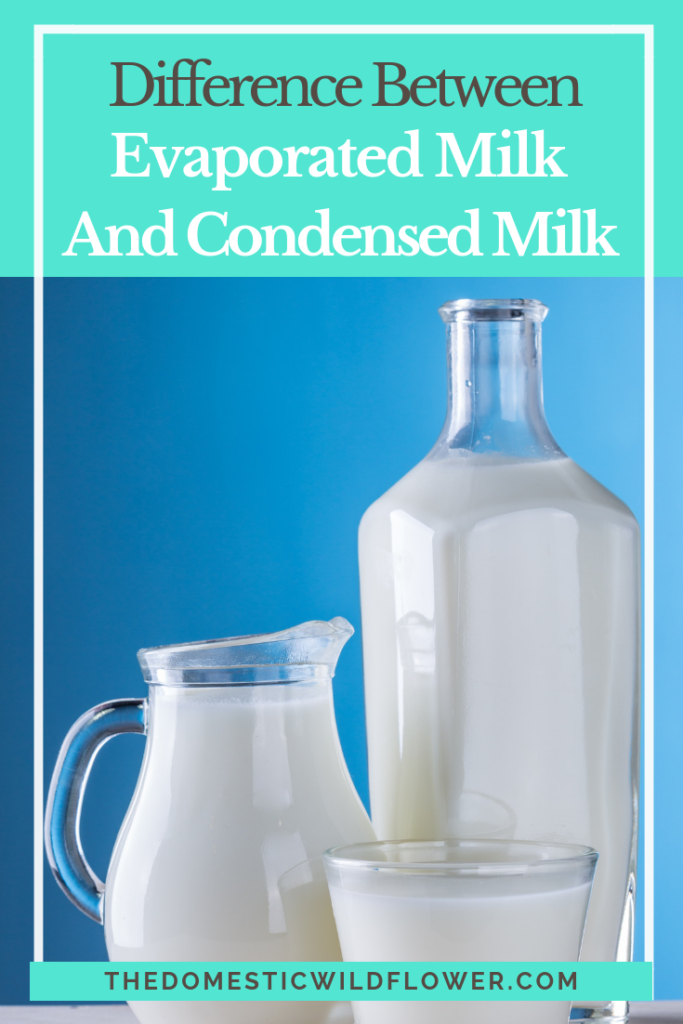
So Dear Readers, I have many character flaws and this post directly relates to the particular flaw of haste. Yes, I know haste makes waste but I can’t seem to keep that lesson in mind for very long. During my latest trip to Costco (a terrific warehouse-type store where I shop only every other month or so because it is an hour and a half drive from my home), I snagged a flat of what I thought was sweetened condensed milk. I saw cans, some familiar text, loaded it into the giant cart, and on I went zooming down the aisles in search of a giant jug of olive oil. I gave the flat zero thought after that. A week later, I ran out of my dulce de leche and quickly set up my crockpot (as described in this post here), ripped the label off of one of the cans, and plunked it in the water. Here was the first red flag that I ignored in haste. The can of evaporated milk is about half an inch taller than the sweetened condensed and I thought, “huh, that’s strange” and set the can on its side so it would be completely submerged. Six hours later, I shut the crockpot off, and when it was cool I pulled the can from the water and heard a distinctive slosh. One detail I failed to mention explicitly in my post about dulce de leche was that once it is cooked, it is really thick and there is no sloshing about inside the can. I of course then realized my error. This error led me to a laugh at myself and led to a few important discoveries that I will share with you now.

Evaporated milk has no added sugar, thus heating it in a crock pot will NOT result in a caramel of any kind. Sweetened condensed milk is exactly that- sugar is added and it is cooked down, leaving less water and more milk and sugar, which is why it is so delicious in coffee. Evaporated milk cannot be interchanged with sweetened condensed milk unless sugar is added to the recipe. The type and quantity depend on the recipe at hand. Once you get into Ingredient Replacement 2.0, I feel like the risk of failure is a bit greater, so proceed with such replacements at your own risk and not on an important cooking day like Thanksgiving. I wouldn’t wish that kind of stress upon anyone, least of all my dear readers.

My second discovery is that there are MANY recipes that call for evaporated milk and you can bet your boots that once I come upon a great one, you dear readers will get to see how I use up all 12 cans of evaporated milk that I bought in haste.

Surely, I could have guessed that these ingredients (marketed in very similar cans, dang it) are not interchangeable but once I took to an internet search it was clear that I wasn’t the only hasty shopper to make such a mistake.

How can I use up 12 cans of evaporated milk, my wise wildflowers? Leave your pearls of milk wisdom in the comments below and happy cooking!

I Funny Story about Dulce de Leche OR 1 Important Difference Between Sweetened Condensed Milk & Evaporated Milk

Filed Under: Cook

2 Important Tools for Mending a Beaded Garment

April 12, 2015 by Jenny Gomes Leave a Comment

Want to know how to fix loose beads on a dress? Need to know how to mend a beaded sweater? This tutorial will share with you the 2 tools you need to fix those loose beads quickly and easily.

How to fix a beaded garment | The Domestic Wildflower Use this tutorial to fix loose beads on a dress or fix a beaded sweater- any beaded garment can be fixed with these two important tools!

This post may have affiliate links.

With these 2 important tools, a mending task went from nearly or entirely impossible to only detail-focused and a little tedious.

2 Important Tools for Fixing a Beaded Garment

You need a beading needle. One with a collapsable eye (the hole the thread goes through) is nice because they are easy to thread and accommodate tiny beads. If you buy or borrow a beading needle, you might use it to fix an earring or some other item. I love these needles here.

How to fix a beaded garment | The Domestic Wildflower Use this tutorial to fix loose beads on a dress or fix a beaded sweater- any beaded garment can be fixed with these two important tools!

You need invisible thread, aka monofilament. The monofilament can be used on wedding veils and dresses (I have added and moved a lot of bustle snaps for friends using monofilament) and it can be used with a regular sewing needle which will be less flexible and have a much bigger eye. The invisible thread will make it possible for your sewing to be less than perfect and for you to reattach any bead without your sewing being seen.

How to fix a beaded garment | The Domestic Wildflower Use this tutorial to fix loose beads on a dress or fix a beaded sweater- any beaded garment can be fixed with these two important tools!

If you have fishing line (also known as monofilament), be warned: invisible thread is very, very thin, and that’s what you want. IF you want to use fishing line, it has to be a very low “test” as in, a very small fish would break it. Also, fishing line is sold on the merit that it doesn’t readily kink or knot, but we want ours to knot (inside our dress or sweater, of course), so that is another reason fishing line isn’t exactly the right tool for the job.

I have had this pretty beaded sweater for over a year and it has sat in my mending stack for about 11 months because I knew I owned and could not find 2 very important tools for re-beading the loose beads on the front.

Sewing with monofilament is a lot like sewing with cobweb, so be warned: It is hard to see, hard to knot, it tangles easily in some situations, but because it fits through the tiny eye of a beading needle AND because it makes your repair job nearly invisible, it is preferable. Once you get the hang of using it, you’ll use it over and over. I love it.

The next step is securing your cobweb/monofilament to the fabric at hand. If you are mending a sweater, tying a knot at the end may not be sufficient. The knot just won’t end up big enough to anchor the monofilament to the backside of the sweater. What you can do if this is the case it pass the needle through from the backside to the front, and back through to the backside about a quarter inch from where you pushed up, being careful to leave a long tail for you to work with. Tie the tail in a square knot (or whatever knot you can tie handily) and trim the tail. Of course, if your monofilament is thicker, or your material is more closely woven (like a dress shirt) then a regular ol’ knot will do. Also, if you were able to get regular sewing thread through the eye of the beading needle then knotting will also be sufficient. There’s lots of variables here but if you are reading this I bet you have a lovely item that needs you to fix it to be enjoyed once again. Onward Wildflowers!

How to fix a beaded garment | The Domestic Wildflower Use this tutorial to fix loose beads on a dress or fix a beaded sweater- any beaded garment can be fixed with these two important tools!

Because my beads were sewn on (and coming undone) in a straight line, sewing them back down was a piece of cake. Don’t get hung up on perfection. Bring the needle up through the garment, through the bead, and back down again. Repeat. Don’t repeat so many times that you only have 3 inches of thread left to tie the above mentioned difficult knot. You need at least 6 inches and a prayer to tie off without frustration. On an all-over beaded design like mine, I worked from left to right, bottom to top. If you have a fairly large area, a little method to the madness is wise. Because my sweater, beads, and factory thread were all dark blue, it was tricky to see what I had resewn and what I hadn’t. A few beads on my sweater were lost, never to be found again, and that is okay. You hardly notice it and I am not going to worry about it. Fixing my sweater that had a LOT (maybe 25% of the whole front of the sweater) of loose beads, this took me about 40 minutes to mend.

How to fix a beaded garment | The Domestic Wildflower Use this tutorial to fix loose beads on a dress or fix a beaded sweater- any beaded garment can be fixed with these two important tools!
All mended up!

If you want to learn how to sew, check out the courses HERE!

Filed Under: Sew

Cloth Diapers Part 2: The Gritty Details

April 5, 2015 by Jenny Gomes Leave a Comment

Picture

Cloth Diapering Part 2: The Gritty Details

The very same concerns come up every time I talk to people about cloth diapering and I will try to address them here. Cloth diapers are not dirty, they are easy to use when out and about, and they are not more time consuming than disposables.

Cloth diapers are a very clean choice for many reasons. The brand of diapers I use is gdiapers and I LOVE them and highly recommend them but there are other great companies out there that are certainly excellent also. Gdiapers sell a product that helped take the yuck factor out of poopy diapers. The cloth liner is a product not unlike a stiff piece of toilet paper that fits right on top of the cloth. After baby poops, Mom can lift the stiff paper-y cloth liner out and plop the poop into the toilet (where poop belongs!). In the event that you don’t have a liner when baby poops, it is not a big deal. Read: It is NOT a big deal! Lots of times, the poop can be plopped into the toilet, or I just swish them in the toilet and then put them in the diaper pail.

Cloth diapers are washed in a washing machine using the hottest water setting (which kills germs, last time I checked), using the longest cycle and soap that is appropriate for cloth diapers (agitation and soap removes the “stuff” from the cloth). I separate the white cloth and white gpouch (an elasticized liner that keeps the absorbent cloth close to baby’s skin) and put it into the diaper pail. The colored and oh-so-cute outside part (called gpants in this brand’s system) gets velcroed shut and tossed in my regular laundry. That has kept the colors brighter and velcro and elastic lasting strong through two children.

I use Rockin’ Green soap because it is plant-based and comes in a formula for hard water, which I have. It isn’t any more expensive than Tide or other petroleum-based soap and I have found it to work very well.

I use a Bambino Mio brand diaper pail and that particular diaper pail has a lock which has been handy for keeping toddlers at bay. Because I wash diapers every day or every other day, my house doesn’t smell like diapers. I assure you, I have some bloodhound women in my family and they’d let me know if my home was smelly.

As for time, consider first the time one would spend going to the store, the aisle, and the checkout line to buy disposable diapers. Then consider the time one would spend to take the now very full trash bag out, to the curb, and the money spent to pay to get rid of the garbage. All that is time that has to be considered first. Now consider that as a new parent, your laundry needs have increased significantly. Babies dirty onesies at a terrific pace, and as a new mom I know I rarely went a whole day with the same outfit on because I’d spill or leak something terrible on my shirt. All this means is that new parents do more loads of wash. I found it to be of no inconvenience to throw one more load a day in the machine. I’d bet dumping the diaper pail into the washing machine takes under a minute. I chose to hang my cloth diapers on the line to dry because I really like saving money, I like my washline, and with my first baby, my dryer didn’t work well. That doesn’t take much time either and then I guess the only other time consuming part is making a stack of the diapers and putting them pack in the changing station.

As for going out and about with baby, my wet cloth diapers go in a wet bag that is likely designed to put wet swimsuits in. When I get home from my outing I put the wet contents in the diaper pail along with the wet bag and that’s it.

As for wipes, I use cloth wipes because of all the reasons I chose to use cloth diapers. Also, they are so small (washcloth sized) that they don’t create more laundry- they don’t make an additional load of wash, they just increase the size of the load by a little bit. I do use the gdiaper brand plant based wipes for when I am out where there isn’t a faucet nearby. Because I have saved a lot of money by using cloth diapers, I don’t feel like it is frivolous to buy slightly more expensive biodegradable wipes that are made with what I refer to as, “plants and fairy dust.”

Speaking of plants and fairy dust, gdiapers makes a biodegradable insert to use instead of the cloth. The idea is that you can have the cute, colored outside part and inside you have an absorbent part made of plant matter (and said fairy dust) and you can compost, flush, or toss and it will decompose in a landfill in 50 days. This was one selling point of the gdiaper brand that I felt comforted by. If ever I was behind on laundry or on a trip (to an imaginary place where there are no washers and dryers) I could and would use the disposable inserts. I actually use them when on a long car ride or overnight sometimes because my babies have been very big (more potty) and deep, long sleepers (also more potty) and the disposable inserts are a little bit more absorbent in those situations.

My cloth diaper “test” was when my first born was 4 months old and I had to jump in the car and spend several days away from home, sans husband, to be with an aunt who was very ill. I had no time to plan and hardly time to pack but I grabbed my wet bag, a stack of cloth diapers and a package of the disposables. I was in and out of the hospital visiting for several days and I never even opened the pack of disposables because at the end of the day I just used my cousin’s washing machine. After that trip I was convinced that they’d work in any situation. I wish I could find the blog post I read when I was first reading about using cloth. A couple used them successfully on a yacht, sailing around the world. After reading that, I was completely on board.

As a mom who values time, money, and quality I have been so, so happy I chose to use cloth diapers. I know as an expectant mother the last thing you want to do is make the wrong choice. I truly would say that any new mom should try them. I’d love to hear from a mom who used cloth and did NOT have a washer and dryer in the home. I know there’s a frugal wildflower out there who’s done it- let me know how you made it work!

Filed Under: Kids

  • « Go to Previous Page
  • Page 1
  • Interim pages omitted …
  • Page 63
  • Page 64
  • Page 65
  • Page 66
  • Go to Next Page »

Primary Sidebar

Categories

Follow me here, there, & everywhere!

  • Email
  • Facebook
  • Instagram
  • Pinterest
  • RSS
  • Twitter
  • YouTube

Search

Get The Pressure Canning Cookbook

Get 10 Free Recipes Now!

Best Chicken Coop

Footer

Get Started Pressure Canning

Shrubology Ebook

Shrubology: Refreshing Homemade Fruit and Vinegar Syrups for Cocktails
Make easy, no-cook fruit & vinegar syrups for cocktails & mocktails! This ebook shares crowd pleasing recipes and simple to understand ratios so you can make a shrub on your countertop any time- without a recipe. Dive into these Prohibition Era drinks today!

Copyright

Copyright 2019
The Domestic Wildflower
www.thedomesticwildflower.com.
All content created by Jennifer Gomes unless otherwise noted.

Copyright © 2025 · Lifestyle Pro on Genesis Framework · WordPress · Log in