• Skip to secondary menu
  • Skip to main content
  • Skip to primary sidebar
  • Skip to footer
  • The Pressure Canning Cookbook
  • Blog
    • Subscribe
    • Welcome!
  • Perfectly Preserved Podcast
  • About
    • ADW Manifesto
    • Work With Me
      • Read
  • Shop
    • My Account
    • Cart
    • Checkout

The Domestic Wildflower

Handmade Food & Craft Tutorials for Beginners

  • Courses
    • Free Canning Basics
    • Everything Canning Course
    • Steam Canning Workshop
    • Free Homemade Cocktail Mixers
    • Wildflower Mixology
    • Crochet Basket Workshop
  • Can & Preserve
    • Never Canned?
    • Steam Canner Equipment Bundle
    • Shrubs Course
  • Sew
  • Cook
  • Craft
    • Crochet Step-by-Step Guides
      • Crochet Basket
      • Giant Yarn Throw
      • Thick & Thin Throw
  • Living
    • Creativity Challenge
    • Clean
    • Kids
  • Rentals

Jenny Gomes

How To Sew a Burlap Garland

January 28, 2017 by Jenny Gomes Leave a Comment

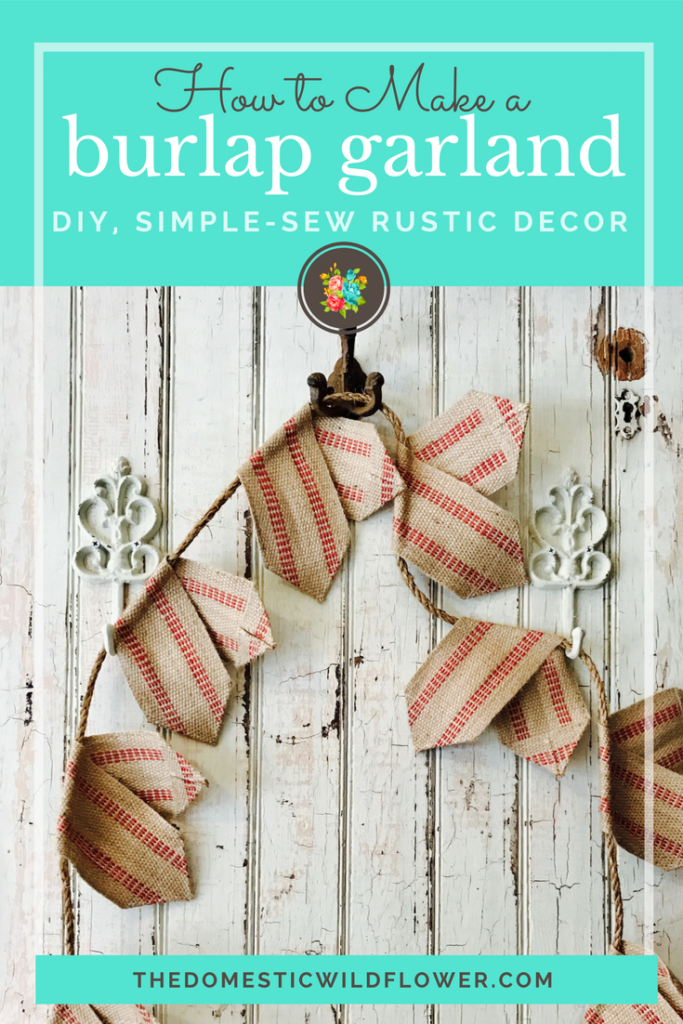
This post will teach you how to sew a super simple burlap garland that you can make yourself with jute webbing, hemp rope, and an hour of time.

How to Make a Burlap Garland | This DIY tutorial is so farmhouse adorable, and so easy to sew! Perfect for rustic DIY decor for the home, this fixer upper style banner is right at home in a kitchen or for Valentine's Day

This post may contain affiliate links which are a way for you to support your favorite blogger without any impact on your amazon checkout. I’d never recommend something I didn’t use and love myself.

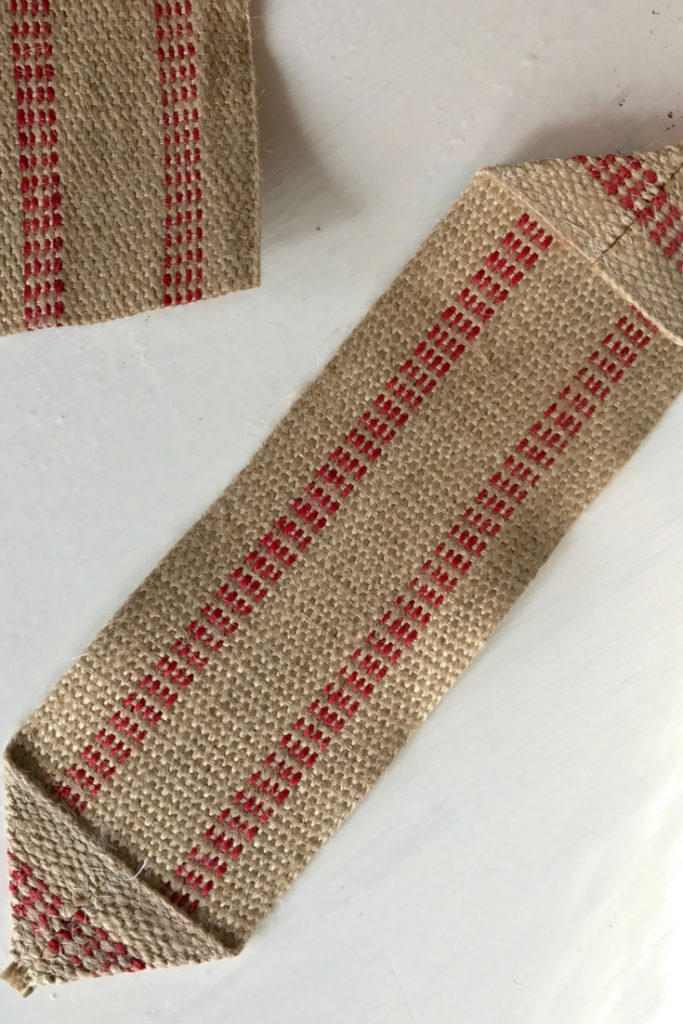
This garland is truly simple to sew for a very beginner for several reasons. Jute webbing is easy to sew on, and requires  only a universal needle,  and basic sewing thread. Sewing on jute webbing (that characteristically is just striped burlap meant for supporting a chair cushion in a chair or sofa) is easy, and gives a good chance for a newbie to practice making a narrow seam allowance (sewing close to the edge) and pivoting at the point of the garland to make a nice, sharp point. Of course, if you are a seasoned seamstress, this project will be even faster and easy to customize further. Jute comes striped in a variety of colors (navy, black, and red being the most common) and a couple different widths. Mine in 4 inches wide.

You will need: 

4 yards jute webbing

5 yards hemp rope

Universal sewing needle

all purpose thread. 

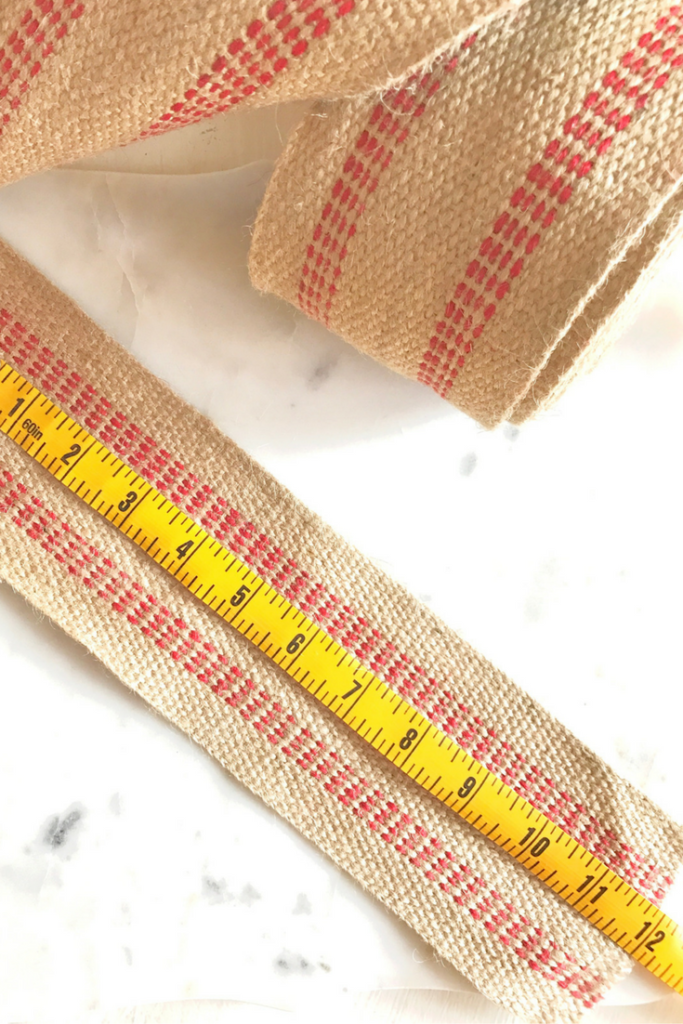
Instructions: Cut jute into 12 inch lengths. Zigzag cut edges. You can skip this step, but be warned that this webbing will fray significantly, and not in the cute way.

How to Make a Burlap Garland | This DIY tutorial is so farmhouse adorable, and so easy to sew! Perfect for rustic DIY decor for the home, this fixer upper style banner is right at home in a kitchen or for Valentine's Day

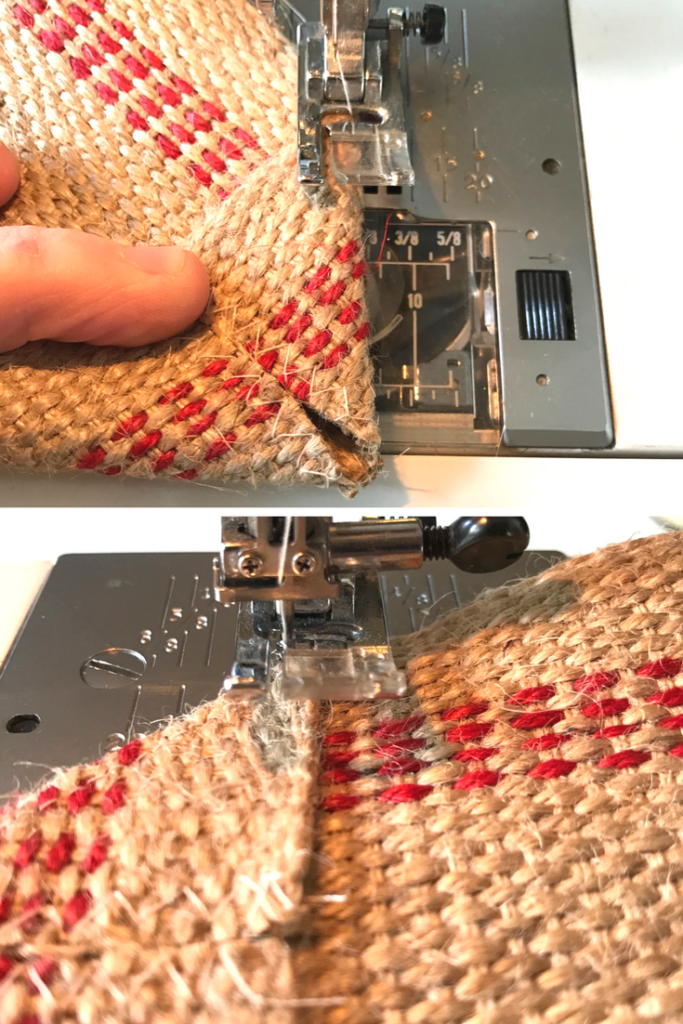
Fold the end into a point. Sew from the side, to the point, lower the needle, lift the presser foot, pivot, and sew down the other side of the triangle. I prefer a narrow 1/8 inch seam allowance and since your stitches disappear readily in the jute webbing, this is a great time to practice sharpening your skills.

How to Make a Burlap Garland | This DIY tutorial is so farmhouse adorable, and so easy to sew! Perfect for rustic DIY decor for the home, this fixer upper style banner is right at home in a kitchen or for Valentine's Day

How to Make a Burlap Garland | This DIY tutorial is so farmhouse adorable, and so easy to sew! Perfect for rustic DIY decor for the home, this fixer upper style banner is right at home in a kitchen or for Valentine's Day

Repeat on all sections.

Measure about 20 inches from the end of the rope. This is where your first section will be sewed.

Lay the jute webbing sections around the hemp rope with the triangle points pointing to the right. The enveloped rope will be to the LEFT of the presser foot, which may feel contrary to your instinct but this worked best for the next step.

How to Make a Burlap Garland | This DIY tutorial is so farmhouse adorable, and so easy to sew! Perfect for rustic DIY decor for the home, this fixer upper style banner is right at home in a kitchen or for Valentine's Day

Use a sewing pin to secure the section however you’d like. Sew a straight line, remembering to backstitch at start and finish. Do your best to get as close to the rope as you can. This creates a tight casing so your garland sections aren’t sliding all over the rope. I like mine to be close to evenly spaced.

How to Make a Burlap Garland | This DIY tutorial is so farmhouse adorable, and so easy to sew! Perfect for rustic DIY decor for the home, this fixer upper style banner is right at home in a kitchen or for Valentine's Day

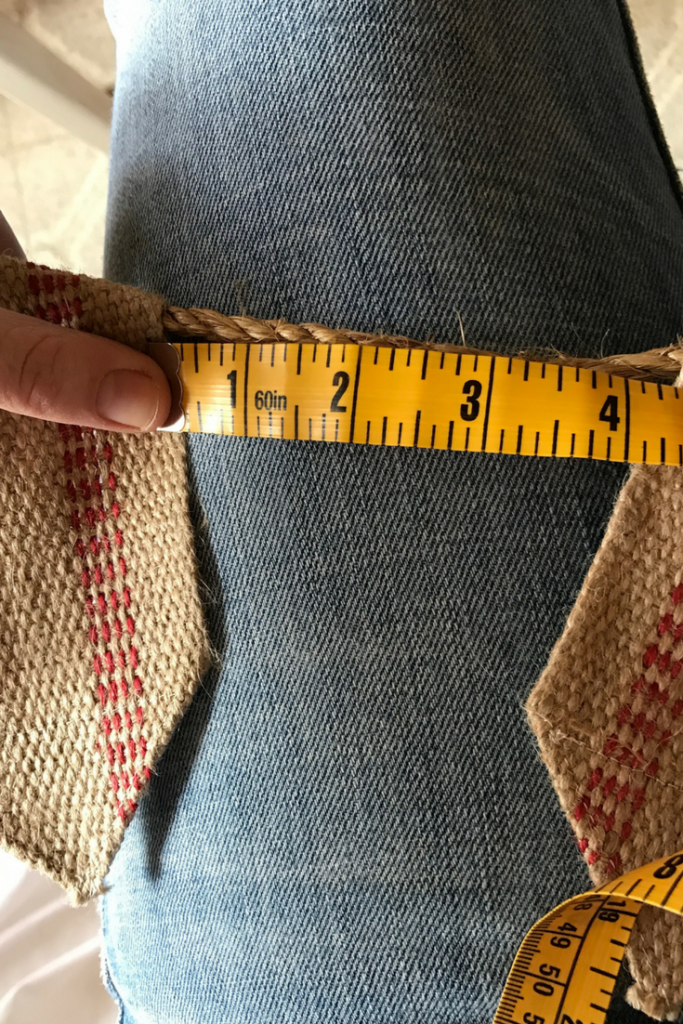
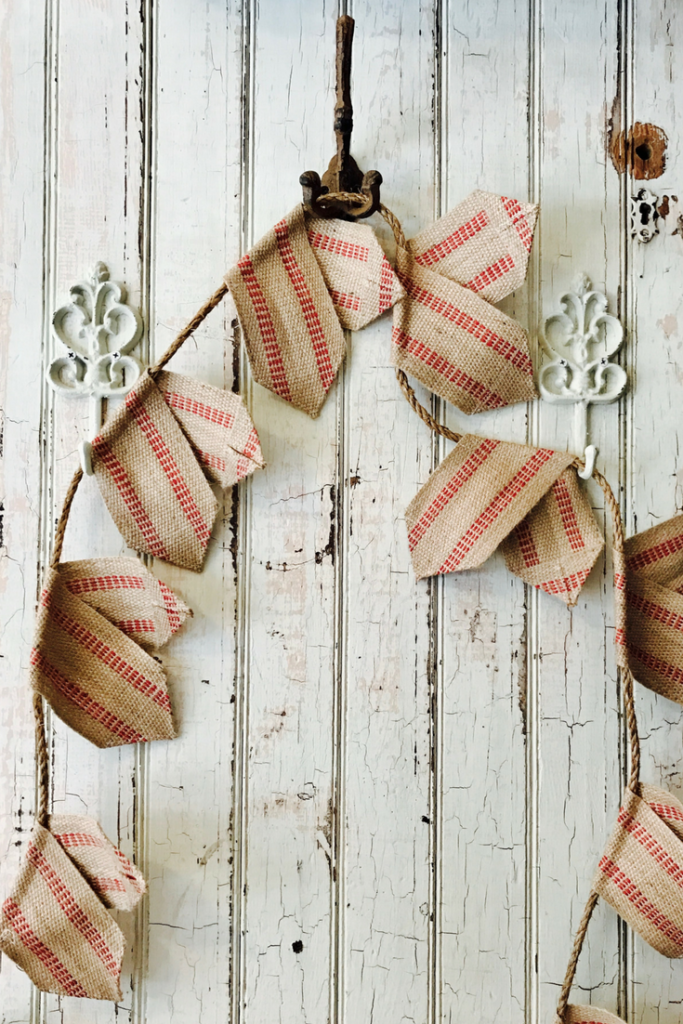
Continue to sew sections to the rope about fist-width, or 4 inches, apart, the length of the rope.

Knot ends of the rope.
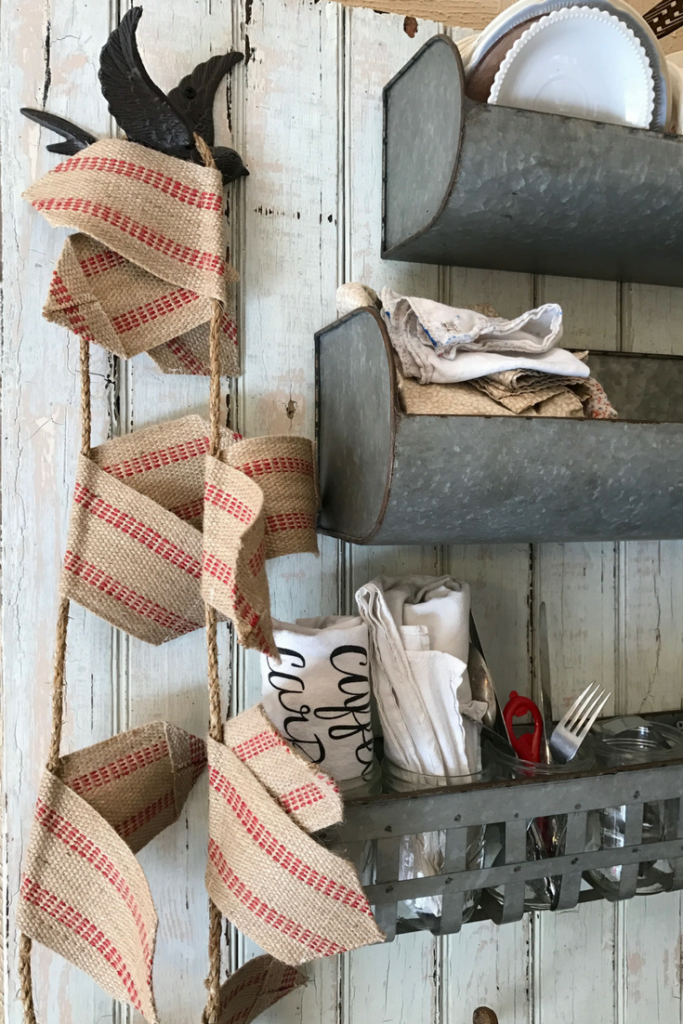
Display with love!

How to Make a Burlap Garland | This DIY tutorial is so farmhouse adorable, and so easy to sew! Perfect for rustic DIY decor for the home, this fixer upper style banner is right at home in a kitchen or for Valentine's Day

That was a piece of cake, right? I know some of you are new to me so I wanted to say hi! I’m Jenny and I love helping newbies get started making homemade things for themselves. I used to work in a fabric store while I was in college and I will NEVER run out of killer good ideas for crafting for beginners. Never 🙂

Jenny of The Domestic Wildflower

That’s me! My photographer makes me look like I’m actually sorta in control of the two wild children and galumphing chocolate lab behind her. God bless her 🙂

If you want to learn how to sew, check out the courses HERE!

If you are loving this super simple tutorial AND want another gorgeous home decor project, I want you to check out what I made recently:

Learn how to crochet this beautiful thick and thin rustic throw blanket!

Beautiful, right? I want you to get the step-by-step guide for where to get the yarn, how to crochet it (only 1 stitch!) and how to make that creamy, cloud soft blanket yourself! It is completely free (not kidding!) and written in plain English; no crazy pattern lingo here!

Yes! Download Now!

Filed Under: Craft, Sew

Tips for Making Homemade Cocktails

January 26, 2017 by Jenny Gomes 2 Comments

This post will share with you a wonderful homemade cocktail resource, the author of “The Thinking Girls Guide to Drinking” Ariane Resnick, and her tips for preparing healthful, homemade cocktails.

Ariane Resnick is the author of two books I know my readers would love, on very different subjects. Her first book was The Bone Broth Miracle and this volume was an Amazon #1 best seller. She and I need to collaborate on another project where we pressure can bone broth together, I think 😉

Her second book,  “The Thinking Girl’s Guide to Drinking: Cocktails without Regrets” she shares wonderful information about how to craft cocktails that work to leave you feeling better than before your first sip. She incorporates ingredients known for reparative, health boosting qualities into homemade beverages so the regrettable aspects of drinking are by and large left by the wayside.

Ariane is a certified nutritionist and and special diet chef and has been a chef to a variety of Hollywood stars. Her life’s work has been centered around helping people eat and drink well, and usually that is through homemade, whole foods and helping those with restrictive diets eat delicious, “normal” foods.

Most importantly, Ariane is the sweetest, smartest expert I could have asked to interview. She’s easy to talk to, humble, and passionate about helping others. She makes the science behind her craft easy to understand and has tons of helpful advice for regular gals like me and you. I can’t thank her enough for sharing her tips for how YOU can incorporate better cocktailing into your routine, and why you need to avoid the junk served at the bar and sold at the grocery store in the first place.

Enjoy Ariane’s tips!

When I realized that 1. lots of my readers needed and wanted to improve their libation offerings and 2. saw that many of them were really, really worried about preserving in general (you Wildflowers are so darn smart!) I created this email course that explains in 6 easy to follow emails how to make the simple, no-cook shrubs we discuss a bit in the interview above. The mini-course teaches you HOW to make these really easy homemade cocktail mixers out of nearly any produce. Did I mention it is free? It’s free, Wildflowers. Get in there now!

Enroll Now!

Sign up for the free email course that will teach you how to make a no cook syrup from fresh fruit, sugar, and vinegar. These drinking vinegars are fresh, unique and delicious mixed with sparkling water. The optional shot is divine on a hot day & and they are the most gorgeous, bright colors! Sign up for the free course today!


Ariane has been featured in media such as Forbes, Shape, Star, Goop.com, Food.com, Huffington Post, Refinery 29, Men’s Fitness, Food Network’s “Chopped,” and is a regular contributor to Livestrong.com. She was afflicted with Lyme’s disease and chemical poisoning and recovered holistically from both. She’s the author of two amazing texts that I think you all will LOVE and you can head to the affiliate linked photos here and add them to your cart right now, Wildflowers!

You can follow her a www.arianecooks.com and be sure to jump on her email list- she shares super valuable tips and recipes all the time. Her inspiring Instagram account will show you that healthy drinks (and foods) can be indulgent, easy, and beautiful.

Tips for making homemade cocktails | This interview shares super valuable tips for how to be a great hostess, how to make homemade cocktails easily, and use whole foods and fresh produce to make drinks that won't make you sick. Such a good interview!

I wanted to create an easy way to teach my readers how to make a super simple type of preserve- sort of a beginner, junior version of canning- which is why I wrote this shrubs homemade cocktail mixer course. You can sign up right here!

Enroll Now!


Tips for making homemade cocktails | This interview shares super valuable tips for how to be a great hostess, how to make homemade cocktails easily, and use whole foods and fresh produce to make drinks that won't make you sick. Such a good interview!

Filed Under: Cocktails

How to Make Homemade Popcorn in 2 Minutes

January 23, 2017 by Jenny Gomes Leave a Comment

Did you know you can make homemade popcorn in the microwave? That’s right, you do NOT need to buy microwave popcorn, slathered in Heaven only knows what kind of pretend butter-flavored not-ingredients, nor do you have to have a fancy popper to pop kernels. Grab a small brown lunch sack and read on, Wildflowers!
Get the simple recipe to healthy, whole grain, homemade popcorn with no crazy artificial flavors!

In a lunch sack or in the white ice cream bags in which the grocery store checker insists putting ice cream, pour ¼ cup of popping corn kernels. These are often sold on the very bottom shelf in the popcorn section in the grocery aisle. Drip a few drops, probably half a teaspoon, of oil (I use olive but whatever you use for cooking will do) shake the bag about to coat the kernels, and fold the top of the bag shut.

My newish microwave cooks popcorn in 1 minute and 25 seconds. You want to stop the microwave when the popping slows and the kernels continue to pop after the microwave is off for a few seconds. The first couple times you do this, stand by the door and listen for the slowing of the popping. A few old maids is much better than scorched corn.

I dress with either a little salt or a little cinnamon and sugar mix. I would challenge you to try it without butter only because butter makes everyone’s fingers buttery and it is pretty good without it, not because you should be anti-butter. I’m actively pro-butter, in fact.

Sadly, I have no clever solution to the popcorn getting stuck in your teeth. I hate it too, but this popcorn is such an easy, fast, and healthful snack especially when made this way that we eat it on the regular in my home, and just floss afterwards.

Here’s a helpful info graphic that will help you visual learners SEE the inside scoop on popcorn 🙂


Source: Fix.com Blog

Happy snacking, Wildflowers! Share in the comments below your favorite way to dress popcorn! Also, please share if you know what the term “old maid” means as it has come to my attention that it is likely a colloquialism that may be lost on some of my readers. I love language almost as much as I love popcorn!

Filed Under: Cook

Strawberry Pineapple Shrub Recipe

January 12, 2017 by Jenny Gomes Leave a Comment

Strawberry Pineapple shrub is an easy preserve that is a perfect cocktail mixer and it elevates sparkling water infinitely. The vinegar and sugar combined with the fruit make a bright and flavorful syrup with very little effort and this is the perfect shrub for beginners because it is simple to make. I enjoy mine with sparkling water (the lemon flavored kind is a tasty addition) and with a shot of tequila. It’s not as foreign a flavor as my delicious Rhubarb Pineapple Balsamic Shrub so I’d say it’s the better of the two to start with if you are shrub-uninitiated. This particular shrub also is the prettiest pink color. Read on, Dear Readers!

Strawberry Pineapple Shrub Recipe

This post may contain affiliate links. All opinions are my own. 

You will need:

1 ½ cups pineapple, fresh is preferable

½ cup strawberries, chopped

1 ½ cups sugar

1 ½ cups cider vinegar, better quality is preferable

Chop the fruit and place in the bottom of a large jar. You can fit it all in a quart jar, but I prefer to use my half-gallon and have plenty of room in case my fruit isn’t chopped small enough to fit nicely in a quart.

Add sugar to the fruit and toss in a jar to coat. Add lid and leave for 24 hours.


Chopped pineapple and strawberries awaiting sugar.


Strawberry Pineapple Shrub Recipe | A Domestic Wildflower

Shake and then add the vinegar. Screw the lid on tight and leave on the countertop for about a week, shaking or stirring daily.

After the week has passed, strain using a cheesecloth-lined colander or strainer if you care about absolute clarity or just a strainer if you aren’t particular

Here’s my casual Periscope broadcast of me straining shrubs to show you what the nearly finished product looks like.

The shrub is now ready for mixing! Store in the refrigerator until mixing in the following ways.

Strawberry Pineapple Cocktail:

1 part tequila

1- 1 ½ part strawberry pineapple shrub

3 parts sparkling water

over ice.

Or as a refreshing addition to sparkling or plain ice water, add 1 to 3 tablespoons shrub.

The basic formula for a shrub is 2 cups chopped fruit + 1 ½ cups sugar + 1 ½ cups vinegar if you want to experiment. I can’t wait to hear what combinations you come up with, Wildflowers! Please share in the comments below what you create and be sure to print your free recipe card!

CLICK TO PRINT!
Strawberry Pineapple Shrub Recipe | A Domestic Wildflower click to get the recipe and the free recipe card!

I started making shrubs as one way I could have something tasty and pretty to serve for company. They are sweet, but not too sweet, and jewel-colored, which is obviously fun, and different than everything else I could buy in a store. They are a way that I can (hope) to make my guests feel welcome and special, instead of letting on that I really feel like a colossal hot mess most of the time. They are fun to whip up, easy to make and make me feel like I am able to really demonstrate my desire to be a kind hostess. I think learning a skill like homemade cocktail mixers like shrubs helps you be a genuinely better host to your loved ones. Here’s a pretty graphic that will hopefully help YOU know what the heck to gift next time you are the one being hosted, Wildflowers!


Source: Fix.com Blog

If you want to learn even more about making shrubs, I created a free email course just for you! Sign up for all my shrub recipes and the ratios to make nearly any fruit into a sweet-tart syrup!

If you love strawberries, you’ll love my Canning Strawberries Recipe Book!

Enroll Now!

Filed Under: Cocktails Tagged With: pineapple, shrub, strawberry

Pineapple Core Shrub

January 11, 2017 by Jenny Gomes Leave a Comment

This post will share how to use the part of the pineapple that is so often tossed or composted and thus saves and makes terrific use of it to make a delicious, flavorful shrub. Read on to see how one magic step makes the core the best part of the shrub!

Pineapple Core Shrub

In case you are new to the shrub game, shrubs are a very simple type of preserve where fruit or vegetable are preserved in sugar and vinegar on your countertop. If you love the idea of saving a little fruit in a jar on your counter in under 10 minutes for use in cocktails, sparkling water, salad dressing, yogurt, and more,

Sign up for the How to Make Shrub Email Course here!

Enroll Now!

I have to say, I might be the proudest of this shrub recipe out of all of my shrub posts. I try to put forth a genuine and concerted effort to avoid waste in the kitchen. That’s a lot of conditional adjectives because it is darn difficult to do. I have been inspired by the Zero Waste Home blog because of its emphasis on cutting out expensive, wasteful practices in the home. This recipe is a great example of my effort being successful (rather than flop-full).

This little love affair I’ve had with creating shrubs based on old recipes, mixed with spirits I like, in simple combinations has spawned a project that I’m really proud of and very excited to share. I’ve created a course about how to create your own homemade cocktail mixers called Wildflower Mixology. If you’ve been following me for any length of time you know how much I love homemade, simple, farmer’s market fresh fare, and how much I love helping beginners start making more homemade for themselves.

Now that you’ve entered to be one of the lucky winners, let me tell you how to make this zero waste shrub. My kids eat a lot of pineapples. I cut up a lot of pineapples. After cutting up what felt like my thousandth pineapple, I decided to try the following and was thrilled with the result. I’m sure you will too.

I took the core of 2 pineapples and chopped them into about ½ an inch slices and put them in the bottom of a quart jar. 2 cores measured out to be 1 cup, but that will depend on your core, your slices, and how many pineapples you get to cut up on a weekly basis 🙂 I kept a core for a couple of days by itself cut up and waited till I had to cut another to make my next batch of pineapple core shrub.

With whatever quantity of core you end up with, cover with the same amount of white sugar. 1 cup of core gets covered with 1 cup of sugar. A quarter cup of core gets 1 quarter cup of sugar.  

Pineapple Core Shrub | A Domestic Wildflower click to read this clever way of using the core of a pineapple in a sweet tart shrub! Super smart!
I had one little strawberry left in the basket so I threw it in.

This step is key. You must let this mixture sit in the jar, covered, for 12-24 hours. The sugar pulls the pineapple juice and goodness out of the dense core and makes it available to be mixed with the apple cider vinegar.

Here’s youtube time-lapse video of sugar pulling the juice out of rhubarb. I’ve found pineapple core to be even more amazing but failed to record it for you yet. Check it out; it is amazing, I think.

Stir, shake, stir, shake. When the sugar is dissolved and it has been at least 12 hours, add 2 cups of good quality apple cider vinegar if you had 2 cups of pineapple to begin with, which is about 2 cores total.

Let sit on your counter for about a week.

Strain and decant into a clean jar. Store in the refrigerator.

Pineapple Core Shrub | A Domestic Wildflower click to read this clever way of using the core of a pineapple in a sweet tart shrub! Super smart!

Serve with sparkling water, with or without a shot of your favorite libation.

Pineapple Core Shrub | A Domestic Wildflower click to read this clever way of using the core of a pineapple in a sweet tart shrub! Super smart!

Pretty savvy, right Wildflowers? If you want to learn all I know about shrubs, sign up for my email course! I will send you the ratios, the how-to, and all the recipes so you can make these yummy syrups. Get started now!

Enroll Now!

Here’s a beautiful graphic that shows where shrubs originated (pirates for the win!), and some different flavors you can experiment with! Enjoy, Wildflowers!


Source: Fix.com Blog

Filed Under: Cocktails

  • « Go to Previous Page
  • Page 1
  • Interim pages omitted …
  • Page 39
  • Page 40
  • Page 41
  • Page 42
  • Page 43
  • Interim pages omitted …
  • Page 66
  • Go to Next Page »

Primary Sidebar

Categories

Follow me here, there, & everywhere!

  • Email
  • Facebook
  • Instagram
  • Pinterest
  • RSS
  • Twitter
  • YouTube

Search

Get The Pressure Canning Cookbook

Get 10 Free Recipes Now!

Best Chicken Coop

Footer

Get Started Pressure Canning

Shrubology Ebook

Shrubology: Refreshing Homemade Fruit and Vinegar Syrups for Cocktails
Make easy, no-cook fruit & vinegar syrups for cocktails & mocktails! This ebook shares crowd pleasing recipes and simple to understand ratios so you can make a shrub on your countertop any time- without a recipe. Dive into these Prohibition Era drinks today!

Copyright

Copyright 2019
The Domestic Wildflower
www.thedomesticwildflower.com.
All content created by Jennifer Gomes unless otherwise noted.

Copyright © 2025 · Lifestyle Pro on Genesis Framework · WordPress · Log in