• Skip to secondary menu
  • Skip to main content
  • Skip to primary sidebar
  • Skip to footer
  • The Pressure Canning Cookbook
  • Blog
    • Subscribe
    • Welcome!
  • Perfectly Preserved Podcast
  • About
    • ADW Manifesto
    • Work With Me
      • Read
  • Shop
    • My Account
    • Cart
    • Checkout

The Domestic Wildflower

Handmade Food & Craft Tutorials for Beginners

  • Courses
    • Free Canning Basics
    • Everything Canning Course
    • Steam Canning Workshop
    • Free Homemade Cocktail Mixers
    • Wildflower Mixology
    • Crochet Basket Workshop
  • Can & Preserve
    • Never Canned?
    • Steam Canner Equipment Bundle
    • Shrubs Course
  • Sew
  • Cook
  • Craft
    • Crochet Step-by-Step Guides
      • Crochet Basket
      • Giant Yarn Throw
      • Thick & Thin Throw
  • Living
    • Creativity Challenge
    • Clean
    • Kids
  • Rentals

Jenny Gomes

Antique Door Project

October 19, 2016 by Jenny Gomes Leave a Comment

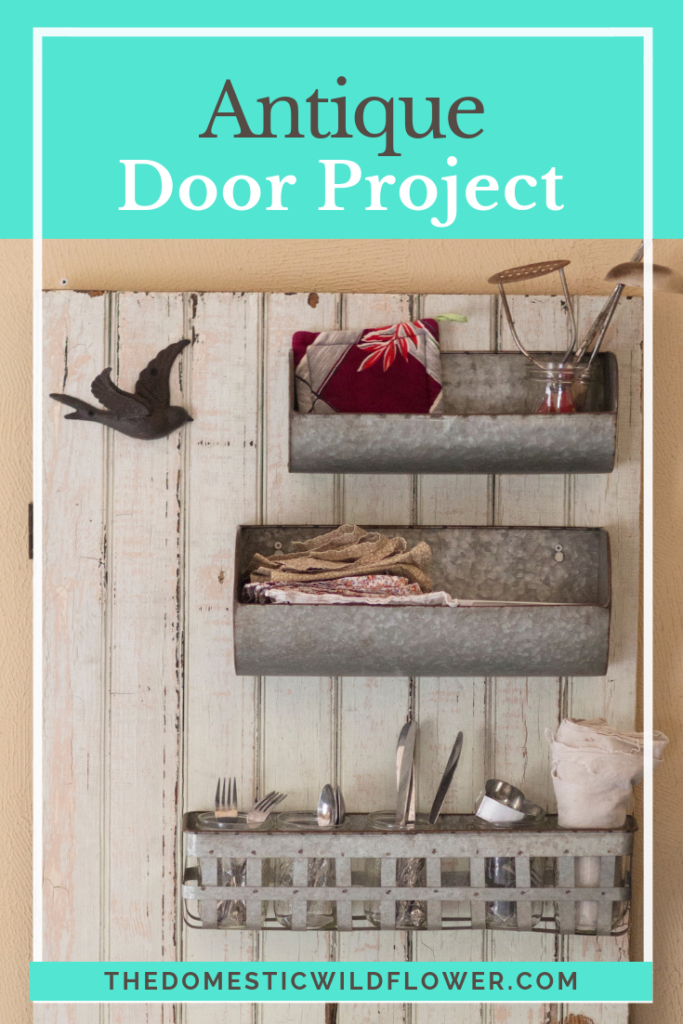
This post will show you my heirloom door project and show you how you can add a few new or old items to make a functional workspace.

Antique Door Project

Ranches are full of many wonderful things beyond animals, feed, and family ties. Ranchers get good at ranching by saving old things for use in some future project. Old baling wire is saved for mending projects decades later. Old appliances are refashioned for a new purpose out of practicality rather than fashion. Old building materials are used over and over in fences, shelters, and finally, sometimes burned to ash. Farms and ranches are the original up-cyclers, far before that was a hashtag or buzzword.


That said, I love old things. On our family ranch where I grew up, there used to be a house in what is now the front yard. In that old house, my great-grandmother lived, and a few items from that old house have been saved in various buildings. In the “storehouse” as opposed to the granary or hogshead, has been stored the door that went from the dining room to the bathroom. It’s a bit narrow, white and chipping paint, and as genuine farmhouse fabulous as a girl could hope for. This door and the clawfoot tub that will make it’s blog debut someday soon I hope is what I have wanted to feature in my home for a long time.


So a door all alone, without an entrance to guard, is sort of a tricky item to display. I had to put it where it would be useful, where its whole shape would be visible, and where it would be accessible. I planned on attaching shelves and hooks and making a sort of vertical buffet, to lend a hand to a sort of furniture-less dining area (which is really part of the living room in our small home).


I had the pleasure of visiting and purchasing my shelves and hooks at the lovely Pretty in Paint store in Medford, Oregon. If you’re ever nearby, definitely check them out. This is a family owned business with a gorgeous supply of home furnishing for both the DIY girl or the ready-made purchase. They carry chalk paint (which totally transformed my dining room table and my entryway- that’ll be another blog post!), fixtures, pillows, knobs, rugs, tables…it is just my favorite.


I got 2 galvanized shelves, one sort of woven looking galvanized basket that I originally thought I might put on the center of my dining room table and instead decided to screw to the door as well, and several hooks. One hook is a flying bird- a swallow, we’ll say- , several aged white hooks, and a few that I’ll call barn wood brown.

Antique Door Project | The Domestic Wildflower click to see how an antique ranch door was transformed into a functional, farmhouse style workspace. Click through to read the post!

After we decided that we’d place the door near the dining room table, I decided a few low hooks could welcome kid’s sweatshirts, and the higher ones could hold extra towels (those worn, white gems were my Great Aunt Nadine’s). The shelves hold the cloth napkins, a very antique tools with wooden handles on the very top shelf, and the bottom basket holds extra silverware, cookie cutters, and a pot holder. I wanted the few extra items I always need at the table at hand. I might also hide DVDs or other things I don’t want my kids to see on the top shelf. Don’t tell 🙂

The door is screwed into a stud and I just LOVE the way I was able to make something gorgeous and old work for me and my little home.

Antique Door Project | The Domestic Wildflower click to see how an antique ranch door was transformed into a functional, farmhouse style workspace. Click through to read the post!

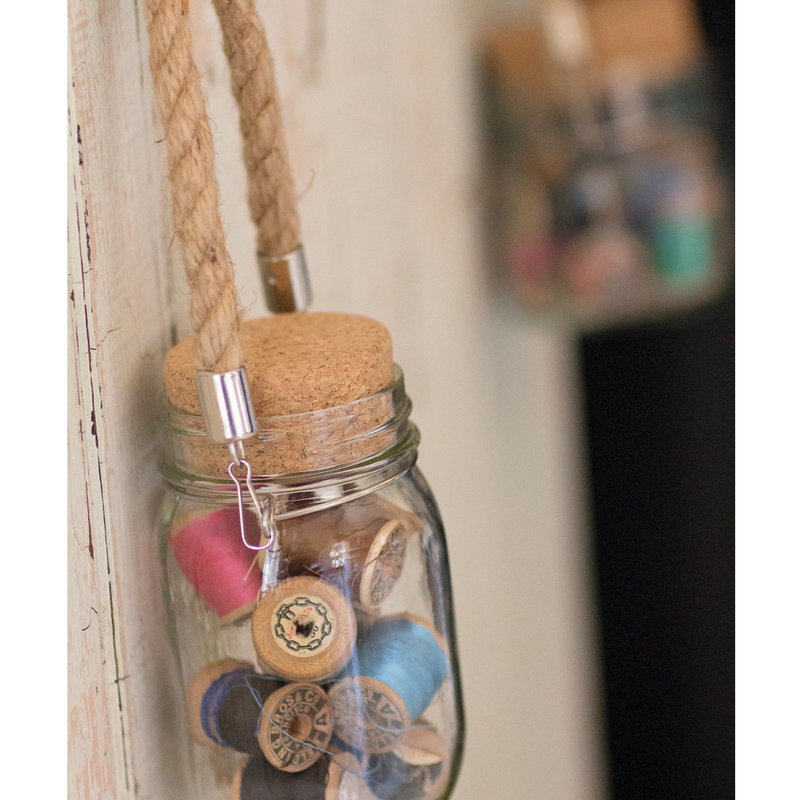
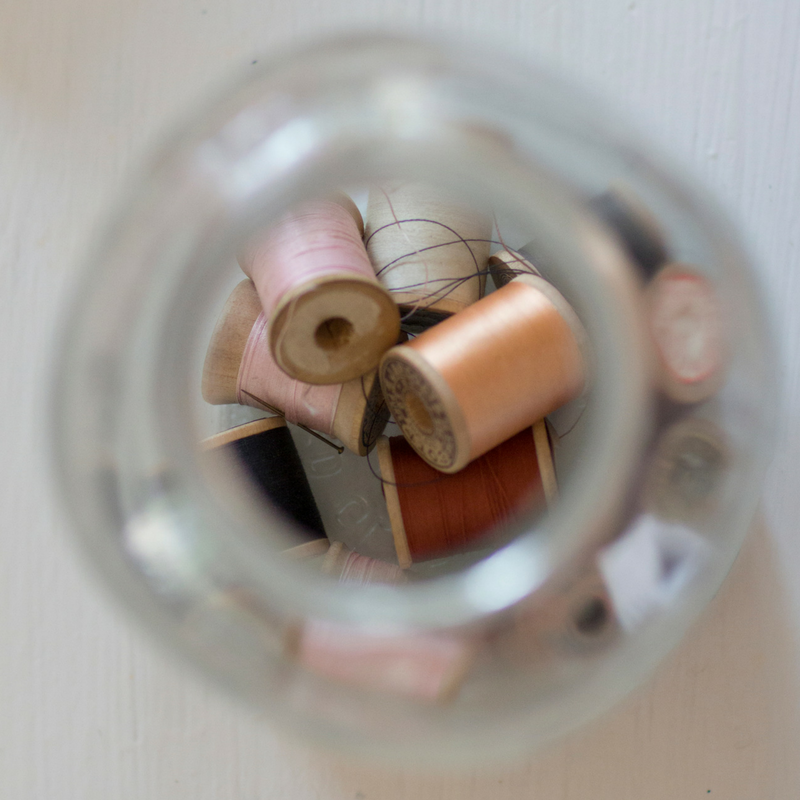
The rope and wire contraptions are from my favorite online retailer of all things mason jar related, Mason Jar Lifestyle. They sell anything and everything you could want to accompany your mason jar including mason jar lids of all kinds from decorative to lunchbox-able, cookie cutters shaped like mason jars, and more. They have been exceedingly generous to me and my Wildflower readers and I’m giving away the rope and wire mason jar hangers so you can suspend your very own mason jars full of…whatever gems you like. I filled mine with antique spools of thread (because the colors! swoon!) but you could do whatever you like.
I’m sharing this rapid-fire giveaway on INSTAGRAM (I’m at @adomesticwildflower) from October 19th at 8am to the 21st at 11pm Pacific Time. Go to Instagram, follow me @adomesticwildflower and @masonjarlifestyle, turn on notifications (touch the three dots in the upper right hand of the account, and TAG three mason jar loving friends in the post. Sorry, this giveaway is only on Instagram. I can’t wait to see who wins!

Filed Under: Craft

Maple Whiskey Peaches

October 10, 2016 by Jenny Gomes Leave a Comment

This post will show you step by step how to can peaches in a vanilla syrup with a splash of whiskey. The resulting preserve can be eaten out of the jar plain, are perfect on top of a cheesecake, waffles, or ice cream, or are a flavorful alternative to plain ol’ peaches in a pie or crisp. Read on for the tutorial!

Maple Whiskey Peaches


This recipe is based off one my grandmother tore out of the Sacramento Bee for me several years ago. I’ve changed a few things and added complete canning instructions, but this recipe was one of the first I tried where I canned with booze and I’m forever grateful to both my Gram and the good ol’ SacBee. It is so, so good.


The alcohol mostly if not entirely cooks off so you can feel safe feeding this preserve to those who are children or who abstain from alcohol. I’m actually very sensitive to approximately 10,000 migraine triggers and alcohol is one of them. I’ve never eaten these and felt like it caused one. So, pour in a generous ⅓ cup, make yourself a cold drink for the canning process, and relax!


The peaches in this recipe are not pureed or milled up the way I often process fruit. They are in halves if your peaches are freestone (the pit just comes right out with ease) or in chunks if your peaches are clingstone (no force in the world can pull the flesh of peach from the pit).


This brings up an interesting point about canning safety. The processing time (the time the hot food in hot jars is submerged in boiling water) is determined in large part by the density and/or size of the fruit and veggies in the jar. Larger, more dense pieces mean slightly longer processing time. This time is critical to observe because the center temperature of the jar MUST have time to rise above the 212-degree mark to kill spoilers. It takes a bit longer to get the center of a peach half that hot than it does in say peach nectar (same ingredients just more water and pureed thinly). Do not cut the processing time short, newbies or experienced canners. Keep the jars submerged for the prescribed amount of time, and don’t forget to adjust for altitude by adding 5 minutes of processing time for every 1000 feet you are currently canning above sea level.  

Get the Canning Essentials Workbook that will guide you through your first canning season! Get the printable workbook here including equipment checklists, visual guides, and more!

Get the Canning Essentials Workbook for $5 and be guided every step of the way making this recipe, and every recipe this season! The Workbook includes

  • Canning Season Planner
  • Pantry Checklist
  • Equipment Checklist
  • Acid & Canning Guide
  • Canning Log
  • Process Cheat Sheet
  • Elevation Adjustment Guide
  • Bonus Recipes
Buy Now!


Here’s what you need:

4 lbs peaches (10-11 peaches)

2 cups water

2 ½ cups sugar (brown is good but white is good too)

Pinch salt

¼ cup vanilla extract (I make mine at home)

¼  cup good quality real maple syrup

⅓ cup whiskey

[Read more…] about Maple Whiskey Peaches

Filed Under: Can

Giant Yarn Crochet Baby Blanket Pattern

October 3, 2016 by Jenny Gomes Leave a Comment

This post will share how to create a practical giant yarn crochet baby blanket with this easy pattern.

Giant Yarn Baby Blanket

You all may have noticed, I’m a huge fan of giant yarn, pun absolutely intended. I love it because it is unusual, warm, fast to work with, and easy to see errors you might have made. Love Fest Fibers has become my favorite domestic source of giant yarn and for good reason. They have a variety of large-scale yarns to choose from, in neutrals and dreamy colors, in both all natural and recycled plastic + natural material blends.

For the baby blankets I decided to make for a pair of cousins who are pregnant and due at nearly the same time, I chose the Relove Merino blend that is wool and recycled plastic bottles. I’m not going to bluff you; I chose it because it is washable, not because I am primarily interested in using, or not using, recycled plastic. Function comes first and foremost in my mind. However, it is clearly an advantage to use up some of those wasted plastic bottles in a rad baby blanket. Additionally, a baby blanket must be washable. Unless you aren’t giving it to a baby 😉

This yarn is about as big in diameter as a dime, which isn’t the biggest yarn I’ve worked with but it comes in a delicious aqua (that I really, really want to use in a blanket for my bed), a pink, and a blue. They also have large wooden hooks and needles available for purchase which is very helpful indeed. I crocheted a basket with their Tough Love felted yarn with my fingers but for this project, a hook was definitely faster.

One skein of their largest size, 100-yard length made a perfectly sized baby blanket. I crocheted a chain about as wide as a crib, and used my go-to single crochet stitch, chain one and skip a stitch, single crochet routine on repeat back and forth. That way you get a lot more blanket area than if you made a stitch in every single chain.

One important tip when working with really large scale yarn is that because you want to use up every last bit of it, sometimes you’d rather not just end a row and cut it off. You might want to keep crocheting but aren’t sure if you’ll make it to the other end without running out. I will taper off by making a few short single crochets (just a tighter stitch) and then doing a looser slip stitch, and then a snug slip stitch. That way you can gradually decrease and hopefully make it to the other end. You don’t have to do this of course but that’s one way I’ve found that is helpful.

This video will show what can’t be explained in words. I hope it is helpful, Wildflowers!

Making a baby gift by hand is something that many people wish they could do but don’t realize that the actually CAN do. You absolutely can learn how to crochet a baby blanket. If you don’t want to learn how to crochet, you can learn how to sew. If you’d rather not sew, I bet you can paint silk, or embroider a baby monogram, or make a bib, or customize a diaper bag…you are capable beyond your wildest dreams, Wildflowers, and that’s why you are here. Learn how to create more by hand and reap the benefits tenfold. 

Giant Yarn Crochet Blanket Pattern

If I have thoroughly whet your appetite for giant, yarn, I think you will LOVE this thick and thin yarn crochet step by step guide.

Filed Under: Craft

How to Replace a Lost Button on Your Jeans

September 26, 2016 by Jenny Gomes 2 Comments

This post will show you a smart, simple way of fixing jeans that have lost a button.

How to Replace a Lost Button on Your Jeans

Fixing a broken button from a beloved pair of jeans isn’t as easy as it seems. You can buy replacement buttons but they often require a special tool to clamp them to the waistband. If the button pulled it’s way completely through the waistband, you are left with a hole that is larger than the shank of most replacement buttons…and then what? Add in a zipper that doesn’t prefer to stay up all on its own, and your jeans are ready for demotion to the rag pile.

I have a good way of mending the hole where the button pulled through that leaves you without having to buy a replacement button and tool that may or may not work that is difficult to use. It also makes your mending job last so you won’t be sewing the button back on every time you want to wear the jeans.

Read on for the full mending tutorial + video!

The first thing you need is a regular button that slides in and out of the factory buttonhole in the waistband of your jeans. You have a few stylistic choices when it comes to the color and style of button. You could find a metal button that closely resembled the button that originally was on the jeans, you could find a neutral colored plastic button, or you could choose a bright, colorful, or otherwise really fun button that would be meant to stand out. For jeans, I usually wear each pair with a variety of outfits so I choose my replacement buttons to be as neutral as possible.

You will need thread that matches the button, a sewing needle with an eye large enough to accommodate the thread, a pair of sharp scissors, a pair of tweezers, and a scrap of denim that is at least 2 inches x 2 inches.

Take the tweezers and insert them in between the layers of the waistband. Your waistband is made from at least 2 layers of fabric, almost certainly, if not more, and you’ll be able to feel with the tweezers that there’s space for a flat, smooth, denim square to be inserted.

How to Replace a Lost Button on Your Jeans | The Domestic Wildflower click to read this super helpful mending tutorial for fixing your jeans when you lose the factory button. This tutorial even has a clear video to walk you through the process. Watch it here!

The extra fabric that you will insert will become a strong anchor onto which you will sew the new button without making the waistband of the jeans look mended. It will be completely invisible within the waistband and will give you something sturdy to sew on.

Trim the denim patch to be just a bit smaller than the height of the waistband. When mending, always make the patch bigger than you think. You can always pull it out and trim a little more.

Using the tweezers, pinch the edge of your denim anchor patch and slide it into the hole (that used to house the shank of the original jeans button). Use the tweezers to wiggle and shimmy the patch between the layers so it is flat. Imagine opening up a sandwich that’s already prepared to slide in one more piece of cheese. It’s like that. Sort of 🙂

Use your fingers, the tweezers, a ball point pen, the tines of a fork, or any other small tool to patiently wiggle the fabric into place.

After the fabric is flat within the layers, begin sewing the button exactly over the same hole that the original button was in. As you sew, you’ll feel that you are sewing through several layers of fabric which will firmly anchor the button in place. Try to stab through layers of the original waistband also, but because you’d added the extra layer, you shouldn’t end up with a button that separates from the waistband at all.

How to Replace a Lost Button on Your Jeans | The Domestic Wildflower click to read this super helpful mending tutorial for fixing your jeans when you lose the factory button. This tutorial even has a clear video to walk you through the process. Watch it here!

This video should show you exactly how to mend this way; be sure to pin it for reference later!

After making about 8 passes (on a 4 hole button I like to do 4 one way, 4 the other), knot the thread on the backside (by your tummy) and snip the thread. You could add a dot of Fray Check or clear nail polish, but I usually don’t find it necessary.

Now, your jeans can remain in the regular line up instead of lingering in the purgatory of unwearables.

If you want to learn how to sew, check out the courses HERE!

Happy Mending, Wildflowers!

Filed Under: Sew

Roasted Chipotle Salsa

September 19, 2016 by Jenny Gomes 7 Comments

This post will share the canning recipe and tutorial for roasted chipotle salsa.

Roasted Chipotle Salsa

For this recipe, we Wildflowers have the distinct pleasure of enjoying another guest post from my friend and fellow canning enthusiast. Kimmy is an experienced canner, a lover of all things spicy, author of the Bread & Butter Pickled Jalapeno recipe, and is an active member in our Grow Like a Wildflower Facebook Group. Kimmy and I will be sharing recipes for years to come, I’m sure. There’s no one I’d rather have to help me educate you in your canning pursuits. Here’s Kimmy!

I love tomatoes, and I love canning. I recently made friends with a tomato farmer at my local farmer’s market and he has been giving me great deals on tomatoes when I buy in bulk. So every Wednesday evening I leave my house as my husband rolls his eyes at me. “More tomatoes? Really?” Heck YES! Who doesn’t love opening a jar of fresh tomatoes/sauce/salsa in the middle of the winter? It’s like summer in a jar! So when I lugged my 3, 25lb boxes this week, I decided to make one of my husband’s favorites. He loves all things chipotle, so it was easy to convince him to help me on a lazy Saturday morning.

Now, I like to get things done as efficiently as possible. Those of you that know me in person are probably smiling to yourself, because you know that’s an understatement. I do not like wasting time, so when he suggested that we roast the veggies for this salsa, I immediately thought, why? I knew it would take a lot more time than just blending the tomatoes whole, but he was willing to help. So we heated up my favorite cast-iron griddle and started roasting. I am so glad we did! This salsa has the best flavor of any salsa that I have ever canned. You want to roast the tomatoes, peppers, and onion just to the point where they look a little charred. Those black specs are actually beautiful on the finished product.

So for this recipe, we used 20 lbs. of tomatoes. I am one of those people who like to do a lot of canning all at once. You do not have to do this! This recipe can easily be cut in half if you just are getting started at canning and don’t want to spend a ton of time. Along with the tomatoes, we also roasted 5 lbs. of tomatillos, around 8 lbs. of peppers. I did a mix of what the farmer sold me at the market, some Italian sweet peppers, a few jalapeños, a few serranos, some bells, and some anaheims. Of course, if you want it really spicy, you will use more of the hot peppers, and if you don’t want it as spicy, you’ll use more of the bells and sweet peppers. We also roasted 4 lbs. of onions.

To roast, we did a combination of roasting on my cast iron griddle (if you have never used cast iron, it is time to start, but that’s another blog post for another day), and under the broiler in the oven. Once the veggies were nice and charred we blended them in batches. We also blended in a bunch of cilantro (use more or less depending on your preference), a can of fire-roasted chipotle peppers with the juice, a head of peeled garlic, 2 TBS cumin, 3 TBS salt, and 2 TBS black pepper.

Bring your salsa to a low boil and let simmer for an hour or so. This isn’t necessary, but it cooks off some of the water from the tomatoes for a stronger flavor. While your salsa is simmering, prepare your jars in your canning pot and get your lids and rings hot in another pan of boiling water. Once everything is ready, ladle your hot salsa into your hot pint jars, add ½ TBS white vinegar to the top of each jar. Make sure to wipe your rims to ensure a good seal and tighten on your lids/rings. Place in your water bath canning pot and process pints for 20 minutes.

This salsa is similar to a salsa that you would get before your dinner at a Mexican restaurant, but with a smoky, chipotle taste. You can add more or fewer chipotles/hot peppers depending on your preferred degree of spiciness. For what it’s worth, my husband’s comment about this recipe was, “It’s got a kick!”

My favorite thing to do with this salsa is to pour it over a pork roast in my crock pot. I add a can of black beans, a can of corn, and a can of diced green chilies. Then, I warm up some tortillas and have a delicious and easy dinner. I hope you enjoy this recipe as much as my family has.

Recipe

20 lbs. tomatoes

5 lbs. tomatillos (make sure to remove the husk first)

8 lbs. peppers (Mix of sweet peppers, bells, jalapeños, serranos, anaheims)

4 lbs. onions

1 bunch cilantro

1 can fire roasted chipotle peppers

1 head garlic

3 TBS. salt

2 TBS. cumin

2 TBS. black pepper

1 cup white vinegar

Roast tomatoes, tomatillos, peppers and onions on sheets in the oven or on a cast iron griddle. Blend in a blender or food processor with cilantro, chipotles, garlic, salt, cumin, and black pepper. Simmer for an hour.

Roasted Chipotle Salsa | The Domestic Wildflower click to read this beginner friendly salsa canning recipe. This roasted chipotle salsa is smoky, spicy, wholesome and delicious. Get the recipe and tutorial here!

Download the canning process sheet to make these steps a breeze!

Yes! Download Now!

Meanwhile, fill your water bath processing pot with jars and hot tap water. Remember to use a wire canning jar rack or a silicone trivet. You can get the canning equipment checklist here! Bring to a boil.

Put a corresponding number of lids and rings in a saucepan filled halfway with tap water. Bring to a simmer.

Have nearby countertop covered in a towel, and have a jar lifter, funnel, and lid lifter ready.

Ladle into hot, prepared jars. Add ½ TBS vinegar to each jar. Wipe rims, and put on hot lids and rings. Process pints in a water bath for 20 minutes, making sure to adjust for altitude if necessary by adding 5 minutes for every 1000 feet you live above sea level. Let sit on the counter for 24 hours before washing, removing rings and storing.

Roasted Chipotle Salsa | The Domestic Wildflower click to read this beginner friendly salsa canning recipe. This roasted chipotle salsa is smoky, spicy, wholesome and delicious. Get the recipe and tutorial here!

Roasted Chipotle Salsa | The Domestic Wildflower click to read this beginner friendly salsa canning recipe. This roasted chipotle salsa is smoky, spicy, wholesome and delicious. Get the recipe and tutorial here!

If you’re not sure if you have the equipment you need to make this recipe, watch this:

Thank you so much for sharing Kimmy! This recipe sounds delicious and I’m convinced that the flavor from roasting the veggies first would be well worth the time. I can’t wait to hear about how you serve this salsa, Wildflowers! Be sure to share in the comments below!

And if you’re wishing you felt confident enough to try this recipe…

Get the Canning Essentials Workbook that will guide you through your first canning season! Get the printable workbook here including equipment checklists, visual guides, and more!

Get the Canning Essentials Workbook for $5 and be guided every step of the way making this recipe, and every recipe this season! The Workbook includes

  • Canning Season Planner
  • Pantry Checklist
  • Equipment Checklist
  • Acid & Canning Guide
  • Canning Log
  • Process Cheat Sheet
  • Elevation Adjustment Guide
  • Bonus Recipes
Buy Now!

SaveSave

SaveSave

Filed Under: Can

  • « Go to Previous Page
  • Page 1
  • Interim pages omitted …
  • Page 42
  • Page 43
  • Page 44
  • Page 45
  • Page 46
  • Interim pages omitted …
  • Page 66
  • Go to Next Page »

Primary Sidebar

Categories

Follow me here, there, & everywhere!

  • Email
  • Facebook
  • Instagram
  • Pinterest
  • RSS
  • Twitter
  • YouTube

Search

Get The Pressure Canning Cookbook

Get 10 Free Recipes Now!

Best Chicken Coop

Footer

Get Started Pressure Canning

Shrubology Ebook

Shrubology: Refreshing Homemade Fruit and Vinegar Syrups for Cocktails
Make easy, no-cook fruit & vinegar syrups for cocktails & mocktails! This ebook shares crowd pleasing recipes and simple to understand ratios so you can make a shrub on your countertop any time- without a recipe. Dive into these Prohibition Era drinks today!

Copyright

Copyright 2019
The Domestic Wildflower
www.thedomesticwildflower.com.
All content created by Jennifer Gomes unless otherwise noted.

Copyright © 2025 · Lifestyle Pro on Genesis Framework · WordPress · Log in