• Skip to secondary menu
  • Skip to main content
  • Skip to primary sidebar
  • Skip to footer
  • The Pressure Canning Cookbook
  • Blog
    • Subscribe
    • Welcome!
  • Perfectly Preserved Podcast
  • About
    • ADW Manifesto
    • Work With Me
      • Read
  • Shop
    • My Account
    • Cart
    • Checkout

The Domestic Wildflower

Handmade Food & Craft Tutorials for Beginners

  • Courses
    • Free Canning Basics
    • Everything Canning Course
    • Steam Canning Workshop
    • Free Homemade Cocktail Mixers
    • Wildflower Mixology
    • Crochet Basket Workshop
  • Can & Preserve
    • Never Canned?
    • Steam Canner Equipment Bundle
    • Shrubs Course
  • Sew
  • Cook
  • Craft
    • Crochet Step-by-Step Guides
      • Crochet Basket
      • Giant Yarn Throw
      • Thick & Thin Throw
  • Living
    • Creativity Challenge
    • Clean
    • Kids
  • Rentals

Blog

Dove with Butter and Herbs

October 5, 2015 by Jenny Gomes 1 Comment

It has become a bit of a joke among those in my cattle ranching family that I have all manner of wild game on my supper table and rarely now do I serve steak. Above all else, I try to be practical, and because my husband is an enthusiastic hunter and fisher, I have had to learn to cook a wide range of beasts. My freezers are filled with meats that are wilder, leaner, and more ‘free range’ than anything you might pay top dollar for in a specialty market and I suppose I am very fortunate in that regard. I am no expert, and I plan on asking Santa for these books in order to improve my game cooking skills even more. I have read a bit by this author, Hank Shaw, and I can tell he’s the Real McCoy. Check him out on Instagram. He does things like roast grouse bits to make broth. It’s awesome.

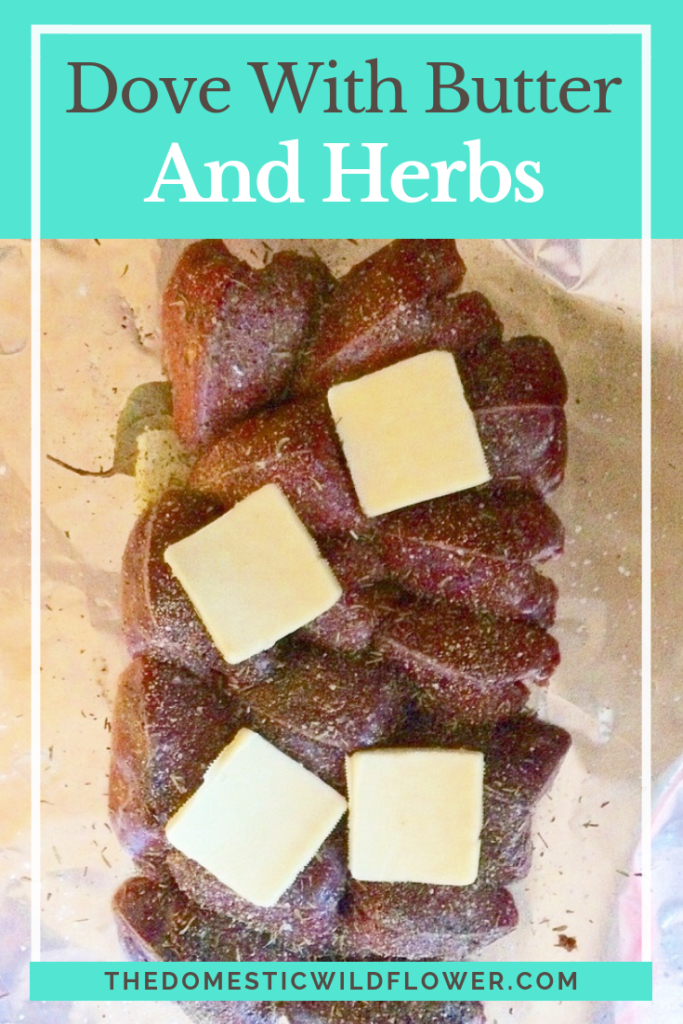
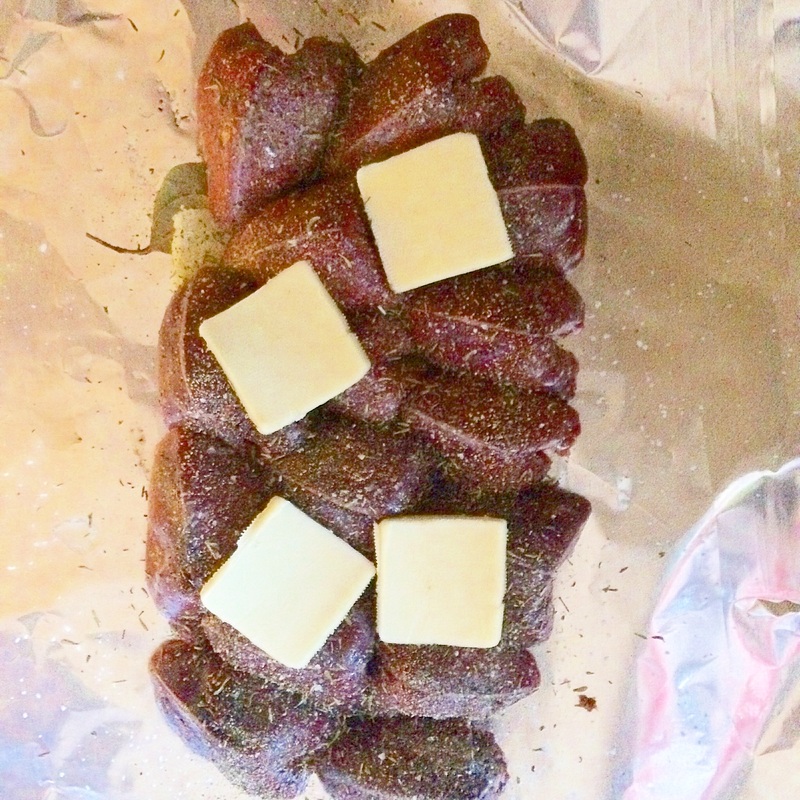
Dove and other birds have a tendency to be dry, and the key to a dinner that doesn’t end up in the dog dish is keeping the meat moist. Dove is a rather small upland game bird and the way our family loves them cooked is in a foil packet on the barbecue. The foil keeps the moisture in, and the butter and herbs are a perfect compliment.

Procedure:

Arrange cleaned dove breasts (that look charmingly like stylized hearts) on 2 sheets of aluminum foil. Doubling the foil is critical; without it, a hole in the foil is likely and you will lose all your butter. Beneath and atop the dove, add slices of real butter, adding up to about ½ a tablespoon per breast, give or take, erring on the side of more.

This isn’t a recipe exactly because it depends on how many your hunter or grocer has available. I had 10 breasts in these photographs so I used about 5 tablespoons of butter.

Tuck 3-4 bay leaves beneath the butter, and sprinkle with rosemary and thyme, salt and pepper. Add a few more slices of butter on top for good measure.

Dove with Butter and Herbs | A Domestic Wildflower click for this simple and delicious recipe!

Dove ready to be sealed in a foil packet and headed for the BBQ.

Fold up the foil packet, and if possible, fold in such a way that you could open it up while still on the barbeque. I fold the top down the way you might hold a brown bag lunch, for example.

Cook on the barbecue, on medium high, for 10 minutes. Dove is done when the meat is not bloody, and darker in color. You might unfold your packet a bit to peek and perhaps retrieve a breast to slice open. Just don’t spill the butter!

Pour reserved butter into a dish for dipping pieces of meat into. Alternatively, you could use it to make a gravy, which I haven’t done but I’m sure would be delicious, or you could pour on top of accompanying potatoes or rice.

I’m always looking for more ways to cook wild game, Wildflowers, so please share your favorites in the comments below!

Filed Under: Cook

Canning Roasted Bell Peppers

October 1, 2015 by Jenny Gomes Leave a Comment

Canning Roasted Bell Peppers

This is a versatile, simple, and easy recipe. Roasted bell peppers are divine on a toasted cheese sandwich, indispensable in Mexican dishes, right at home in Mediterranean meals, and so utterly useful that I run out every year way before canning season returns and I always wish I had made time to can more.

They are, however, time-consuming in one critical step. Once roasted (under the broiler or on a bbq), they have to be peeled by hand and they are usually piping hot, slippery, wet, and I always end up feeling like a roasted bell pepper myself. They are the kind of thing that you’d want to preserve with the help of a good friend and a cold drink. Perhaps with two of each, even.

This recipe is from the delightfully written and exceedingly useful Canning for a New Generation by Liana Krissoff. If you are interested in getting started canning, this is the book to buy. Unless you and I are friends and you plan on inviting me to your wedding in which case plan on receiving it from me as a gift. I mean it; I love this book!

This post may contain affiliate links. All opinions are my own. ​

Roasted Bell Peppers: How to Can Roasted Bell Peppers Recipe and Tutorial | A Domestic Wildflower click through to read the beginner friendly tutorial and make delicious and versatile roasted bell peppers!

The first step of roasting the peppers can be done earlier in the day than when you get your water bath going. Or, you can really create a sauna in the kitchen and do it all in one. Refer to my advice about cold drinks and good friends above.

It bears mentioning that this is an easy recipe to double, or otherwise adjust in quantity. You just need to have enough of the brine to cover the peppers and the quantities are pretty easy to divide and multiply.

You will need:

4 lbs of red or green bell peppers

1 cup bottled or strained the fresh lemon juice

2 cups white vinegar (6% acidity) (read more here about acid & canning)

2 teaspoons salt

1 cup extra-virgin olive oil

You can place whole bell peppers under the broiler OR you can cut the stem out of the bell and pull out whatever seeds and ribs come with it. I did it this way most recently and felt that it was a less hot mess to deal with when skinning.

Place peppers on the racks of your oven set to broil. Turn the oven light on, and be nearby with tongs. In my oven, the bells were ready to be turned the first time in about 10 minutes. This is awkward, hot, and difficult to the uninitiated because bell peppers aren’t exactly easy to turn and even a gal with a messy kitchen like me tries to not end up with bell pepper juice all over the floor. You might be well advised to place a cookie sheet or other pan on the lowest rack to catch the drips or errant little peppers. I’d be lying if I said I had the sense to do so, but as I write this, I feel like I definitely might do it next time.

Continue turning peppers till they are charred on as many sides as you can get beneath the broiler.
​

Roasted Bell Peppers: How to Can Roasted Bell Peppers Recipe and Tutorial | A Domestic Wildflower click through to read the beginner friendly tutorial and make delicious and versatile roasted bell peppers!

They will likely get charred and done at slightly different times, so as they are ready to be removed, place them in a bowl with a lid. As they cool, the skin will become easier to pull off.

Either while the peppers are cooling or while they are roasting, assemble the canning liquid that they will be swimming in and get your jars ready and water bath boiling. I like wide mouth half pints personally but of course, use what you have.

Once the oven is off, the lid is on the bowl and you’ve cooled off a bit with a said friend and drink, start peeling the skins from the peppers. This is not an exercise in perfection (nothing on this blog will ever be, Wildflowers) but in patience. Not all of the skin will come off, but all of the skin you do peel off will stick to the various surfaces it comes in contact with including your hands, clothing and the countertops. I usually stand with the compost pail to one side and the cutting board to the other, peeling and placing the done peppers on the board. If you are able, remove the bulk of the seeds as you work.

Here’s a short video of me in my tiny, steamy kitchen peeling peppers. It’s a casual Periscope broadcast but it gives an idea of what the peppers will look like before and after peeling.

Once they are all peeled, the bulk of the work is over and you should feel great excitement for all the yummy dishes in which you will use the peppers.

Bring the lemon juice, vinegar, oil, garlic, and salt to a boil in a wide preserving pan.

Follow standard water bath canning practice described in detail here or in any good canning cookbook and pack the chopped bells into jars and ladle the hot brine atop the peppers, leaving ½ headspace. Remove bubbles from the jar with either a chopstick or the back of a spoon and by pressing down gently. Wipe the rims carefully, as even a smidge of oil can thwart the creation of a seal. Add the lids and rings and return to the water bath pot. Bring to a rolling boil and process for 15 minutes.

And that’s it, Dear Readers! It is a recipe that I return to year after year and it is absolutely worth the chore of peeling those hot, slippery bell peppers. I’d love to hear how you’d use these up, Wildflowers! Please share in the comment section below to which dishes you’d add these peppers!

Filed Under: Can

How to Manage Housework When You are Busy

September 24, 2015 by Jenny Gomes 4 Comments

How to manage housework when you are busy is the question that every busy gal (and guy!) is asking and this post explains my strategy for staying ahead of it all. Read on for my best tips for how to manage housework when you are busy!

How to Manage Housework When You Are Busy! This post shares some great tips for getting control of your housework situation.


This post contains affiliate links.

I don’t have it all figured out. I don’t have it even ¼ of the way figured out. Being a mom is hard work and adding anything at all (a job, a rowdy pet, a messy, manly husband, a broken vacuum) and it starts to feel like you a struggle to keep your head above water. One strategy that I have found very helpful is described below and makes me feel as if, at the very least, that I am doing more than treading water and that I am in fact winning the daily war on chores. I’m inclined to think it actually does keep me a tiny bit ahead but the I’ll have to look back in 20 years and let hindsight make that determination.

How to Manage Housework

I feel like the appliances that we buy, borrow, rent, and bother to store and upkeep are like our little soldiers. They are our minions of service to help us battle laundry, dirt, and clutter. They should be working all the time. They shouldn’t get a break unless they are on fire. If I’m working, peeling potatoes or folding wash, those machines are going to be working too.

When I am driving up my bumpy dirt drive, I think through and decide on the appliances I’m going to put into immediate action when I walk through the door. Often it is the washing machine that is set into action first.

If you want to shop the items I suggest in this post, I have a rad little Amazon page that has them linked right here!

How to Manage Laundry

An aside on laundry: This is an area of housekeeping that I can say with confidence that I’m good. I’m solid on laundry. My kids don’t have TONS of clothes, and they aren’t often naked. I keep up on the cloth diaper laundry well, and have them ready for daycare almost always. My husband has very few work pants, shirts, and white tee shirts that he likes (*insert huge eye roll from me here) and he also goes to work clothed. I am weaker in the folding area, as my couch laundry pile demonstrates but I have the washing part down pat. It’s because I am in a fairly steady state of washing.

By rounding up the dirty laundry that is strewn from Hell to breakfast and depositing it into the washing machine (This is the one I love!), the floors are thus less cluttered and closer to a state of vacuum readiness. Turn that washing machine on, Wildflowers!

The laundry soap that I love is from Norwex. It is a no-filler soap which means it has no junk fillers that clog your machine, cost you money while not actually cleaning your clothes, and fade your clothing fibers. The soap lasts forever and ever and I highly recommend it.

I DO hang my laundry on the clothesline when it is warm enough and I wrote a really helpful blog post all about it here! 

How to Manage Dishes

The dishwasher needs to be running ASAP or the plates need to be soaking if you don’t have a dishwasher. Soaking before washing cuts scrubbing time significantly. If the dishwasher is running, then there are probably fewer dirty dishes on the counter tops, right? See how getting a few appliances turned on makes your home less cluttered, stat?

If you don’t have a dishwasher in your home or you rent, consider a portable, or even a compact portable dishwasher. This 18 inch washer was a total game changer for me. It rolls to the sink and connects via a hose in the back when it is full and rolls back over beside the countertop when it is done running. True, some days I run it twice but it was money well spent in my book. There are also countertop models you could explore.

How to Manage Picking Up the Floor

While you set those main machines into motion, your human minions may or may not be directed into putting toys away, bringing you said dirty laundry or dishes, or maybe just resting in a state of neutrality where there are neither dirtying nor cleaning. Insert fantasy of helpful, whistling children here.

I fantasized (and I mean that truly) about a robot vacuum for YEARS before I bought one. Years, I tell you! After a lot of research, and frankly after being sick of my floor NOT being clean, I chose one and ordered it.

My hesitation was, and rightfully so, that those robot vacuums would suck up any little Barbie shoe or Lego left on the floor. And that, my friend, is the beauty of it. Here’s what you do to manage picking up the floor. You can use the robot vacuum in just one room of the house so don’t freak out and think you have to pick up the whole house- you don’t. Go room by room. Start with the easiest room first- a spare bathroom even! Pick up the floor and make your children help you. Warn children that the robot will suck up stray toys (which removes YOU as the agent of toy loss and puts THEM in a position of responsibility, which I love) and turn the robot on. Close the door and move to another room and repeat if time allows. I block off an area with chairs if there’s no door available.

After some extensive YouTube research, the best budget robot vacuum I found and purchased was the Bobsweep Bobi Pet and I LOVE IT. It has a little microfiber cloth that mops while it vacuums, it comes with an extra beater bar, extra screws, a screw driver, extra microfiber mop, and more, and has a docking station with capabilities far beyond my interests.

I don’t let it “run wild” in the house when I’m gone because there are just too many chairs/edges that it might get hung up on and if I’m home it takes one second to scoot the robot back on course to vacuuming WHILE YOU DO SOMETHING ELSE and if you aren’t home to do that, then the magic is sort of lost.

My best tip if you get one of the robot vacuums is to keep up on the maintenance, which is true of any appliance really. Clean the beater bar, empty the receptacle, and follow the directions to keep that little soldier cleaning for you! If it gets a clog or somethings is the matter, it will display an error code, which is actually quite helpful. Refer to this YouTube Video and jot down what each error code means on a post it. Tape the post it to the top of the robot vacuum. Then, next time it says 03 Error, you’ll know to flip it over and check the beater bar. This robot vacuum has been such a great way to make my house a lot cleaner. It picks up a TON of pet hair, and forces the whole family to do a better job of picking up the floor. It’s amazing and is my favorite new appliance.

For when I want to vacuum my floor myself, I LOVE my Meile canister vacuum. It’s a high quality, easy to use, pet-hair sucking machine. I love that the hose is easy to take off the attachments and it honestly is the MOST valuable when I’m cutting my 4 year old son’s hair and he’s crying without end and I can vacuum the itchy hair on the low setting- it’s really such a nice vacuum. I think Dysons are garbage by comparison and I had 2 before the Meile. Can we still be friends if you are a Dyson fan? 😉

How to Manage Cooking

The crockpot and bread machine are other workhorses that, with a little planning, can set a homemaker ahead. The crockpot has gotten lots of press in recent years for good reason. For those of you new to the cooking game, here’s what they do: They cook food, slowly, likely with plenty of liquid but not necessarily, and can make cheaper, tougher pieces of meat tender and tasty. The feature that I depend on is that there’s no “done” time, with a bell ringing where you have to run, not walk, to remove the food. It’s like a “done” hour or two where you can shut the pot off. As long as there is water/beer/broth/can soup/other liquid in the pot, you’re not going to ruin supper. They’re awesome.

I will write a full length ode to the bread machine sometime soon but here’s the short of it. While I wouldn’t say you NEED a bread machine, I will assert that they are exceedingly helpful and if you can score a used one for free or cheap, they are a wonderfully useful addition. I even leave mine (handed down from my Gram) on the counter all the time and I have like 2.5 square feet of counter space in my whole microscopic kitchen. They are the unsung hero of the kitchen appliance world. The homemade bread you can crank out is top notch and it takes under 5 minutes to fill the compartment with ingredients. Many models have a timer that can be set so your bread is done at a certain time, so you could fill it in the morning and come home from work to the smell of baking bread. They are rad! If I really have it together, I can come home to baking bread and a simmering crockpot of stew. You can do it too, Dear Readers!

I also keep ahead of meal prep by canning. If you are thinking that canning takes a ton of time, I’ll challenge you by checking out some of my super fast canning recipes like my Raspberry Jam Recipe that’s completely done in under 30 minutes. If you are thinking that you don’t have all the gear it takes to can, you should check out my no-frills canning equipment checklist! Download it free right here!

If you want to learn more about how canning can save you time, dive into my FREE Canning Basics Course! It’s fun, easy, and I help you conquer the most common pitfalls beginning homemakers make when learning how to can.

Enroll Now!

So my strategy is a simple one. I get all appliances going that I can and then focus on more immediate concerns. That way, my little soldiers are cleaning and cooking for me while I complete tasks that can’t be automated or mechanized. Of course, my washing machine and dishwasher aren’t running all the time but by setting them into motion early, the likelihood of making time to put away dishes and clothing is increased and the surfaces of my home are clearer.

Shop this post on Amazon here!

Related Post: How to Clean Cloth Napkins

Filed Under: Clean

Craftsy’s Knife Skills Class

September 21, 2015 by Jenny Gomes Leave a Comment


How to improve your knife skills:
Complete Knife Skills with Brendan McDermott

I love classes. I do, I love them. I really dig getting expert instruction on something I care about. I am always looking for ways to work smarter, not harder, and classes can help a person do just that.

This post may contain affiliate links. All opinions are my own. ​

I have been a www.craftsy.com fan for a few years now because they have a terrific selection of online sewing classes. Because I lived so rurally, and am awfully busy, taking a sewing class or workshop in person is pretty near impossible. Finding tutorials on Pinterest or YouTube can sometimes be a home run, and other times it can be a time suck. Enter www.craftsy.com. Their classes are all a home run. I have taken a few sewing classes and this knife skills class and I have never been disappointed.

Unfortunately, I spend a ton more time in the kitchen in front of the stove than I do in front of my sewing machine these days. That’s okay; the babies will grow and someday I will get to sit down and sew…right? This shift in effort has meant I have been ever more interested in upping my kitchen game in any way possible which is why I watched every minute of this Complete Knife Skills class. My husband cracked plenty of knife + ninja jokes until he watched a little bit of the class with me and remarked immediately that we’d been cutting cilantro all wrong.

I had been cutting cilantro all wrong, and come to find out, I’d been cutting all kinds of things the hard way. I’d been wasting garlic goodness, risking my little fingertips, and using the wrong knife. I was a knife ignoramus and the handsome, tattooed, and raspy-voiced teacher Brendan McDermott brought me into the light.

This FREE class is a set of 4 videos and it comes with a couple recipes to boot. Once you register, you can access the videos any time you want, forever and ever, amen. The videos are easy to understand, the videography is pretty and clear, there’s no weird, distracting music and I found the teacher to be quite engaging indeed. If you watch them, you will cut better and more safely, and probably faster too.

So until I can devote the time I want to a sewing class (the craftsy sewing with sheers class is at the top of my wish list…sigh…) at least my kitchen time is shortened and improved because of this online gem.

Click below to try this FREE class!

Complete Knife Skills with Brendan McDermott

I am really eager to hear what you Wildflowers think of the class; Please share your response in the comments section below! What other Craftsy classes have you taken? Which class is on your wish list, Dear Readers?

Filed Under: Cook

Cloth Diapering Solutions: Tips for Cloth Diapering with Boys, Bigger Babies, and Bedtime

September 17, 2015 by Jenny Gomes 1 Comment

Cloth Diapering Solutions: Tips for Cloth Diapering with Boys, Bigger Babies, and Bedtime

Cloth diapering my daughter was a piece of cake. She never un-velcroed the diapers, she rarely leaked and was a relative breeze to potty train before she was 20 months. My son has proved to be a bit more challenging for several reasons, many of which are due to his little firehose that is already causing me grief. Here are my solutions for when cloth diapering is a little leaky.

This post may contain affiliate links. All opinions are my own. ​

My son is off-the-charts big which means he potties more at once than a featherweight baby. This means that one cloth insert is not gonna cut it at naptime and frankly during the daytime now that he is getting closer to 2 years old. There are a few things you can do if you are in a similar position.

  • Use one or more disposable inserts. These are sold by diapers and are one of the many reasons I LOVE this brand. They are made from totally compostable, biodegradable stuff (I like to say tree pulp and fairy dust but really I don’t know exactly what it is) and are a bit more absorbent than the regular cloth inserts. If you are reading this, it may be because you are currently soaking through and thus washing untold numbers of cloth inserts daily and you might appreciate the information that you can use the inserts. Go ahead; it is okay! I figure that because you are already saving tons of money by using the cloth, a “splurge” of the disposable insert at nap and night is acceptable. If you use two, and/or have a boy, consider folding one in half (they come folded so this is pretty intuitive) and layering the second on top flat.
Cloth Diaper Solutions for Boys, Bigger Babies, and Bedtime | A Domestic Wildflower click to read the solutions for this trickier cloth diaper scenarios for cloth diapering success!
  • Use a combination of cloth and disposable. You can layer a folded or flat cloth insert under a flat disposable insert with great effect. The only hang up is that you have to put one in the garbage or compost and the other in the diaper pail. Just don’t toss your cloth into the garbage can.
Cloth Diaper Solutions for Boys, Bigger Babies, and Bedtime | A Domestic Wildflower click to read the solutions for this trickier cloth diaper scenarios for cloth diapering success!
A wood pulp and fairy dust compostable diaper insert, a folded cloth insert and the trusty grant.
  • Use up to 3 cloth inserts at once. No, three isn’t too much. I have a heavy boy wearing size XL diapers and 3 fits. I am almost certain 3 fits in a size large also. I put one flat cloth in, hemp side up (because the hemp is what holds the moisture, I figured it would be best to keep it away from the exterior of the diaper…this is an art, not a science so feel free to experiment), a folded cloth insert, hemp side out on top, and then a flat cloth insert on top of the first 2, with the hemp down. This makes a nice hemp core that in my approximation keeps the leaking to a very low minimum. If you do 3 at once, you may need to fold the whole thing hot dog style a bit to get the elastic edges up into the crease of Baby’s legs.

Cloth Solutions: Cloth Diapering with Gdiapers for night, nap, boys and other leaky situtations

A hemp sandwich
  • You can try just folding one cloth insert hemp side out and layering one cloth insert on top. I use 3 at bedtime and 2 at naptime and any extended day play time.
  • If you are using more than one cloth, and are thus soiling way more cloth than previously, dig into the stash of small or medium cloth inserts you have nicely stored away in a labeled box 😉 I brought out the smaller sized inserts in a moment of laundry desperation and I now use the smaller ones folded in half beneath the large inserts in the day time and it works perfectly. It really buys you a lot more laundry time.
  • When diapering, make sure the elastic of the grants comes up to, if not over, the belly button. This is clutch for giving the little boy body plenty of coverage.
  • For bigger or older babies who have more predictable bowel movements, I think the liners are a wise investment because they save a lot of time shaking/jiggling/soaking #2 out and off of the cloth inserts. They are kind of like a stiff paper towel that sits atop the cloth insert, next to the skin and you can just lift it out of the diaper when it is soiled. It’s very handy indeed.

If your BM intuition gets really good, you can just use them when you are expecting to need them.

As for the velcro that busy hands like to undo: I put pants on my son and he forgets about it and when I occasionally forget, it takes quite a while for him to remember what fun it is to pull at the tab. Just go for pants for a while, Mama.

If you want to read more about why in the world you would choose cloth diapers, check out this post.

Here’s my post about shopping for cloth diapers.

And here’s my post about the dirty details of cloth diapering. 

Some of the above photos are indeed affiliated links but the opinions are my own, as always, and I would never share a product with my dear readers that I don’t own and love or would love to own myself. 

What solutions can you share, Wildflowers? Share your comments in the section below! Happy diapering!

– See more at https://www.adomesticwildflower.com/blog/cloth-diapering-solutions-tips-for-cloth-diapering-with-boys-bigger-babies-and-bedtime#sthash.i25wExKt.dpuf

Filed Under: Kids

  • « Go to Previous Page
  • Page 1
  • Interim pages omitted …
  • Page 55
  • Page 56
  • Page 57
  • Page 58
  • Page 59
  • Interim pages omitted …
  • Page 66
  • Go to Next Page »

Primary Sidebar

Categories

Follow me here, there, & everywhere!

  • Email
  • Facebook
  • Instagram
  • Pinterest
  • RSS
  • Twitter
  • YouTube

Search

Get The Pressure Canning Cookbook

Get 10 Free Recipes Now!

Best Chicken Coop

Footer

Get Started Pressure Canning

Shrubology Ebook

Shrubology: Refreshing Homemade Fruit and Vinegar Syrups for Cocktails
Make easy, no-cook fruit & vinegar syrups for cocktails & mocktails! This ebook shares crowd pleasing recipes and simple to understand ratios so you can make a shrub on your countertop any time- without a recipe. Dive into these Prohibition Era drinks today!

Copyright

Copyright 2019
The Domestic Wildflower
www.thedomesticwildflower.com.
All content created by Jennifer Gomes unless otherwise noted.

Copyright © 2025 · Lifestyle Pro on Genesis Framework · WordPress · Log in