• Skip to secondary menu
  • Skip to main content
  • Skip to primary sidebar
  • Skip to footer
  • The Pressure Canning Cookbook
  • Blog
    • Subscribe
    • Welcome!
  • Perfectly Preserved Podcast
  • About
    • ADW Manifesto
    • Work With Me
      • Read
  • Shop
    • My Account
    • Cart
    • Checkout

The Domestic Wildflower

Handmade Food & Craft Tutorials for Beginners

  • Courses
    • Free Canning Basics
    • Everything Canning Course
    • Steam Canning Workshop
    • Free Homemade Cocktail Mixers
    • Wildflower Mixology
    • Crochet Basket Workshop
  • Can & Preserve
    • Never Canned?
    • Steam Canner Equipment Bundle
    • Shrubs Course
  • Sew
  • Cook
  • Craft
    • Crochet Step-by-Step Guides
      • Crochet Basket
      • Giant Yarn Throw
      • Thick & Thin Throw
  • Living
    • Creativity Challenge
    • Clean
    • Kids
  • Rentals

Blog

Yoga With Kids Sequence: Busy Parents Yoga Part 1

July 20, 2015 by Jenny Gomes Leave a Comment

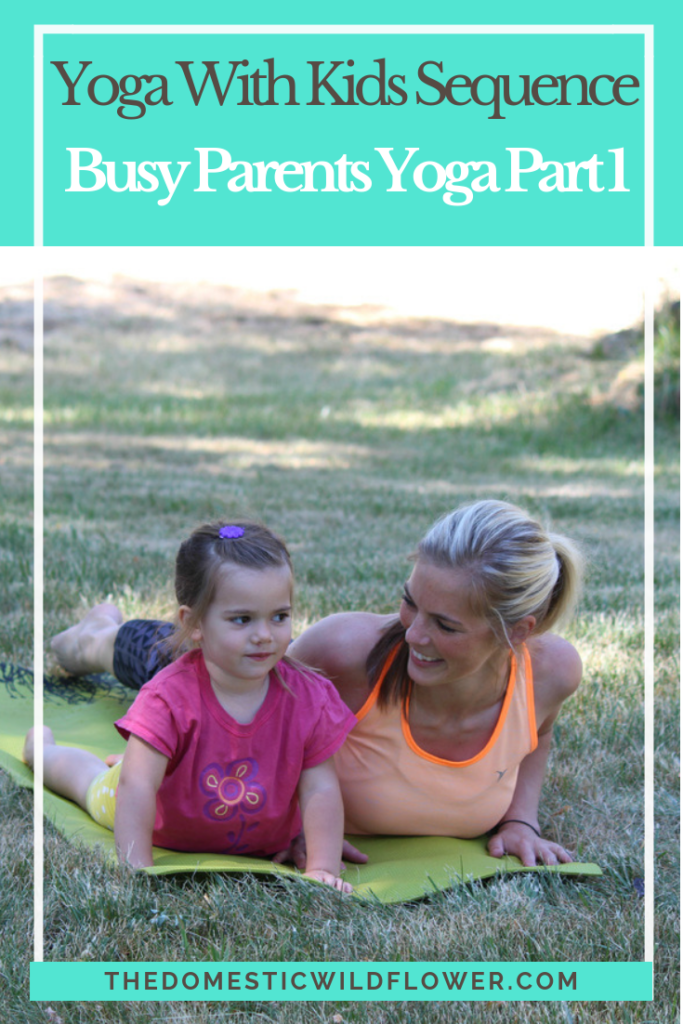
As much as I love slipping away for a full hour of yoga by myself, sometimes I have to squeeze a little yoga practice in at home with the kids. These are the poses that any beginner can try, that kids can follow along with if they want, and for the most part, leaves your eyes and ears available to keep an eye on your little darlings wherever you are practicing. You can mix the sequence up, and start and stop again if you have to attend to a mom duty. I broke the sequence into small sections so if you have a few minutes to try it, you can do just that. Part 2 will be a few more poses that you can try later in the week!

You can expect this whole sequence below to take about 20 minutes with some minor child distractions.

Spend as much time as you like in a particular pose, but shoot for three breaths and see how it feels. You know that great feeling you get when you wake up from a good night’s sleep and stretch in bed? That’s the terrific stretching feeling you are going for. Yoga should feel awesome.

For those who are unfamiliar with yoga, fear not. You don’t have to be flexible, strong, fit, or wearing yoga pants to get started. The idea is that as you are stretching and placing your body into these somewhat foreign positions, you try to focus on breathing (so you don’t forget to breathe!) and thus forget those three loads of laundry to fold. For me, yoga slows down the pace of motherhood and working womanhood significantly. There are oodles of research that all say the same thing: Yoga is good for you.

Here’s the sequence: 

Yoga With Kids Sequence: Busy Parents Yoga Part 1
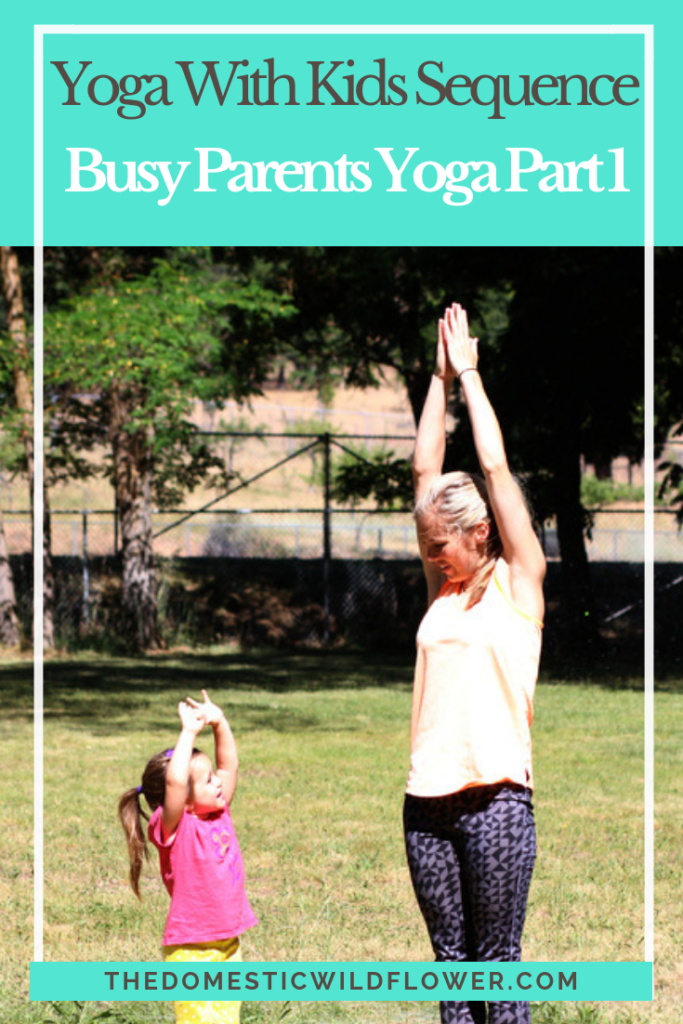
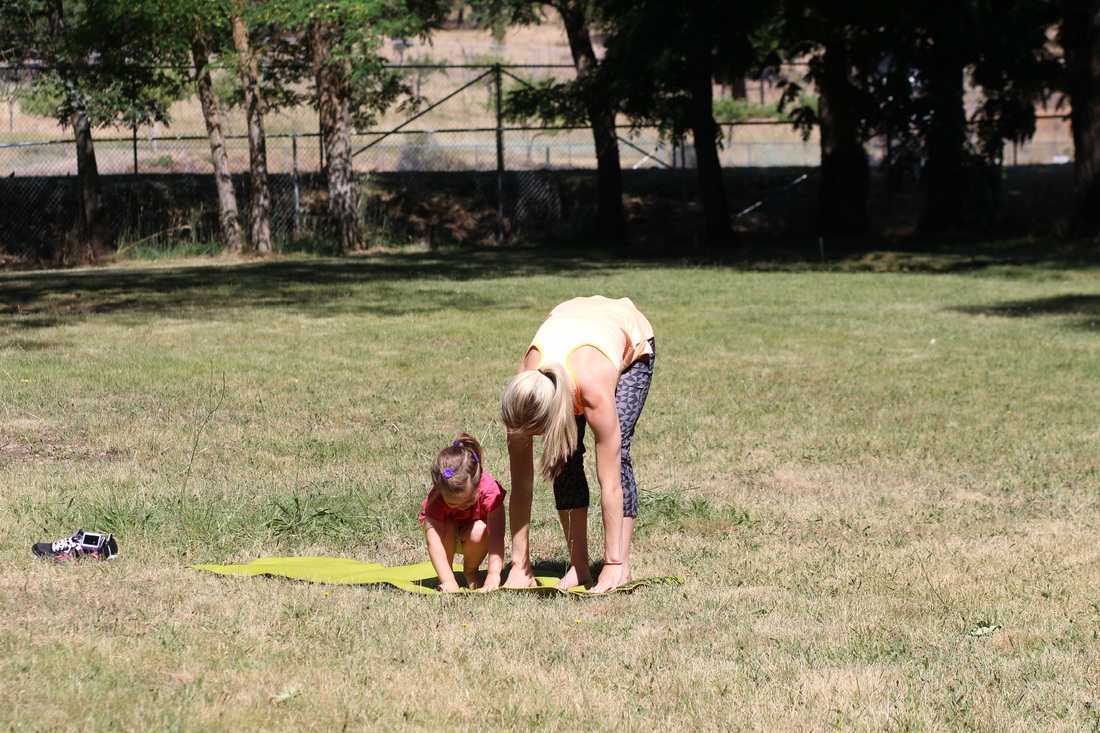
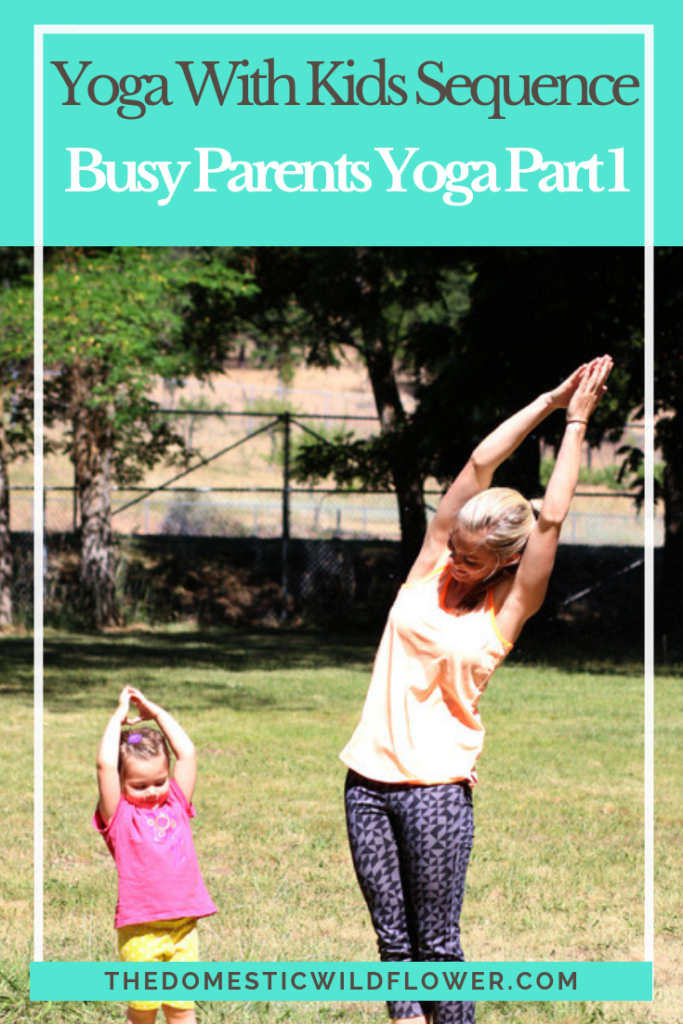
Arms Up: Inhale your arms overhead and if it feels good, touch your fingertips together. Lean over to the right, even just a little way, and imagine filling the left lung up with air, stretching the muscles along your side. Try it again on the other side.
Eagle Arms: Inhale your arms out to your side (perhaps cueing kids to make “airplane arms”) and bring them in front of you with the right arm underneath the left. Bend both arms at the elbows so your fingertips are pointing to the sky, and twist your arms up so that your right fingers are touching the inside of your left arm, wrist or palm. Let your shoulders relax down and away from your ears and maybe move your elbows up and down a bit to see if there’s a sweet spot in between your shoulder blades that needs a little love. This is a great pose for those holding heavy babies or after long hours at a desk. Unwind your arms, and try it on the other side, with the left arm underneath this time.

Picture

Picture
Swan Dive: Extend your arms out, like an airplane or a bird, bend your knees, and hinging at the hips, fold forward. Your knees don’t need to be straight as you hang forward. Focus on the divine feeling of stretch at the back of the legs, and clasp hold of your elbows if you’d like. Plant the hands and sink down to all fours.

Picture

Picture


Picture

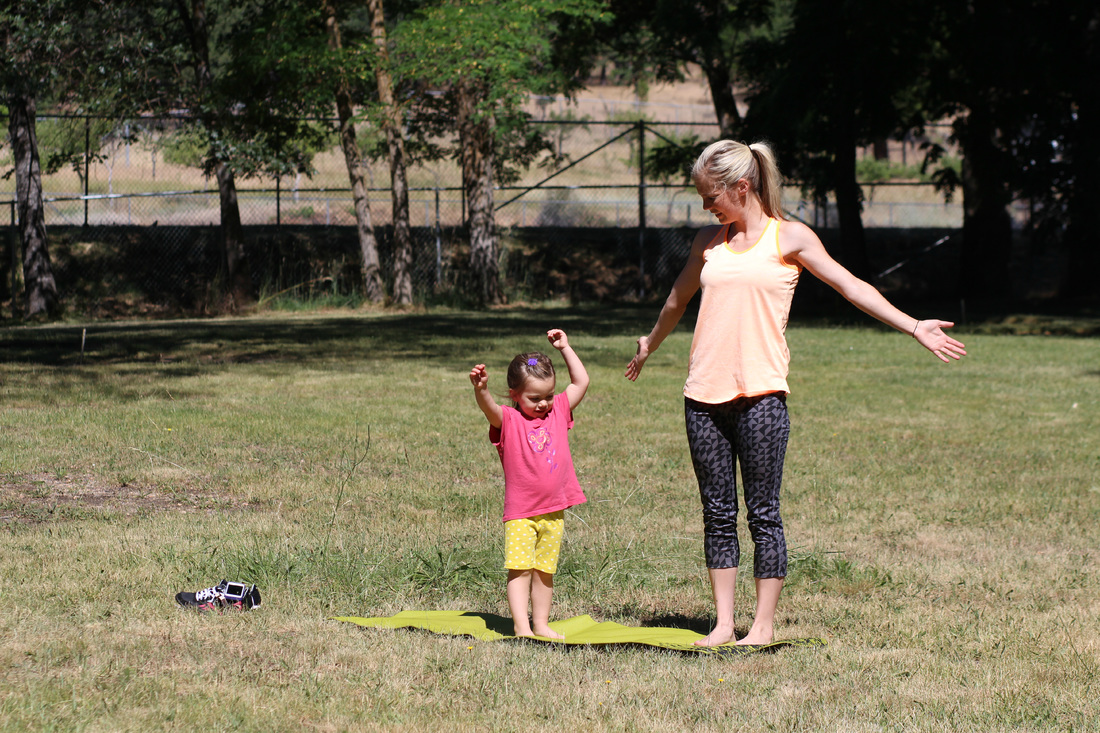
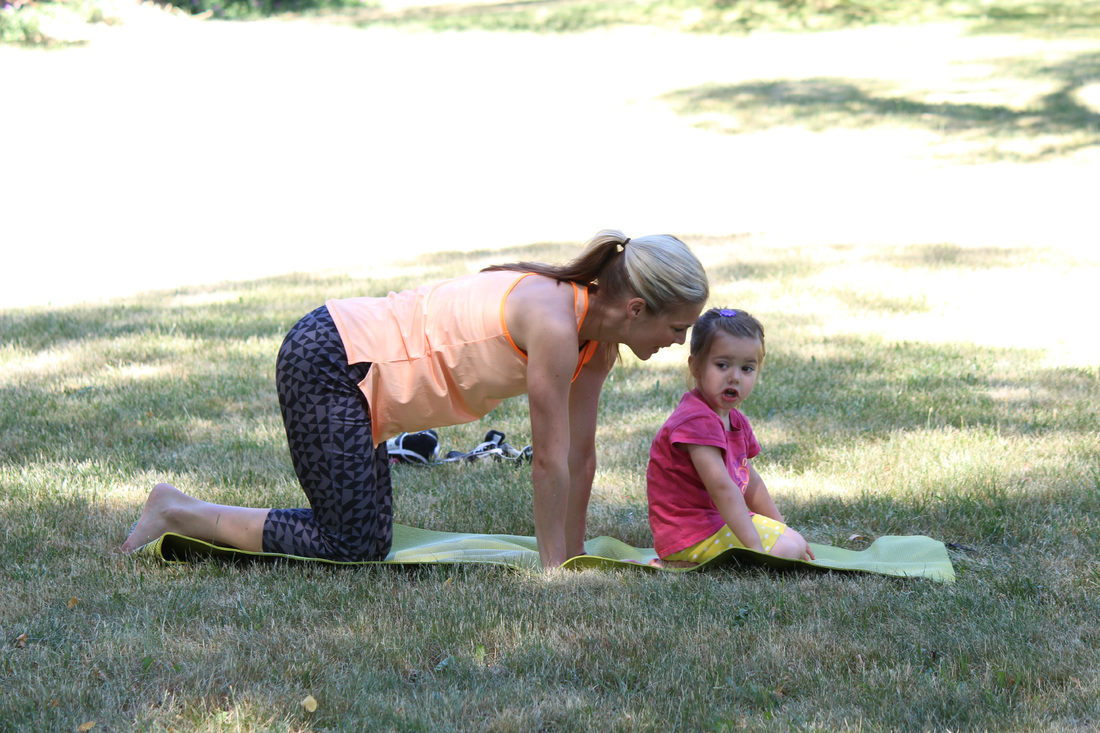
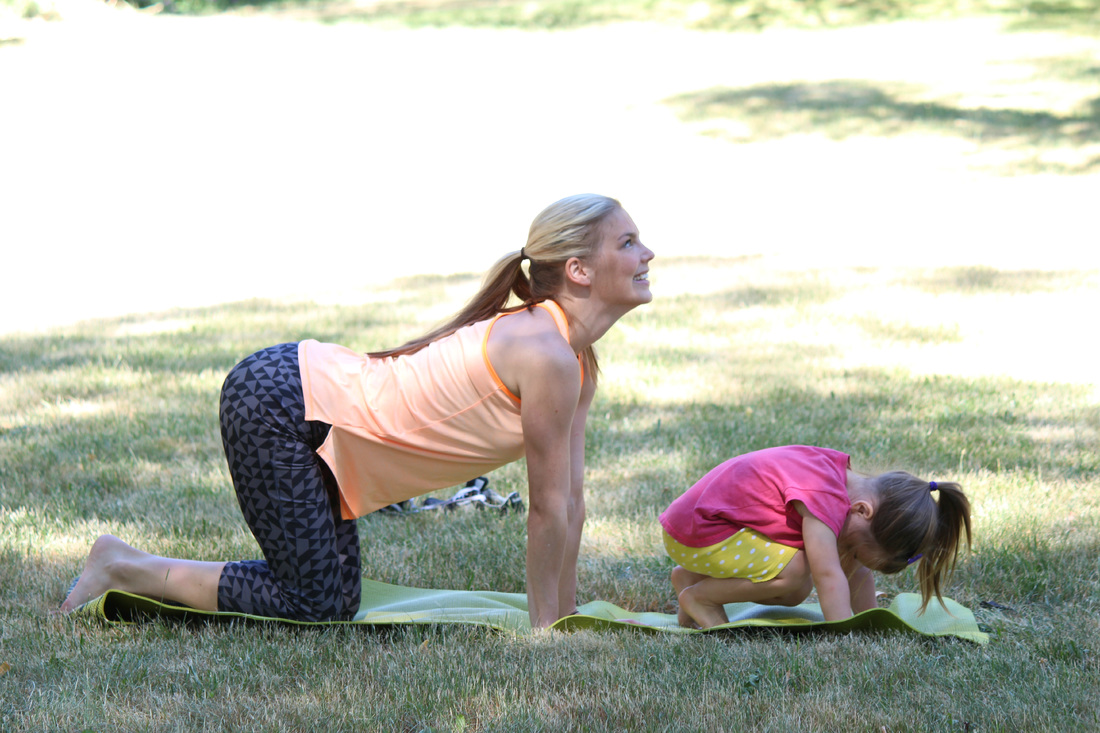
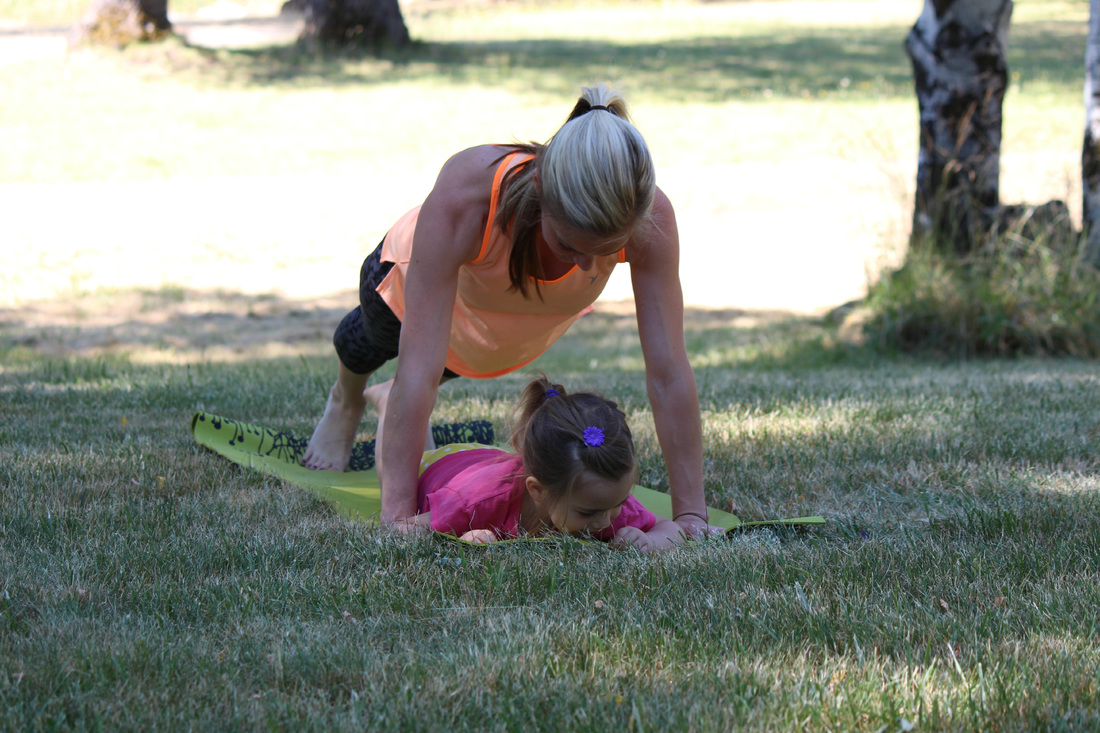
Cat & Cow: On all fours, push the mat away from you and push your spine up to the sky, much like a cat does. You can spend a whole breath or more in cat pose. Then, for cow pose, tip your pelvis forward and let your tummy sag like a hammock. Take your eyes to the sky and look up a bit with your chin. You can move in a fluid fashion from cat to cow and back again as many times as you like.

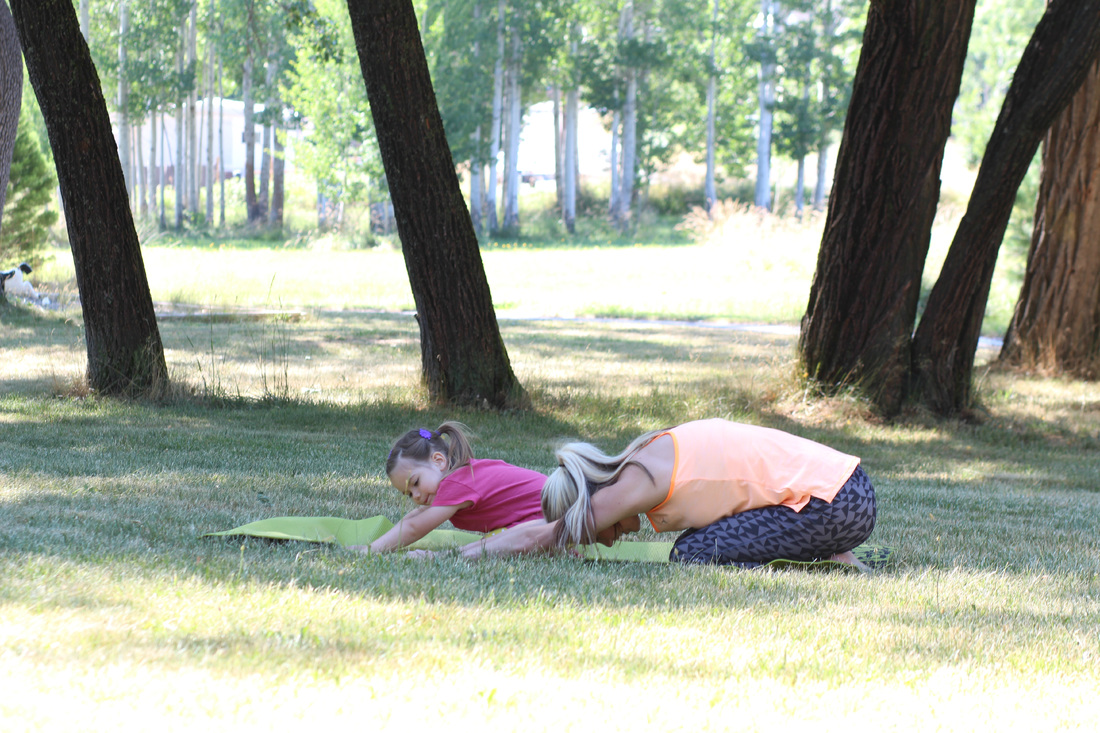
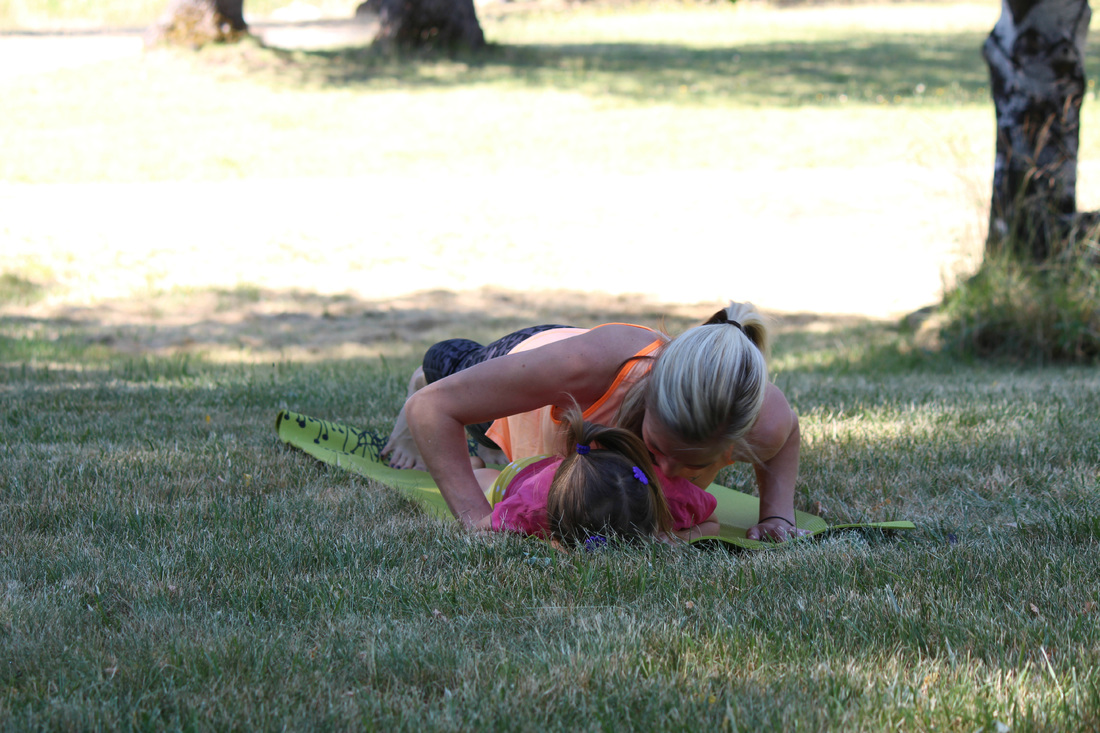
Child’s Pose: From all fours, sink down with either your knees together or wide apart. Extend your arms out, reaching actively with your fingers. After a few breaths here, walk your fingers over to the right, and then the left, and then back to center. This is the only pose that leaves you with your eyes to the ground rather than on the kids that may or may not be nearby, so don’t forget to peek up.


Picture

Picture
Downward Dog: From all fours, check to see that your hands are planted shoulder-width apart and your knees are under your hips. Curl your toes under and push up. Imagine pushing the ground away from you and drawing your hips up and back. Draw your shoulders away from your ears. Perhaps bicycle your legs a bit. Marvel at how flexible children are as they do this pose, and every pose with almost no effort.

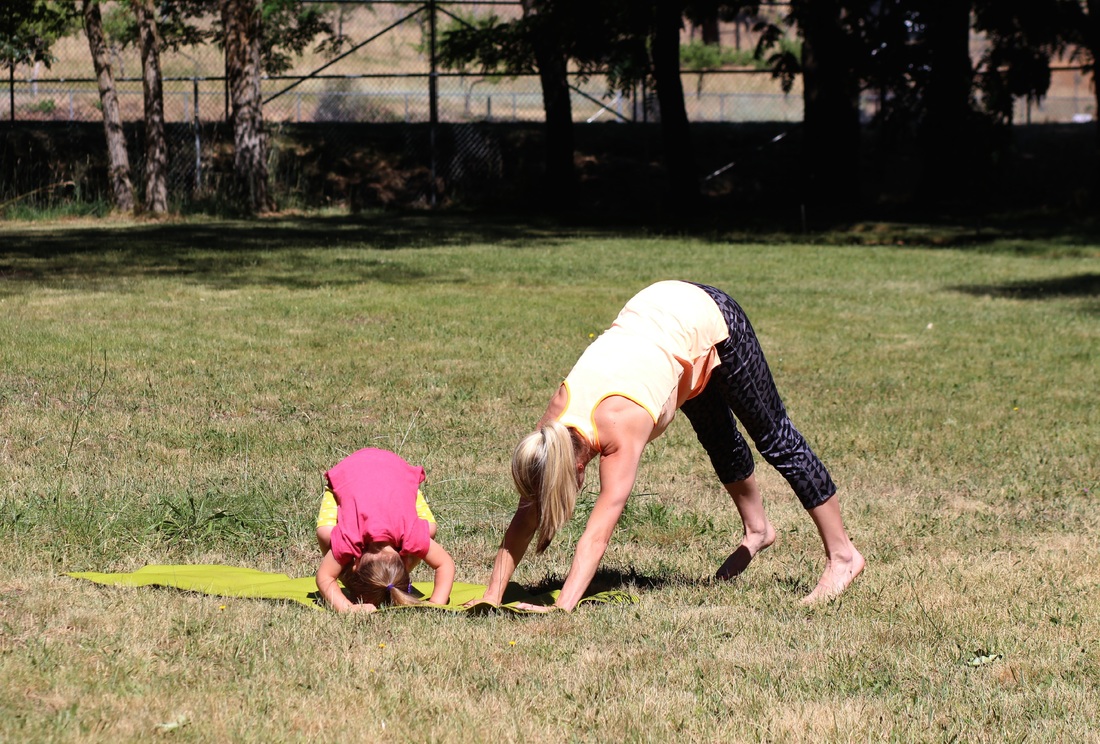
Three-legged Dog: From downward dog, take your right leg up to the sky. Bend the right knee and let your right heel come closer to your left hip. You should feel a great stretch all along your right side. Slowly bring your foot back down to the ground. Extend the left leg to the sky repeat. End in downward dog.

*Here is a good time for a rest, some water, or child’s pose to give your arms a break. 


Picture
Plank: From downward dog, come down into a push-up position known as the plank. Draw your shoulders down and away from your ears and drive your weight through your heels. Bring your knees to the ground if you feel wobbly. Engage your abdominal muscles for stability.

Picture
Crocodile: From plank, sink down into the bottom half of a push-up, known as a crocodile. As your upper body strength increases, you will be able to spend more time in crocodile. It is okay if you can spend just a millisecond in crocodile. Next time shoot for two milliseconds. You can rest your lower body on the ground as soon as you need to.

Yoga with Kids Sequence | A Domestic Wildflower
Cobra: From crocodile, place your hands beneath your shoulders. Bring your ankles and big toes together and make your legs active and press into the ground. Engage your back muscles at the same time so your upper body comes up off the ground. Test yourself and see if you can keep your upper body up off the ground and lift your hands up a bit. You can expand on this pose by gently lifting your upper body up higher by pressing your hands into the ground and lifting higher still.

Downward Dog and transition to standing: From Cobra, you can either come to all fours and then into downward dog or push straight into the downward dog from a cobra. Spend as much time here as you’d like. Walk your feet toward your hands, bend the knees, extend arms out like an airplane, and slowly come to standing, bringing your ankles and big toes together.

*Here is a great place to stop if you need to, or you can just continue on to the next pose in my next post!

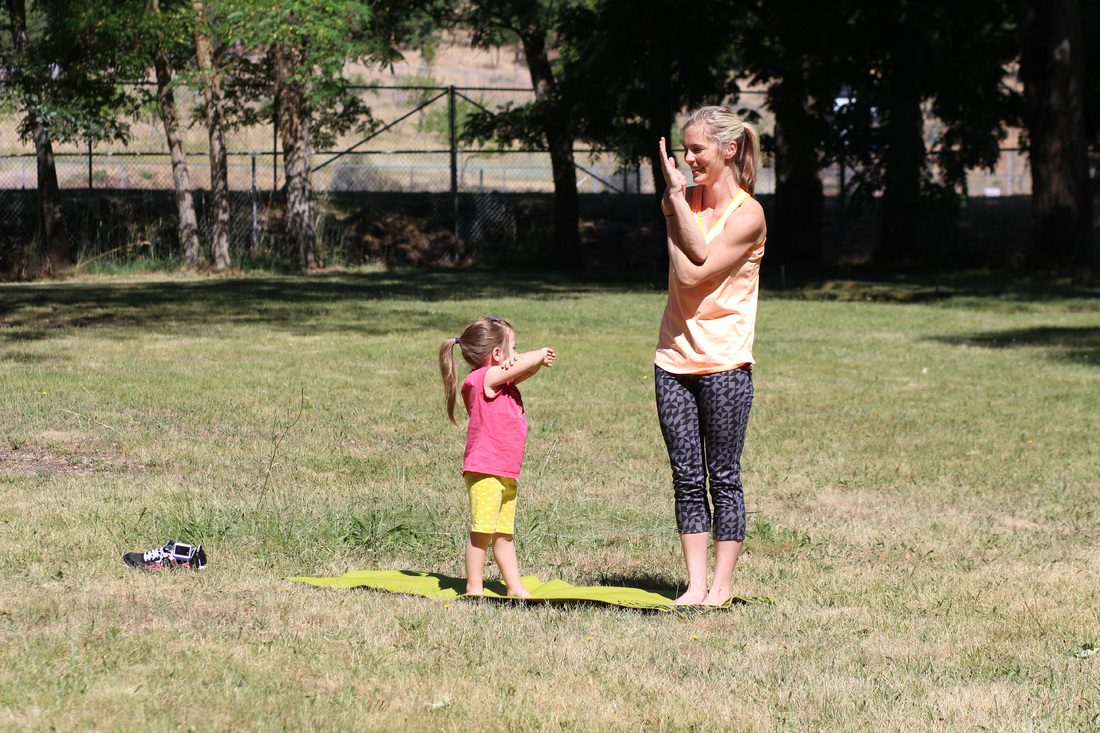
Share in the comments below if you think you can squeeze a little yoga into your busy day, Wildflowers! If so, which poses did you enjoy the most?

Yoga With Kids Sequence: Busy Parents Yoga Part 1

A big thank you to Circle Bar Photography for taking these photographs of me and my darling. 

Filed Under: Yoga

How to Create Greeting Cards from Found and Salvaged Papers

July 13, 2015 by Jenny Gomes Leave a Comment

This post is mostly about getting over the mental hump that some of us are hampered by that one has to spend money to extend kind written words in the form of a card. I love snail mail and cards of all kinds, including the kid-created version here, and I long ago got over the worry that a card recipient would judge me or my card negatively because it was homemade. I have created many cute and completely free cards over the years with found or salvaged papers. Here are some examples to get your creativity flowing the next time you need to open your feelings.

I wrote a baby shower card on an orange paint sample card and I’ll never forget how my dear friend laughed at how “me” it was to do that. You can do that too! There is beautiful paper all around us and one only has to think outside the box to see it. The next time you purchase something, examine the packaging that was already paid for, and is likely destined for the trash can, and see if it can be repurposed. This applies for gifting also. A great friend gave me a baby gift in a lime bag- as in the bag the limes came in from the store. It was adorable, matched the stuffed alligator inside, and I reused shortly thereafter for another gift. That, my friends, is the epitome of sensibility.

The photos for this post show a box that a pair of Stella & Dot earrings came in. I fell in love with the box, cut if flat, and saved until I needed a card. I cut the rectangles, wrote in colorful sharpie my salutation on the back, and sent. I didn’t have to remember to search for a card in a store which is clearly a time saver.

I have confessed in other posts that I am no wizard in the paper arts but if you were such a wizard, there is no limit to the darling things that could be created, for free or nearly free, with minimal effort, with found papers. I am limited in artistic ability and am in a state of near constant haste so my cards are often limited to cute paper and a colorful pen. No one has ever sneered at my cute homemade card, at least to my face though perhaps they have worried to themselves what others might think if they did something so unconventional.

Well, Wildflowers here’s to the sensible, the unconventional, and the creative! What cute, brave, and clever ways have you reused paper? Share your ideas in the comments below and next time you have to send a card, be willing to be a little unconventional!

Filed Under: Craft

Hands Down Card: An Easy Activity to do with Kids

July 13, 2015 by Jenny Gomes Leave a Comment

I am a wholehearted lover of snail mail and handmade cards. I am actually pretty terrible at the paper arts but I thoroughly appreciate the intricate and beautiful things folks who love scrapbooking and zigzag scissors can do in the way of creating cards. My comfort level is in the textile arts, and in a flaw of character, I generally stick to my strongest suit.

I usually keep my card creation simple and glue-free but since I have had children I have dabbled more into the mysterious realm of paint. My current and ultra creative babysitter (I’ve been blessed with several awesome sitters, hallelujah!) showed my daughter how to make this card and we have been making Hands Down cards for every occasion since. I think it is a good starter card for the art-phobic and I love how it customizable for any event. For example, you could change up the tagline and say, “Let’s Give You a Hand” or paint a little foot and do a footprint; there are lots of options. It is satisfyingly messy without consuming an afternoon with clean up and captures tiny hands (that grow so fast!) on paper. Sigh. Read on for the easy how-to!

Paper: I have used construction paper and fancy-ish watercolor paper and the white paper pilfered from the printer. Skip the printer paper and use anything a bit sturdier if it is around.

Paint/Ink: I have used watercolor paints with the best success because it is easiest to get on a wiggly hand quickly and while it might be drippy, I think it’s my favorite so far. I have used a washable marker which is not as washable as you might hope nor does it stay wet enough for long enough to make an amazing print. I haven’t tried acrylic or the thicker poster-type paint because I don’t have any on hand (I admit, I’m somewhat art project phobic) and it seems really messy. I think it would make the shape of the hand nicely, but not the actual finger print that the watercolor does so well. You choose.

Process: Get paper and materials ready. With particularly young or wiggly children, I’d do a dry run where they practice placing their hands on the paper and letting you lift their hand off. My daughter is 3 ½ and we haven’t had an age-related mess yet. Paint the hand quickly, and don’t worry about getting in the chubby creases of the fingers or palms- that’s part of the cuteness. Place hand palm down and you might press the back of the hand a bit to get the palm printed firmly and help the painted child pull their hand off the paper. Either live life dangerously and paint the second hand and hope they can keep the still paint-y hand off you, your hair, etc. or wash hands and repeat for the other side.

Print: Depending on the age of the child, you or they can write the salutation. I love my multi-color Sharpies but they are definitely off limits for my daughter and she was ok with that. Soon, she will want to do her own writing and we will use the washable markers for that.

Now it is signed, sealed and ready to be delivered! Easy and fast, this craft is a hit with relatives who want to admire a child’s handiwork. It also exudes a homemade air that may or may not be present in other areas of your life so I’d embrace this one and go with it!

Share in the comment section below any other easy art projects you have done with kids! Happy crafting!

Filed Under: Kids

Very Inspiring Blog Award

July 9, 2015 by Jenny Gomes Leave a Comment

Very Inspiring Blogger Award| A Domestic Wildflower click to read what inspires this crafting, sewing, DIY, canning blogger and see why she's so inspiring!


I have been honored with the Very Inspiring Blogger award by Hannah of Palindrome Dry Goods. Her blog is spot on and her taste in fabrics is delicious. Check her blog out here and Etsy shop here.

Here’s how the award works!

Award Guidelines:

1. Thank the person who nominated you and add a link to their blog.

2. Display the award logo in a blog entry

3. List the award guidelines so your nominees will know what to do

4. State 7 hidden facts about yourself OR 3 things that inspire you.

5. Nominate other blogger friends for the award.

I will choose to share three things that inspires me with you all.

  1. Fabric

Fabric is as much a part of my memory as smell or music is the rest of us. When I see fabric from my past- the heart print sheet set from when I was a little girl, the jewel tone floral from the couch cushions my mom made, the mod polka dot print of my first day of teaching school skirt- I can recall instantly, effortlessly, the feeling of the time when I wore or felt or enjoyed the fabric (or didn’t enjoy, like the scratchy green lame’ sleeves from when I was a wintertime flower girl). I remember what each interviewer wore when I was interviewed for the Ford Family Scholarship when I was a senior in high school and when I applied for my first and only teaching job. I remember what many of my students wore on their first days of school, all eight first days that I have taught.

For me, fabric choice is such a deliberate and personal thing, and though often free and easy when I’m standing in my closet or in the fabric store, I read into it a great deal. So when I’m checking out what someone wore to an important event, it isn’t with a negative eye. It is me making a memory and trying to discern what consciously or subconsciously the wearer was trying to feel by choosing it. When I open dusty boxes of old fabric belonging to my Gram or other relatives I feel a great excitement and privilege, like I am seeing paints belonging to Botticelli or Michelangelo. This is all so, so “fabric nerd” of me but I will wear that label with pride. Fabric inspires me big time.

2. My Gram

My grandma Glory Ann inspires my creative process in many ways. She’s a realistic and practical sewist. I often think, “What would Gram do?” when faced with domestic dilemmas. She is 83 years young and has lived through some very tough and some very wonderful things. Because of her unfailingly kind and sensible influence, I am a better, more practical, reflective, and more realistic sewist and person.

She would never splurge on yards of fabric without having a plan in mind for their use, for example. She and I might come up with a realistic plan on the spot in the fabric store, but we aren’t gals without a plan. When I make a mistake cutting, I admonish myself to be more like her, to read the directions more carefully before taking out the scissors. When I need to rip out a seam, I try to recall her saying, “Oh, it will be all right!” and laughing about a sewing misstep. When I suggested trying out an old, found pressure cooker without getting the gauge checked and without the instruction book, she wisely recalled a kitchen explosion of her own where berries and glass ended up in her ceiling. I thus got the pressure cooker checked.

Frugality and thrift are popular buzzwords now but until you see the large sack of zippers my Gram ripped out of worn-out garments and saved her whole dang life for future use, I’m afraid you aren’t understanding the real philosophy of “make do and mend” the way she (and other awesome ladies of a certain age, time and place) does. I’m working my way through her sack of zippers, one project at a time, and I’ll never forget to ask myself, “What would Gram do?”.

5754848_orig

3. Saving Money

It is all well and good to say that money doesn’t matter but it does. It matters a lot. It matters a lot to me because I see money as time. The more money I make plus the less money I spend equals more time. I want all the time I can at home with my kids, spending time doing things I want to do. I love my job and am lucky to have a well-paying job that is so enjoyable and I wish the same for all of my students. But, I am inspired by those who figure out a way to make something last, make it for less, and make something better. If money-saving steps like hanging laundry out to dry (in my post here) and saving some strawberries from the compost pile (here and here) can become automatic, our lives improve in ways we can’t measure in dollars and cents. I was lucky enough to have some very frugal women in my family (my mom and Gram above, specifically) teach me how to do things the smart way, as opposed to the easier, and often more expensive way, and thus I spend very little time thinking about money now. I want to work smarter, not harder, and I’m inspired by anyone who does just that.

I’d like to nominate Elena of Randomly Happy. Her sewing technique is top notch and I love her choice in fabrics. Her writing style is smooth as silk as well. Be sure to check out her very inspiring sewing blog!

What inspires you, Wildflowers? Share in the comment section below!

3071219

Filed Under: Living, Sew

How to Hang Laundry On the Line the RIGHT Way + the BEST Detergent!

June 29, 2015 by Jenny Gomes Leave a Comment

How to Hang Laundry On the Line the RIGHT Way + the BEST Detergent!!  Read on for tips for drying your clothes on a clothesline plus read about my favorite laundry detergent!
How to Hang Laundry On the Line the RIGHT Way + the BEST Detergent!
This post contains affiliate links.
Not only is a clothesline full of wet laundry idyllic and romantic, it is frugal, sensible, and not much work at all. Hanging your clothes out to dry imparts them with a delicious fragrance that cannot be replicated nor poured from a bottle and it saves on the damage the high heat of a dryer causes (goodbye fried underwear elastic). Whether a washline conjures for you images of the country or of Mediterranean apartments high above the stone streets below, you can employ a few of these techniques to dry your clothes the old fashioned way.

When you pull a load of clothes out of the dryer, it is a jumbled mess. When you pull clothes from the clothesline, they can be pulled in an orderly fashion which saves the time of sorting tiny baby socks stuck to the inside of grownup pant legs and the like. You can do a lot of the sorting and folding work while putting the clothes out to dry rather than fighting a static-y mess from the dryer later. *Genius.*

Clothesline 101

Before you decide you can’t use a washline because you haven’t the space, let me share the virtues of the clothes rack. The ones I have used and loved have all been wood but I know some are made of metal also. I have one made by Robbins Home Goods out of Maine and it has served me well for over 8 years. Yeah, it is kind of a big awkward thing but it folds flat and can be stored behind a door or under a bed when I’m not using it, which is almost never. This is the one I have and love.

My sister uses the wooden rack that my Great Grandmother used and it is still as sturdy as can be. You can buy a really simple and surely flimsy one at a big box store for about ten bucks but I’d recommend making an investment in a sturdy one that you can hang more than one load of laundry on at a time. They are advertized based on the number of drying feet they feature. Mine has about 50 feet of drying space, for example, and I fit about a load and a half on it. I use it by the wood stove in the winter and on the deck in the summer. A rack also cannot be beat for drying sweaters and delicates.

If you do have the space, a clothesline can be terrific. My clothesline is cotton twine tied with a Munter hitch (a knot that isn’t as fancy as it sounds) between the beams on my deck and it works perfectly. When choosing the site for a clothesline consider that while you don’t need direct sun, it is best if air can move around. Remember also that tree pitch and other organic matter can fall from above onto your clean laundry so plan accordingly.

When choosing clothespins, I’d look for a strong spring over anything else. I prefer wood because plastic ends up breaking eventually but if you see some of any variety at a second hand store or in someone’s attic, use them. You can keep your clothespins on the line or you might find it useful to make a bag for them that hangs on the line and is never far away.

How to Hang Laundry On the Line the RIGHT Way

There’s a knack to pinning clothes on a line to limit the tell-tale dried-in pinch marks and I hope my photos demonstrate how to prevent that. The way you lay clothes on the rack or line is how they will dry. If the pant legs are wadded up, they will dry that way, and slowly too because wrinkles dry more slowly that smooth fabric.

When I look at my basket of wet laundry ready to be hung, I pick a category of clothes or a person they belong to and hang those up together so when they are dry, I can fold them on the spot and then put them directly into the correct drawer.

This means that I hang all my son’s tee shirts together, in a row, then my daughter’s shirts, then their pants respectively.

Yeah, sometimes I don’t see a little boy shirt till the end and it ends up next to my underwear but for the most part it works. All of my husband’s work tee shirts get hung together, upside down, in a row, for example. By doing a good job of smoothing the fabric as you hang it and by sorting as you go, you save a lot of time. If you have a warm day and the air is moving, you can bet the dry time can be much faster than in the dryer and the process is completely free.


How to Hang Laundry On the Line the RIGHT Way + the BEST Detergent!

How to Hang Laundry On the Line the RIGHT Way + the BEST Detergent!
Notice how the tee shirt isn’t folded over the line? I like to pin them so they aren’t folded over so they are completely flat like this so they don’t look “hung up”

How to Hang Laundry On the Line the RIGHT Way + the BEST Detergent!

Jeans and towels are the items that most people seem to insist upon drying in the dryer. Some jeans need to be shrunk up to maximize their fit and God knows I wouldn’t want anyone in saggy-bottom jeans. I grew up with super scratchy line dried towels and I like the feel of them but I get it; some of you want super soft towels. In these scenarios I’d suggest line drying till they are halfway dry and then tossing in the dryer. You’d probably be pleased.

How much money does using a clothes line save? There’s a lot of things to factor in, and math is not my strongest suit but I can say that in my family of 4, in the dead of winter, our electric bill is over $250 and in the summer it is often under $90. We have an electric water heater and wood heat. Also consider that in the summer I probably do fewer loads all together because shorts and tees take up less room in the laundry basket than do pants and sweatshirts, but overall, I know that it indeed saves money.

The Best Laundry Detergent

As for the laundry detergent I’ve been happiest with, I can’t say enough good things about Norwex. Their laundry detergent UPP is  free of fillers which can be anything from chalk, sheet rock ground peanut, whale bones, and other nonsense that doesn’t belong in your laundry. I learned about fillers at the end of my cloth diapering journey when I got my new, high efficiency washing machine. As nice as it is in some ways, it uses less water which means it simply doesn’t wash out those fillers as easily. Couple that with the hard water in my area and my cloth diapers weren’t absorbent, my whites weren’t bright white anymore, and my clothes felt…you know that feeling when you don’t wash the conditioner in your hair out all the way? My clothes felt like that. The Norwex Ultra Power Plus laundry detergent is free of fillers so my clothes are clean AND I appreciate that every dollar I spend on detergent is actually purchasing soap…not chalk that I have to fight to remove from my clothes on the next load. If you want to check out this wonderful detergent, talk to my friend Cassie. She’s a mom who sells this really high quality laundry soap, along with other family friendly cleaning products. I’m also in love with their mop… but that’s a topic for another blog post 🙂

If I haven’t convinced you to hang your clothes on the line and get vastly better laundry detergent yet, check out this lovely infographic. It outlines all the ways you can save money during the laundry process.


How to Hang Laundry On the Line the RIGHT Way + the BEST Detergent!

Source: Fix.com

You might love to read my post about how to make your own dryer balls right here next!
What do you think, Wildflowers? Share your washline tips in the comment section below! Happy washing!
How to Hang Laundry On the Line the RIGHT Way + the BEST Detergent!


SaveSave

SaveSave

Filed Under: Clean

  • « Go to Previous Page
  • Page 1
  • Interim pages omitted …
  • Page 59
  • Page 60
  • Page 61
  • Page 62
  • Page 63
  • Interim pages omitted …
  • Page 66
  • Go to Next Page »

Primary Sidebar

Categories

Follow me here, there, & everywhere!

  • Email
  • Facebook
  • Instagram
  • Pinterest
  • RSS
  • Twitter
  • YouTube

Search

Get The Pressure Canning Cookbook

Get 10 Free Recipes Now!

Best Chicken Coop

Footer

Get Started Pressure Canning

Shrubology Ebook

Shrubology: Refreshing Homemade Fruit and Vinegar Syrups for Cocktails
Make easy, no-cook fruit & vinegar syrups for cocktails & mocktails! This ebook shares crowd pleasing recipes and simple to understand ratios so you can make a shrub on your countertop any time- without a recipe. Dive into these Prohibition Era drinks today!

Copyright

Copyright 2019
The Domestic Wildflower
www.thedomesticwildflower.com.
All content created by Jennifer Gomes unless otherwise noted.

Copyright © 2025 · Lifestyle Pro on Genesis Framework · WordPress · Log in