Let me digress and share briefly why I love dark beers, stouts, and porters in particular. There are a time and place for light beers and you’ll never catch me criticizing the quenching Corona & lime beach standby but I really, really enjoy a dark beer. Dark beer has a much more complex flavor profile in a way similar to that of white bread versus whole wheat (or other whole grain, for that matter). Dark beer can have notes of chocolate, smoke, vanilla, and other flavors that clearly compliment sweets like ice cream. The particular variety that you should seek out for this recipe is up to you, but I’d encourage an oatmeal stout for the same reasons oatmeal cookies are the standby in an ice cream sandwich. See? You don’t need a food science degree or be a foodie to see that it is a combination worth trying. The higher alcohol content of most dark beers takes this small serving of sweets from really good to positively divine.
As for the ice cream, I typically choose a good quality vanilla bean or chocolate. The chocolate and stout can be pretty rich but sometimes you really want something rich. This would also be a good occasion to make your own ice cream. I’m a big fan of using fewer ingredients of higher quality with fewer steps and this is one of the many examples of how I do that in my little kitchen.
Here’s the how-to:
Scoop 2 scoops of ice cream into a jar. I like the wide mouth pint in this application, but use what you have that is more like glass and less like a bowl. You’ll want to drink what remains when the ice cream is melted, I promise.
Slowly pour the beer over the ice cream, being wary of a slow and steady eruption of foam that may occur. I consume about a third of a bottle of beer (so small a quantity, I know) with a scoop of ice cream. Get crazy and use a whole half a bottle, Wildflowers; I won’t tell anyone. I use a super handy beer bottle cap designed to keep it from going flat so I can have a fresh beer for the next night. If you are hung up on the ice cream to beer ratio, go with whatever you’d do for a root beer float.
Some like to leave the ice cream in beautiful ice cream-bergs to slowly melt at their own pace but I like to break the ice cream up with my spoon so there are ice cream and stout in every bite.
Cheers, Wildflowers! What ways will you enjoy beer and ice cream, together or separate, this summer?
Being a bridesmaid is an exciting honor that many women are graced with yet many haven’t any idea how to be an amazing bridesmaid. I have been lucky enough to be a bridesmaid 6 times, I have been a bride myself, and I’m sure I’m not done yet. Here’s my list of the most important things to remember in order to be the best bridesmaid ever and in turn, have an amazingly good time doing so.
- Understand that this is NOT about you. Really, it is not. A wedding is about two people publicly committing to marriage and celebrating their love and that commitment. A bridesmaid’s role is to help with the process of putting together the celebration and supporting the bride through the complicated act of getting married. You have to understand that your friend is about to go through a whirlwind of excitement, activities, and emotions. It doesn’t matter if coral doesn’t really compliment your skin or if you prefer flats over wedges. It doesn’t matter if you’d like to go somewhere warm for the shower or bachelorette party and the destination is somewhere alpine. You are not the star of the show. You are not the center of attention. It is not about you.
2. Be ready. On the big day(s) (wedding day, bridal shower, etc) set aside your needs and troubles and be your A+ self. Do your best to be early, prepared, and ready to help. If you are not feeling well or stressed about something: Suck it up. Your job is to do everything you can to help your friend have a wonderful and well-executed time. That may mean that you have to drive Great Aunt Milly to the florist to get a corsage even though you have never been to this town, florist, nor have ever met Great Aunt Milly before today when you’d really rather be drinking champagne and enjoying the view at the venue. During the various showers, parties, and the day of the wedding itself, you would be well advised to wear a hemline that is conservative, moderate your alcohol consumption, and put your best foot forward. You will likely meet a lot of the more aged members of the bride and groom’s family, have to interact with caterers and other professionals who also have a job to do, and with your co-maids. In some ways, you are a reflection on the bride too.
3. Get stuff done. If your bride asks that all the maids get to X location within Y timeframe to be fitted for a dress, get it done. Really, just get there and do it. Refer to #1 on this list if your instinct is to list off the not-very-serious reasons why it is inconvenient to do so. Of course, it is inconvenient! Unless you are being fitted for three bridesmaid dresses by the same retailer for the same summer of wedding awesomeness, then it is definitely going to be an errand out of your way. By accepting the honor of being a bridesmaid, your job is to do the inconvenient, somewhat expensive, and definitely time-consuming tasks in the job description. Sometimes retailers wait for every measurement from every maid is collected before the order for the dresses is sent in, and you do not want to be the slacker maid who hasn’t made it to the dress outfitter. If your bride needs someone to bounce ideas off of for seating plans, napkin colors, or another minutia that you normally wouldn’t be worried about, listen anyway. There’s a very specific kind of karmic justice for bridal party members and someday you will need someone to help you tie 100 tiny ribbons around mason jars and listen to you complain about your MIL. What goes around comes around, so do what your bride asks of you.
4. Offer to help. If you are a great taskmaster and love organizing, offer to help the bride with creating her guest list spreadsheet and wedding day timeline. If you are crafty (or at least capable with a glue gun) let your bride know that you are ready and willing to help with creating. If you are a budding shutterbug, tell your bride about your new camera splurge and offer to take candid shots at the shower. Maybe you don’t have an easily identifiable, wedding related skill but you have some time off work before the wedding and you can help her run errands. If you identify for your bride what you are good at or interested in, she not only will benefit from your relative expertise but will appreciate the offer and then you won’t get stuck doing a job for which you are really unsuited.
5. Keep it classy. Oscar Wilde famously said it best, “You can never be overdressed or overeducated.” I’ll risk sounding like someone’s mother and remind you of a few things now if Wilde’s quip soon escapes you. Watch your language, your commentary, and criticism. Don’t drink too much too early in the day. If you experience lust at first sight with a dreamy groomsman from out of town, get a metaphorical room. Dress appropriately and if you aren’t sure what the dress code is, ask the bride or err toward the more conservative and more formal. Get some good, nude colored undergarments appropriate for your attire. I’ll never be able to divulge the whole story, but I witnessed a maid once who failed to drink in moderation AND to don underwear that fateful day and there’s a lot of reception goers who saw all about it. It is one thing if you want to get wild and crazy on your own time but refers to #1 above- It is not about you. Set your phone, drama, and vices aside for this very public task of bridesmaiding. You will be captured in photographs that will truly be around forever as a bridesmaid. Bear that in mind when the champagne starts flowing.
Being a bridesmaid has given me some of the best memories ever. Bridesmaiding is actually a ton of fun despite being a big commitment. The whole idea of literally and figuratively standing beside your friend in a moment of public commitment to a relationship is an honor and if you view it as such and remember a few key things, it is sure to be an exciting and memorable experience for everyone.
What do you think, Wildflowers? What else should be on this list? Comment below!
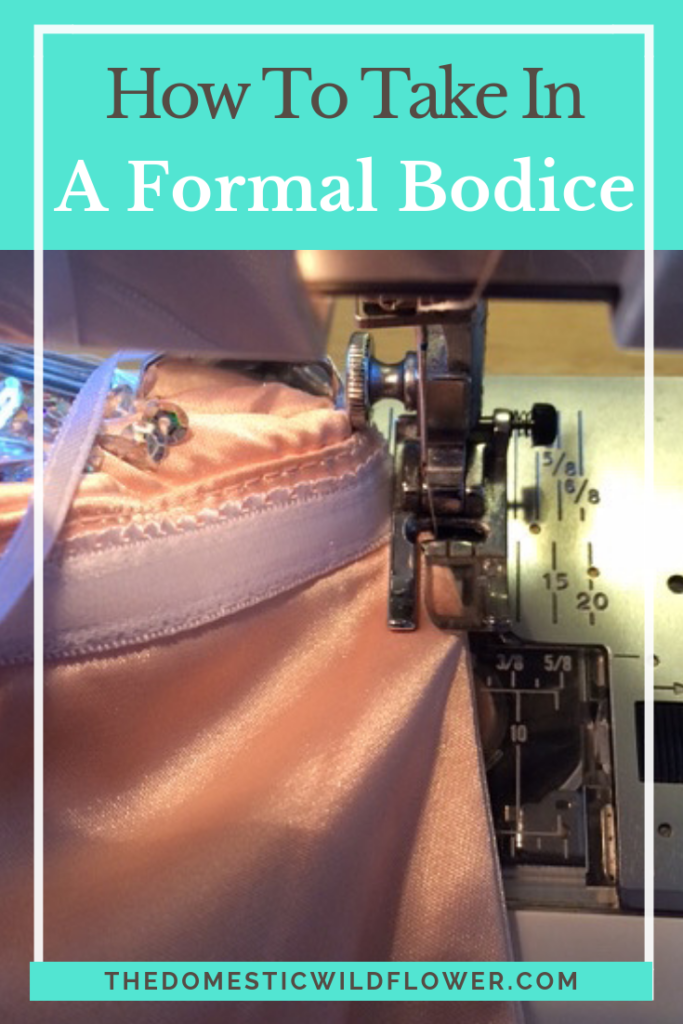
There are lots of beginning sewists out there with basic sewing skills and a desire to tackle clothing alterations but aren’t confident enough to begin. I hope to demonstrate some easy alterations that anyone can do to make your clothes fit better and thus will put those items in your regular lineup.
The hooded sweatshirt is a casualwear standby but often times comes in a boxy, too-large, and unflattering shape. Don’t get me wrong, I love that a hoodie can be pulled on without considering if it will showcase an imperfection in my middle and I wouldn’t dare try to turn an apple into an orange, or a hoodie into a fitted tee. However, a too large sweatshirt can be easily taken in a few inches to make it a closer fit and a more feminine and flattering shape. Here’s how.
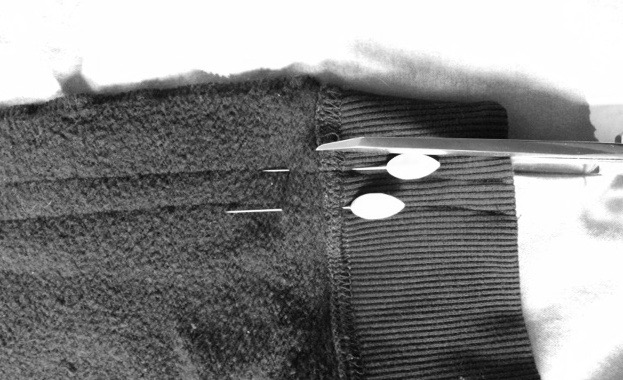
Turn the sweatshirt inside out. Stand before a mirror with pins nearby in a well-lit room. Identify where you’d like to take in the sweatshirt, starting at the wrist or at the waist. If your sweatshirt is one size too big for example, it is likely that you need to begin about an inch in on each side of your waist, at each hip, and pin every few inches up each side and down each sleeve, tapering very gradually off down the sleeve so that you are very, very slowly “exiting” the alteration freeway and merging onto the existing sleeve seam that is almost assuredly a serged seam with plenty of room for you to park and backstitch. You may find it easy to pin one side and impossible with the other because you will have to use your not-dominant hand to pin. Take the shirt off and pin the opposite side.
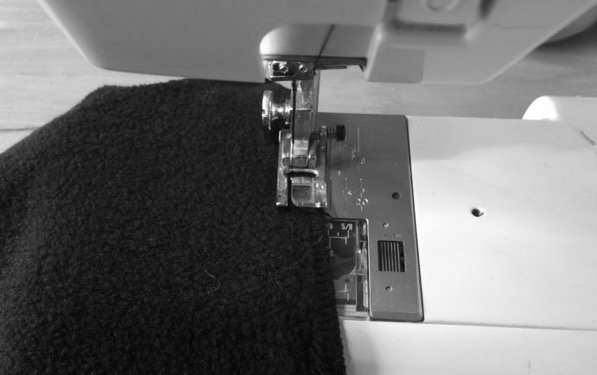
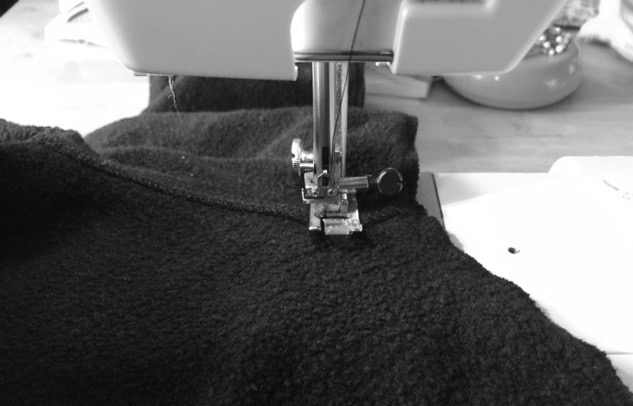
After pinning (and shimmying out of the pinned sweatshirt) sew an inch or so away from the existing seam all the way up to where the sleeve meets the body where you will drop your needle, raise your presser foot, turn the corner, and drive down the sleeve. Very gradually taper off, as described above, and backstitch.
A word of caution against taking in a shirt (sweatshirt or otherwise) in this simple manner: The more you take in, the more likely your underarm will have a weird, totally obvious and undesirable wrinkling and puckering no matter how smoothly you sew. It is hard to explain why this happens so take my word for it. To take in a shirt much more than about 2 inches, or more than one size, in my experience, causes this wrinkling and you would need to alter the shirt in a different way (removing the sleeve entirely, altering the sleeve and body separately, and re-attaching the sleeve) which I would consider a bit beyond simple and achievable for a beginning sewist. By all means, try the more advanced alteration it if you are inclined, but not if you need to wear the shirt to a wedding in 30 minutes. After all, that is how we all improve, by trying difficult things!
Sometimes, a garment only needs to be taken in on the sides. If this is the case, start at the top, near your ribs or wherever you’d like your shirt to be a bit skinnier, and very, very gradually, sew in, first at about an eighth of an inch, then to a quarter, and then in to the inch or so you desire. Imagine, if geometry class isn’t too far away from your memory, that you are sewing one side of a very tall and skinny isosceles triangle. If it has been a while since you have been in geometry, stick with my freeway exit and merging metaphor. It may be wise to lay a shirt that fits well atop the one being altered to guide your pinning.
A canister vacuum is different than the regular uprights that most of us are familiar with and in my opinion, they are far superior in several ways. They are much less popular in the US today but in other parts of the world, like in Europe, they are the standby. They are often the choice of those who clean homes professionally and is my first choice of vacuum. Read on to see why your next investment should be a canister.
- Mobility. Canister vacuums can be loaded into a trunk or car with ease. The wand and hose can be disconnected from the body of the vacuum if you are really tight on space. An upright remains in its inflexible upright shape, really limiting where and how you can move it. Canisters are typically lighter weight than uprights and can be carried without the awkwardness of carrying an upright. Many canisters are designed to sit on a stair for vacuuming carpeted stairs or for cleaning cobwebs up high in a stairwell. Taking a canister anywhere is easier than an upright.
- Less effort exerted to vacuum. With an upright, you push forward and pull back the weight of the whole vacuum. Whatever the upright weighs, you are pushing and pulling it with every pass. Not so with a canister. The heaviest part (the motor and bag) stay stationary on the floor behind you and you only move the head and hose around in each pass.
- Awesome cleaning at any price point. I did a lot of research on what kind of vacuum I would buy and the research is clear that canisters clean just as well as uprights of similar prices if not better. I don’t subscribe to Consumer Reports, but I like to read their free, last year reports online and over and over again canisters score similarly to uprights. I just purchased a Meile C3 Cat & Dog and I would again because it is so awesome for all the reasons I have listed here and then some. If you have a favorite brand, they likely have a great canister option to try.
- Underbed cleaning. The head choices, either the carpet head with a beater bar or the hard floor head, are typically lower-profile than that of an upright and can get farther under beds, cabinets, and furniture than a standard upright can. My powerhead is so low and is so mobile, that I can vacuum from under one side of the bed to the other. It isn’t that you so frequently need to vacuum under furniture but rather how much time you can save when you do need to.
How did I ever come to choose a canister in the first place? Two reasons. My mother in law gave us her really, really old Exectrolux canister before we bought our house and I loved using it. It still works really well, and if it had the carpet head it was originally sold with, I probably would use it exclusively. I use it now for cleaning the car out because the suction is still great and it is much easier to get out to the car than my previous upright. My second reason is that of the fact that my cousins in Switzerland couldn’t understand why anyone would use an upright. One of the many reasons I am devoted Swissophile (see here for other reasons) is because they are some very clean and tidy people. Don’t get me wrong, I am an America-lover through and through but I love when my ideas of what’s normal are challenged for the better especially when it comes to vacuums. I suspect that America’s love affair with the upright has something to do with some good marketing early on and with the belief that bigger is better and that the only way for something to be good is for it to be big. A canister might be smaller but that has nothing to do with the cleaning power it may have.
So tell me, dear readers, what vacuum do you love and why? Tell me if you have been persuaded you to try a canister out in the comment section below!
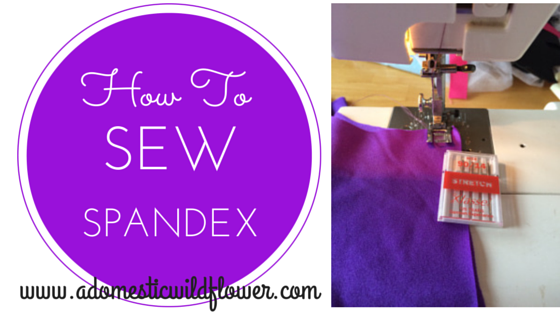
Sewing super stretchy spandex and similar knits can be intimidating but the results can be totally rad workout clothes like the neon purple leggings I made recently. These are the tips I can share to ensure a successful spandex sewing session (like what I did there? I’m an English teacher at heart!).
Sewing machine needles may seem like they are all the same but they are not. They differ in very important ways and by using the correct needle for your fabric type you can avoid a less-than-awesome project which is a buzzkill for any sewist.
Here’s a link to a great article on the Craftsy.com blog http://www.craftsy.com/blog/2015/03/schmetz-sewing-machine-needles/
This explains clearly all the different types of needles better than I ever could.
If a long-ish pdf isn’t something you need in your literal or metaphorical sewing basket, here’s the really short version. You need stretch needles for stretch knits (drapey tee shirt knit, spandex, anything quite stretchy), universal or standard needles for sewing wovens (quilting cotton, non-stretchy fabrics commonly used in clothing and textiles, etc) and if you have a fancy project where you are sewing something like vinyl, sequins, something very sheer or delicate, refer to a guide like the one above.
The difference between a “sharp” needle which is used for wovens and a “ball” needle used for knits is a simple but crucial one. Sharp slices through the fabric and a ball somehow wiggle through the loops in the knit the way you might stick your finger through an afghan. It is magic and by using the correct needle for knits, you prevent a whole host of fabric-ruining troubles. Get the right needle for the project.
My spandex legging project came about when my mom unearthed yards of neon purple swimsuit spandex from when I was a child. As over twenty years ago. Did I mention, dear readers, that we are borderline fabric hoarders in my family? My passion for sewing plus my new passion for yoga resulted in a plan for leggings.
There’s enough purple spandex to make a full Jane Fonda-esque leotard, which would be AWESOME but I am really busy and leggings seemed much more achievable in the time I have to sew.
I used a Simplicity legging and dress pattern but you could get a legging pattern from nearly any pattern company. I chose a pattern that included not only the pattern for leggings but for a tank top dress also. I could have purchased a leggings-only pattern but for the same price, it seemed sensible to choose the pattern with the most choices in the envelope.
Because leggings are a very close fitting and unforgiving garment (especially in neon purple), take the time to measure yourself carefully Dear Readers. I took my pants off and measured several times around the smallest part of my waist (called the waist, which is confusing since most denim waistbands now sit much lower than that) and the fullest part of my rear (called the hip). I was in between sizes so I chose the larger of the two because, as with your hair, you can always cut more (take in) but once you cut, that’s it. I ended up taking the leggings in, a quarter inch at a time, in the thigh and crotch seams, for the perfect fit.
Another important tip I can share is that on the leg hem I stitched a second seam around each leg opening about an eighth of an inch from the first and trimmed the excess. This created a professional finish and was a nice alternative to using a serger, which I do not own.
Because I used old but well-cared for fabric and I purchased the correct stretch needle, I have a new pair of leggings that I love for a very low cost.
Sewing spandex was much easier than I expected because it isn’t super slippery (which can be challenging), it didn’t slide off my lap and table the way chiffon might (also difficult), and it was actually an easy sewing experience. I’d recommend it to any sewist who is comfortable sewing and cutting wovens to the point they can whip out a pillowcase or pair of pajama bottoms with ease and without tears.
Notice in the photo above the horizontal fold in the rise of the pattern piece. I did this because I have a short waist, I’m a short girl, and I didn’t want my leggings to have a high rise. There’s a line where it is appropriate to make such an adjustment on most pant pattern pieces.
Before you cut, be sure your pattern pieces are pinned to the spandex so the MOST stretch is going from hip to hip, or AROUND the biggest part of your body. You do not want the most stretch to be from hip to ankle. Some spandex stretches almost the same in both directions and if this is the case with your fabric at hand, rest easy. As long as there is a lot of stretch happening from hip to hip, your garment will likely fit and be flattering.
Cutting out the two legs of the leggings was a small chore and very few seams required (2 leg seams, the crotch, the waistband, and 2 leg hems) were also simply because I had the right needle.


Leave a Reply