• Skip to secondary menu
  • Skip to main content
  • Skip to primary sidebar
  • Skip to footer
  • The Pressure Canning Cookbook
  • Blog
    • Subscribe
    • Welcome!
  • Perfectly Preserved Podcast
  • About
    • ADW Manifesto
    • Work With Me
      • Read
  • Shop
    • My Account
    • Cart
    • Checkout

The Domestic Wildflower

Handmade Food & Craft Tutorials for Beginners

  • Courses
    • Free Canning Basics
    • Everything Canning Course
    • Steam Canning Workshop
    • Free Homemade Cocktail Mixers
    • Wildflower Mixology
    • Crochet Basket Workshop
  • Can & Preserve
    • Never Canned?
    • Steam Canner Equipment Bundle
    • Shrubs Course
  • Sew
  • Cook
  • Craft
    • Crochet Step-by-Step Guides
      • Crochet Basket
      • Giant Yarn Throw
      • Thick & Thin Throw
  • Living
    • Creativity Challenge
    • Clean
    • Kids
  • Rentals

Jenny Gomes

How to Cultivate Lasting Friendship

August 17, 2015 by Jenny Gomes Leave a Comment

 When I started blogging, I thought that I would never, ever delve into the cerebral or the touchy-feely. And here I am already, writing about lasting friendship.

How to Cultivate Lasting Friendship

I don’t know the statistics but I feel like I am in a minority when I say I have the greatest friends with whom I have enjoyed friendship for years. My dearest friends are those I share memories with for 2 decades or more, and I’m only 31. Other friends, I made later, in college, and have still keep in close touch with despite distance and change. I have felt strongly, ever since high school when friendship turbulence blustered around my tightly knit group of girlfriends, affecting other souls but never us directly, that I was very lucky indeed to share company with such loving, kind, smart, hardworking, and supportive women.

Friendship starts out all about fun and I see now as I become ever more an adult that it is more about love, encouragement, and weathering the storms of life with and for one another and the fun is the cherry on top.

The list I will share below will be incomplete and evolving but it is a starting point for anyone who wishes to cultivate or strengthen existing friendship.

  1. Assume the best in people. I am so fortunate that my friends assume the best in me when I forget birthdays (I’m ashamed to admit I’ve done it more than once), arrive late, change or cancel plans, forget to return calls or texts, can’t attend, and share my copious feelings at inappropriate times. My friends know I’m busy, chronically tardy, and managing a lot in my life. I’m an imperfect person, and so are my nearest and dearest, and that is okay. I always know they mean well and are doing the best they can. It sounds simple but it is a crucial choice of the mindset that can affect your relationships enormously.
  2. Accept change. This is probably hardest for women moving from the metaphorical apartments with friends to homes with marriages and mortgages. One of our dearests had children earlier than the rest of us. Was it a bummer that she moved and missed out on lots of fun college capers? Sure, we would have loved to have her around but were we angry or offended by her absence? Obviously not because things change and that is the way life works. Do I feel a little wistful hearing about my childless and more carefree friends going on weekend adventures while I toil away washing tiny toddler clothing? Of course, but feeling resentment would be silly. Life changes at different paces for everyone and soon enough you might find yourself in the slow lane. Just be grateful that when your turn there comes, your friends will be there for you when things change yet again.
  3. Be friends with their friends. I love my friend’s friends. The gals my besties work with, went to college with, and have met in times and places I wasn’t a part of are just another element of my dearest to be appreciated. It is so much easier, and so much more enjoyable if the circles of friends can overlap. Make a genuine effort to extend friendship to those your closest pals have befriended. I have been warmly welcomed into a pod of UC Davis girls despite being a Chico State alumna, and included in outings full of nurses despite being a teacher. I can add nothing to their chats about work but you know what? They love my friends so I love them too. Their relationships don’t threaten yours; they complement it.  
  4. Plan time. I don’t spend time with anyone who would declare that they aren’t busy at all and that they have all kinds of time available for socializing. No matter your stage of life, Wildflowers, you and your friends are going to be busy. Plan time to see one another and enjoy one another. If a member of your girl gang can’t make it then no big deal; you will see her next time. I think that part is key: If you wait until the time is perfect when no one is going to be inconvenienced, you might still be waiting. The time spent together doesn’t have to be fancy or choreographed. Think quality over quantity.
  5. Build each other up. You know those days when it feels overwhelming that you are doing a terrible job at everything? Or when you feel undeniably fat, like a total failure, like your house is a wreck and your choices leave a lot to be desired? DO NOT be another voice in the crowd telling your friends that they stink. People rarely are asking for advice when they share their feelings. We speak in order to be heard, so listen when your pals vent about their family, their work, and the choices that may or may not have been the best. I’m a lover of quotes from all sources, and the Bible has it right on; “As iron sharpens iron, one [wo]man sharpens another.” Our role as friends is to build each other up, to celebrate our success and encourage when the sailing isn’t smooth. We sharpen one another, in the most powerful sense, and being a whetstone for our dearest friends is a duty not to be taken lightly.
  6. Love. When heartbreak strikes (and it will, sadly) your dearest, respond with love. There have been times that I had no idea how to help a friend experiencing something awful but I know that I did my best (see #1 above) by admitting I didn’t know how to help, offering and then doing what I could, and by hugging, crying, and laughing. I have theorized (on my own, privately, as I drive and wash dishes) that growing up has nothing to do with bearing children as popularly believed but with realizing, facing, and experiencing our mortality. When a friend’s strength is physically or metaphorically sapped by issues of mortality, be that strength for them, as best you can.

Rejoice in your friend’s successes and ache and then act for them in times of trial. Assume they are acting as best they can with what they have and do the same to them. Spend time together and treasure it, rather than the rating or quantifying it. Be each other’s cheerleaders and plan on a lifetime of love from one another.


I’d love to hear what you’d add to this list, Wildflowers. Share in the comment section below!  

Filed Under: Living

How to Clean a Yoga Mat the Easy Way

August 12, 2015 by Jenny Gomes Leave a Comment

I have been a bit confused by the idea of store-bought yoga mat cleaners. I understand the fact that yoga mats get dirty, or at least a bit sweaty, but I haven’t followed why they would need a special type of cleaner to clean them. Other than imbuing your mat with a refreshing scent which admittedly would be nice, the claims that marketers use to compel us, yogis, to buy their products are astonishing and likely total baloney. The idea that a regular ol’ yoga mat would require a non-toxic, organic, gentle cleansing spray is bananas. Yoga mats are absorbent- some more so than others-so simply spraying them with a nice smelling spray doesn’t seem like it would clean it all that well, right? If your tee shirt (also an absorbent material) was dirty, you wouldn’t spray and wipe and hope for best. You would wash it.

While some expensive mats are made from more “natural” products, most are made from petroleum, the same stuff your car tires are made of, indicating to me that they wouldn’t require a delicate, fairy-dust infused cleanser. If you use yoga mat cleaner then, by all means, I hope you enjoy it but I won’t be purchasing any.
So, how did this Wildflower clean her yoga mat after it got genuinely dirty from being drug around the field for the photos above?
I put it in the washing machine. Yep, that’s it. NO soap, NO fancy cleanser, just warm water, and agitation.
I skipped the soap because a yoga mat would likely soak up the soap and it would be difficult to rinse all the soap out, potentially resulting in a slippery mat. Most washing machines have a bit of soap remaining in them and when I ran my load of 2 yoga mats, I saw that a few soapy bubbles were cleaning my mats inside the drum of the washing machine.
I used warm water, the gentle cycle, and no soap. The only other consideration is washing a mat requires a place to hang dry it (more online drying here) and I waited till we had a warm day ahead so it would have plenty of time to dry thoroughly.
I don’t have all the answers, however. I haven’t tried to wash one of the really big, round mats that instructors often use but I’m inclined to think it would fit in a standard washer. I haven’t experimented with hang drying the mat inside in the winter when drying laundry inside is harder because of space and the potential for mildew development. My thicker mat soaked up a lot of water, the way a bathmat might, and if I had to dry it inside, I’d probably have to set up a rack in the bathtub which is not as convenient.
I really hate the idea of people feeling like they need to buy a certain product to do a good job like my post here on useless baby food gadgets. I hope you feel empowered by this little laundry post and encouraged to do things the sensible way, even if it isn’t as popular.
If you resourceful Wildflowers out there have tips for cleaning yoga mats to share, please add them to the comment section below! Happy washing!  

Filed Under: Yoga Tagged With: yoga, yoga mat

Wooden Tools I Love

August 9, 2015 by Jenny Gomes Leave a Comment

While plastic has many, many virtues, and many invaluable applications, most of the time I hate it. I hate how it gets brittle, breaks, often it can’t be recycled most and when it can it isn’t recycled into a number that can be recycled again (lame, right?). Frankly, recycling is a time suck that I don’t enjoy. It is right up there with sacking up garbage in terms of activities I want to do after a long day. If a plastic item isn’t recycled, it sits for the untold number of years in a landfill somewhere which is totally gross, and dealing with said gross landfill will undoubtedly be a huge financial drain for society in the future.

Of course, I appreciate how my milk containers don’t break when I bang them on the trunk lid, and I love how plastics are used in the medical field to make us healthier in a wide variety of ways, but overall, I try to avoid plastic junk when at all possible.

Conversely, I love wood products. I love the idea of purchasing something that I don’t have to recycle in any time consuming or laborious sense. Wood lasts. When I wear out my wooden toothbrush, I toss it into the wood stove or into the compost pile. I love the idea that lots of wood products come from the US and support guys and gals here at home. By using wooden tools, we can slowly break the cycle of buying things designed to last only a little while and get in the habit of buying things that last a long time. I feel strongly that purchasing quality products end up saving money over the long run.

Here are some of the wooden tools I love to use in my home. The links below are indeed affiliate links, but rest assured I’d never recommend a product that I didn’t love and use (or ask Santa for) myself. You can click on the pictures and you’ll be taken to Amazon if you’d like to try them out, or you can seek out high-quality wooden goods at local craft fairs (my favorite place to find wooden spoons, for example) and shops.

This pot scrubber is perfect for doing just as the name implies. I like how it sits up on its own without falling over haphazardly the way long handled brushes do. This little fella sits at the ready sink-side and does a good but gentle job on all important egg-frying pan
 
This little gem is what I use on the grime in the bathtub, on the linoleum, and anywhere else that requires a lot of elbow grease. I also like that the handle isn’t as slippery when wet as a plastic scrub brush. It sounds silly, but I have banged my knuckles on the tub more than once using a plastic scrubber but never again.

And my favorite: The wooden toothbrush. I love these Izola toothbrushes because they are stamped with the months on the handle so I know when to toss them into the wood stove or compost pile. The bristles also are sturdy enough to last the suggested 3 months. This brand also has other varieties including ones with the handles stamped with inspirational words or with numbers. I left mine in the bathroom on a recent girl’s trip to Lake Tahoe and it brought about a huge laugh at me and my vaguely “natural” toothbrush choices but it gave me a chance for me to explain how much better wood is than plastic. My husband thinks they are silly and lackluster but to those who think similarly I’d point out that I still have had zero cavities. A coincidence? I think not 😉

I don’t own these clothespins but I’m sure I need to. They are made in America, have a lifetime guarantee, and are bigger and way better than the regular ol’ made in China version. Santa, please make note that I’d like these in my stocking.

These are just the products that I have replaced and hope to use in my little home. What other tools should be on this list, Wildflowers? Share in the comment section below!

Filed Under: Living

Mending Denim Jeans: 3 Tips for Fixing Denim

August 6, 2015 by Jenny Gomes 2 Comments

Mending Denim Jeans: 3 Tips for Fixing Denim

    • Mending Jeans: How to Fix Torn Denim | A Domestic Wildflower click for a great tutorial on fixing denim with a few important tips!
      how to mend jeans
    • Mending Jeans: How to Fix Torn Denim | A Domestic Wildflower click for a great tutorial on fixing denim with a few important tips!
    • How To Mend Jeans: 3 Tips for Fixing Torn Denim

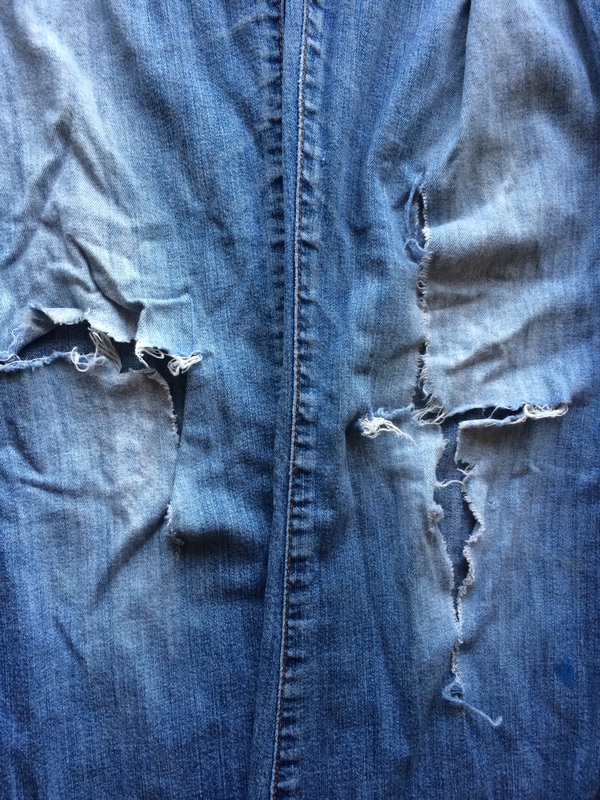
      Mending can be the most valuable when used to save or extend the life a pair of beloved or certainly useful jeans. Yet it can be the most critical mending job as the fit of a pair of jeans is often a matter of the whole being greater than the sum of its parts. We can thank Aristotle for that bit of wisdom, and we can thank a denim needle, a salvaged denim patch, and a lot of pins for a mending job well done. Read on for the all-important sewing how-to, Wildflowers!

      A denim needle is not mandatory but is a wise investment. You will need one if the mending job will require you to sew over any seams, especially the crotch (LOTS of layers of denim there) or over the double fronts of work dungarees. If the patch will be on lighter denim, and you won’t be sewing over seams, then sew on, you risk taker. I do it all the time and lots of times I have been sorry but lots of times it worked out fine.

      This tutorial is for garments that you can mend without opening any seams. Someday I will write a tutorial for that, but this one assumes that you can slide the garment into your machine. If you are mending the knee of slender kid’s jeans, for example, you will have to use an iron-on patch or open up the side seam to sew the patch. If you aren’t sure, try sliding the item into place. If you can’t get the needle to the hole, you’re out of luck.

      A patch should be made from denim that is still in good condition. The bottoms of cut off jeans like these here are a perfect choice. Check out the backside of the denim to see if that wouldn’t be the perfect color to blend into the background of the mending job. I very often choose the backside because it seems to disappear the best. If you haven’t made jorts recently, then ask friends and family for a castoff or hit up a second-hand store.

      I have purchased and used the packaged variety that you iron on with very limited success. They are useful when the location of the patch is nearly impossible to sew but it that is the case, how you will iron it to activate the adhesive back is a challenge. If you want a fix for a torn knee, where it will be worn and washed more than once or twice, sewing is probably the only solution.

      Cut the patch to be significantly larger than the torn area. Not an inch or so larger, but up to three inches or bigger in every direction you think you will need. Big. You can always trim it.

      Choose a thread that when a strand is across the jeans, it disappears. This might be blue, lavender, grey, or white. Be open to possibilities, frugal sewers. Of course, you can use a colored thread but if decoration was your angle, I’d still suggest a matching color for the functional patch and then switching colors to decorate.

    • Mending Jeans: How to Fix Torn Denim | A Domestic Wildflower click for a great tutorial on fixing denim with a few important tips!
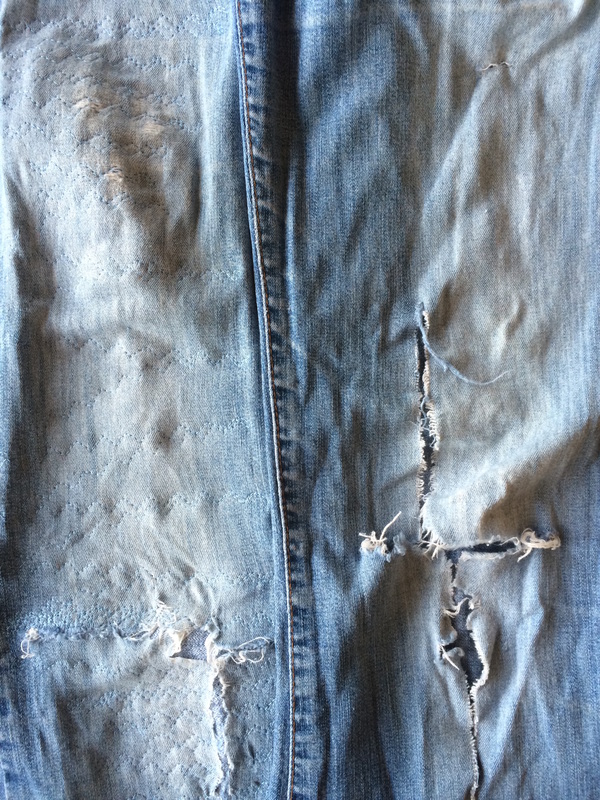
    • Once you have pinned, set your machine to zigzag. I like the stitch that stitches 2 to the left and 2 to the right and back again because it seems to disappear better than the standard 1 stitch to the left and 1 to the right, but surely either will suffice. Sometimes I choose the regular straight stitch (if I have to sew very close to a thick seam and don’t want to sew over it for example) and that works fine also.

      Getting the leg into the machine can be pretty difficult and I have had my husband stand behind the machine and just hold the bulk of the pants while I sewed because I couldn’t scrunch them up in there any farther and sew at the same time. It is at the farthest point when you are really struggling to keep all the fabric to the right of the needle, that breaking a needle is more likely. Exercise caution, Dear Reader.

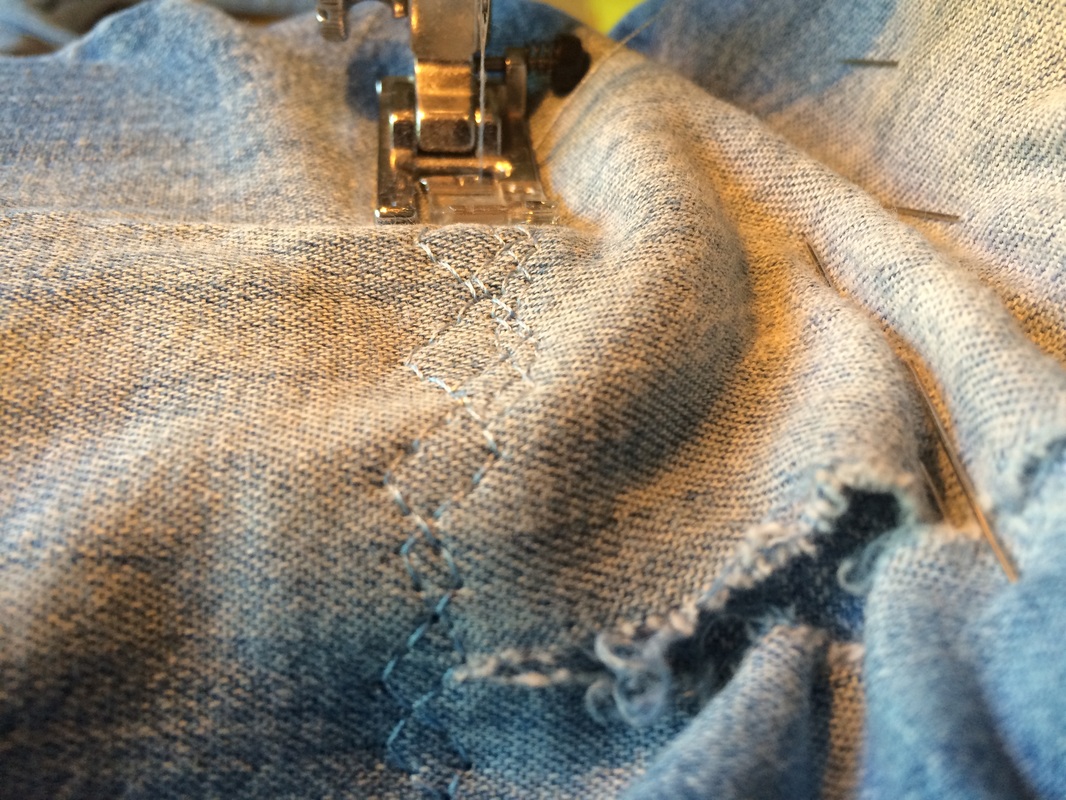
      Begin sewing at the farthest point and sew forwards over the patch and then backward, creating a kind of zigzag shape with your stitching. If you are able and the garment calls for it, you can of course stitch around the patch but in the leg of jeans, you can’t turn around or sew in a circle. It is like you are practicing parallel parking over and over if you follow my often used ‘sewing is like driving’ metaphor.

    • Mending Jeans: How to Fix Torn Denim | A Domestic Wildflower click for a great tutorial on fixing denim with a few important tips!
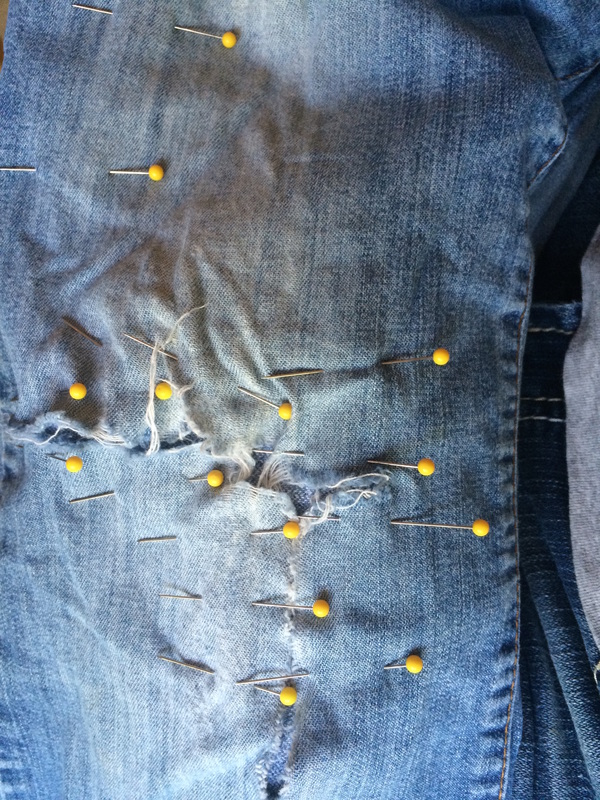
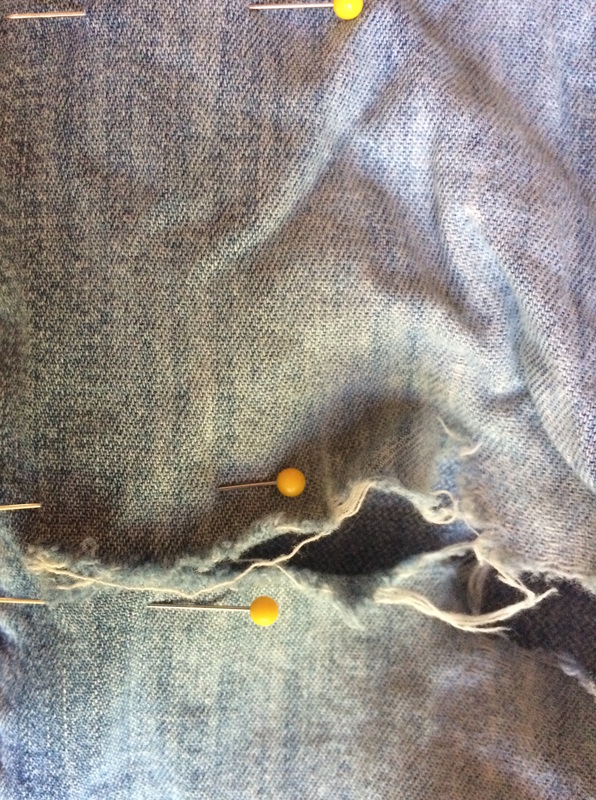
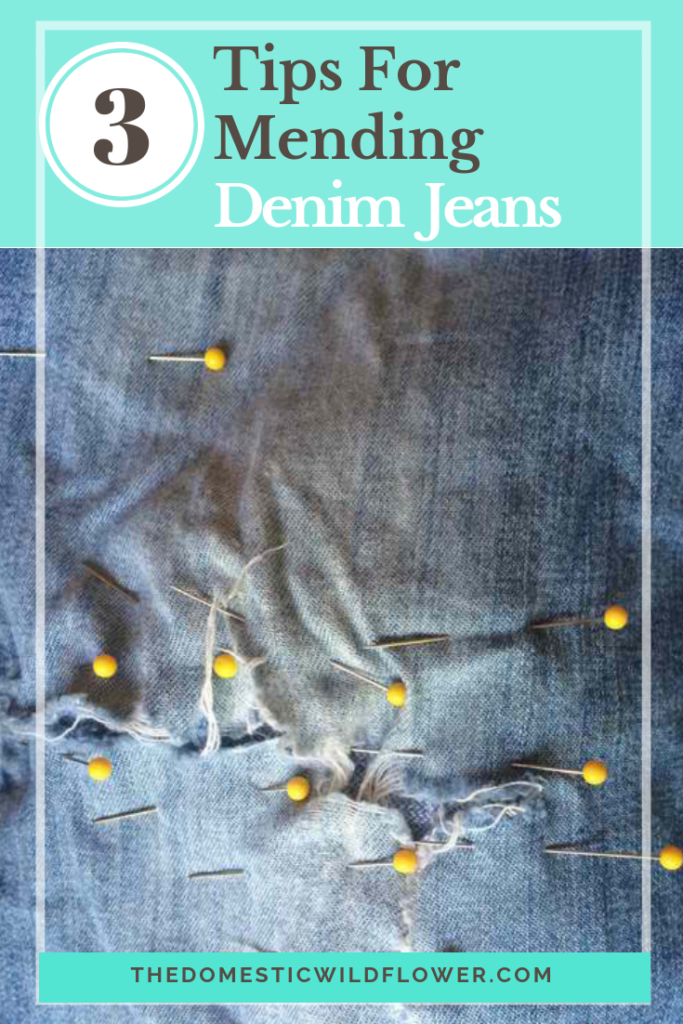
    • With many sharp pins and a large dose of patience, sit with the item in your lap or on a work surface. Slide one hand with the patch inside the leg so you can see the outside of the garment. This can be awkward in the same way putting a comforter into a duvet can be because you can’t see what’s going on but it is more important that you see the OUTSIDE of the item, hence the big patch. I line up the farthest point of the patch first with at least an inch allowance and start pinning. Do your best to bring torn edges close together but expect some to simply not reach especially if the tear is older and some of the fiber has been lost. This is an exercise in accepting imperfection. Pin both close to the torn edges AND all the way out to the edge of the patch, which you are feeling with your fingers and not seeing with your eyes. Use your inside-the-garment-palm to spread the area flat and smooth. Pull the pocket of jeans inside out or pin out of the way.

      Trimming fray is up to you. I often leave it because it can fill in the gap a bit and hide a less than perfect match in the patch- rhyme not intended.

      Read this if you are above beginning level sewing and don’t worry about it if you are just starting out: It is smart to think about which direction you will be putting the garment into the machine and adjust the direction of your pins accordingly. If you are mending the right thigh, then you will slide the jeans in waist-first; thus you’d want the ball or colored part of the pins to either be “facing” the left leg or the hem of the leg. For a mending job like this, you will have lots of pins and if they are pinned in the same direction, removing them will be much faster and result in less bloodshed.

    • Mending Jeans: How to Fix Torn Denim | A Domestic Wildflower click for a great tutorial on fixing denim with a few important tips!
    • Mending Jeans: How to Fix Torn Denim | A Domestic Wildflower click for a great tutorial on fixing denim with a few important tips!

Mending Denim Jeans: 3 Tips for Fixing Denim

  • Trim threads inside and out and trim the patch on the inside of the leg if necessary.

    This is quite a long blog post about mending but if you have ever (and who hasn’t!) had a pair of beloved denim tear you’ll be willing to try to save them.

    Use a denim needle, cut the patch much larger than you think you will need it and PIN all over the area. Good luck, Wildflowers!

    If you want to learn how to sew, check out the courses HERE!

    If this post was helpful, subscribe to the mailing list and never miss a post! Want in?

    Yes, PLEASE!

    Please comment in the section below with your successes and pearls of mending wisdom!

Filed Under: Sew

Canning Log: Keeping Track of Canning

August 3, 2015 by Jenny Gomes 2 Comments

Canning season is upon us and I can hardly contain my excitement. My tiny kitchen is getting steamed up at just the thought of it. One thing you can do to prepare for a successful canning season is to download this canning log and keep track of your canning projects this season.

Grab your Canning Log here and keep track! 

CLICK TO PRINT!

One thing that I have wished I would have done in previous years is keep track of what I preserve for the following year. Canning is different than regular ol’ cooking in that what you preserve is distinctly seasonal (which is why you are going through all the sweaty effort of preserving it) and once you wrap up canning all the tomatoes, you won’t think about canning them for another year. It can be tricky remembering if you liked this marinara recipe or that, or if you liked the way the pectin ratio in this jam recipe set up better than than this one. It also is difficult to recall exactly how many pounds of strawberries one must pick (from such low, low growing little plants) to make a batch of strawberry syrup to yield so many little, little jars.

To help myself and my Dear Readers, I have created (with the help of some awesome Wildflower friends) a canning log PDF that you can print out for FREE as many times as is useful to you to keep track of what you preserve. Jot down the recipe name (and page number if you are so inclined), the pounds of produce you used, the jars it yielded, and scribble reminders in the Notes section, which is the spot of which I’m going to make the most use. I want to remember if I used the really hot peppers to good effect or if that particular recipe was way more effort than I want to repeat next season. For example, for my roasted bell peppers, I’d write, “De-lish. Peeling = Ugh!” When I look back, I’ll remember to do a big batch (because they are so yummy and versatile) and invite a friend to help because they are so miserable to peel (Thanks for coming over, Anna!). I hope you find this log as useful as I do and stay tuned for more pretty, useful tools in the “Resources for Wildflowers” section.

Click to print your pretty helpful Canning Log PDF now and keep track of canning this season!

CLICK TO PRINT!

Happy Canning, Wildflowers! What are you most excited about canning this season? Share in the comment section below!
Filed Under: Can

  • « Go to Previous Page
  • Page 1
  • Interim pages omitted …
  • Page 58
  • Page 59
  • Page 60
  • Page 61
  • Page 62
  • Interim pages omitted …
  • Page 66
  • Go to Next Page »

Primary Sidebar

Categories

Follow me here, there, & everywhere!

  • Email
  • Facebook
  • Instagram
  • Pinterest
  • RSS
  • Twitter
  • YouTube

Search

Get The Pressure Canning Cookbook

Get 10 Free Recipes Now!

Best Chicken Coop

Footer

Get Started Pressure Canning

Shrubology Ebook

Shrubology: Refreshing Homemade Fruit and Vinegar Syrups for Cocktails
Make easy, no-cook fruit & vinegar syrups for cocktails & mocktails! This ebook shares crowd pleasing recipes and simple to understand ratios so you can make a shrub on your countertop any time- without a recipe. Dive into these Prohibition Era drinks today!

Copyright

Copyright 2019
The Domestic Wildflower
www.thedomesticwildflower.com.
All content created by Jennifer Gomes unless otherwise noted.

Copyright © 2026 · Lifestyle Pro on Genesis Framework · WordPress · Log in