• Skip to secondary menu
  • Skip to main content
  • Skip to primary sidebar
  • Skip to footer
  • The Pressure Canning Cookbook
  • Blog
    • Subscribe
    • Welcome!
  • Perfectly Preserved Podcast
  • About
    • ADW Manifesto
    • Work With Me
      • Read
  • Shop
    • My Account
    • Cart
    • Checkout

The Domestic Wildflower

Handmade Food & Craft Tutorials for Beginners

  • Courses
    • Free Canning Basics
    • Everything Canning Course
    • Steam Canning Workshop
    • Free Homemade Cocktail Mixers
    • Wildflower Mixology
    • Crochet Basket Workshop
  • Can & Preserve
    • Never Canned?
    • Steam Canner Equipment Bundle
    • Shrubs Course
  • Sew
  • Cook
  • Craft
    • Crochet Step-by-Step Guides
      • Crochet Basket
      • Giant Yarn Throw
      • Thick & Thin Throw
  • Living
    • Creativity Challenge
    • Clean
    • Kids
  • Rentals

Blog

DIY Basket Liner

September 14, 2015 by Jenny Gomes Leave a Comment

DIY Basket Liner

Sewing for the home can be a really satisfying thing because it can inexpensively bring order, beauty, and utility when you most need it. I needed to corral shoes by my front door and when I spied some old metal freezer baskets in my Gram’s garage, I knew organized footwear wasn’t far off. This post shares how to sew a liner for a basket and you can even download the measuring guide so you can make your own!

Chest freezers seem to be commonplace in rural or agrarian households because you need a lot of freezer space to freeze a whole beef or a whole game animal. Older style freezers featured wire baskets that helped separate different cuts of meat and made it possible for a girl to dig out a ham from the bottom of the chest without being buried in an avalanche of steaks. Now, of course, these baskets are often made of plastic which is nowhere near as good. If you come across these wire baskets, I’d suggest snagging one…or four, the way I did. The funky plastic handles can be snapped off and they are sturdy, useful, and now they are on-trend.

Of course, the baskets need a liner if you want to store anything small (like toddler shoes) in them. I had saved a queen sized sheet that tore after many mending jobs but still had lots of good fabric remaining. I imagined using some fabric dye like my tutorial here but realized the cream color of the sheet was a win.

Cutting out a basket liner is fairly simple. You will need to measure a few things, which I instinctively avoid but it’s got to be done. Get out the tape measure and jot down:

  • the width of the base + height of both sides + overhang desired
  • the length of the base +height of both sides + overhang desired

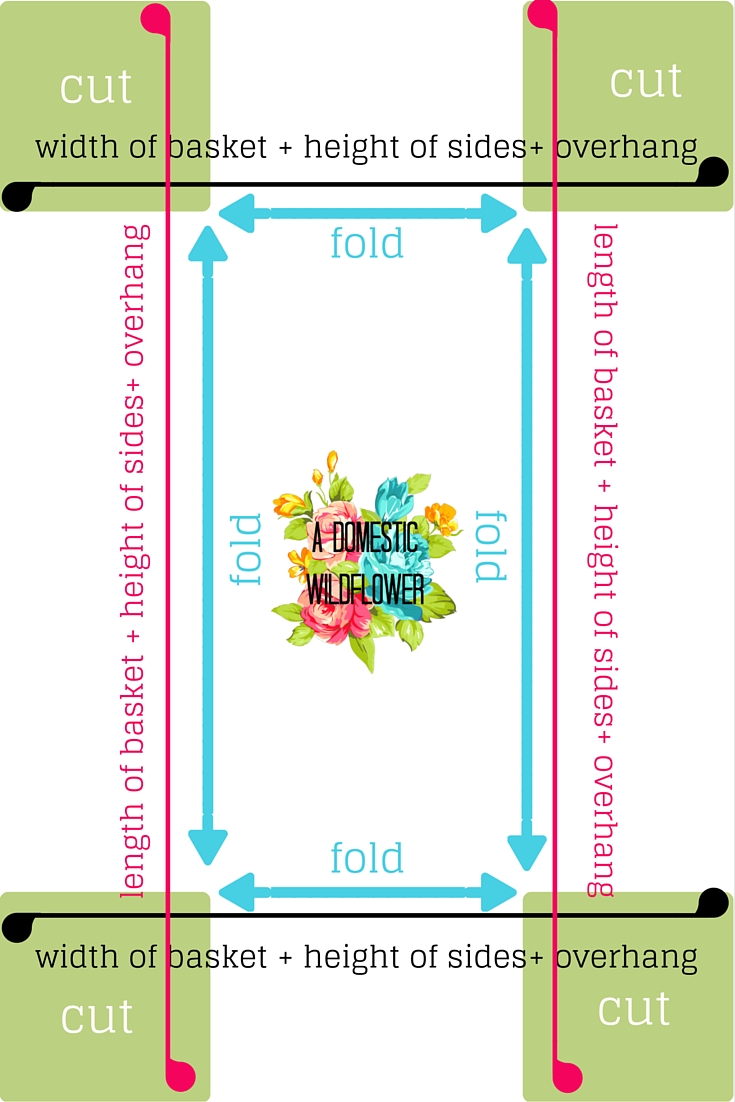
The overhang depends on what you prefer. If you want the wrong side of the fabric and/or the wire hidden, then you want an overhang to be the same as the height. I like a little wire showing so I did a 3 inch overhang on my 8 inch tall baskets.

I use a soft fabric tape measure (tell that man in your life to put the metal construction-style measuring tape away) and I start at one side of the basket and just measure from left to right; up the side, down the side, across the bottom, up the right side and down the right side. Write your number down and repeat for the other direction.

As for the seam allowance: I am generous and round up to the nearest inch with my measurements and sew only a quarter inch seam allowance and unless you want a very snug, precise fit, that should work just fine. I appreciate precision to a degree but if I can’t finish it before my babies wake from naptime then it goes into the giant stack of unfinished and unsatisfying projects and then I still have a tangle of shoes at the door. For me, I eyeball and round up and it works.

Now you have a set of measurements that dictate how big to cut your rectangle. I cut out the rectangle and then set the basket directly on top of the rectangle, in the middle. You can measure but if you are in the less-precise camp like me, this works well also. You will have 4 squares that will be cut from the corners, as indicated in my graphic.

DIY Basket Liner and Freezer Baskets: Organizing with Salvaged Materials

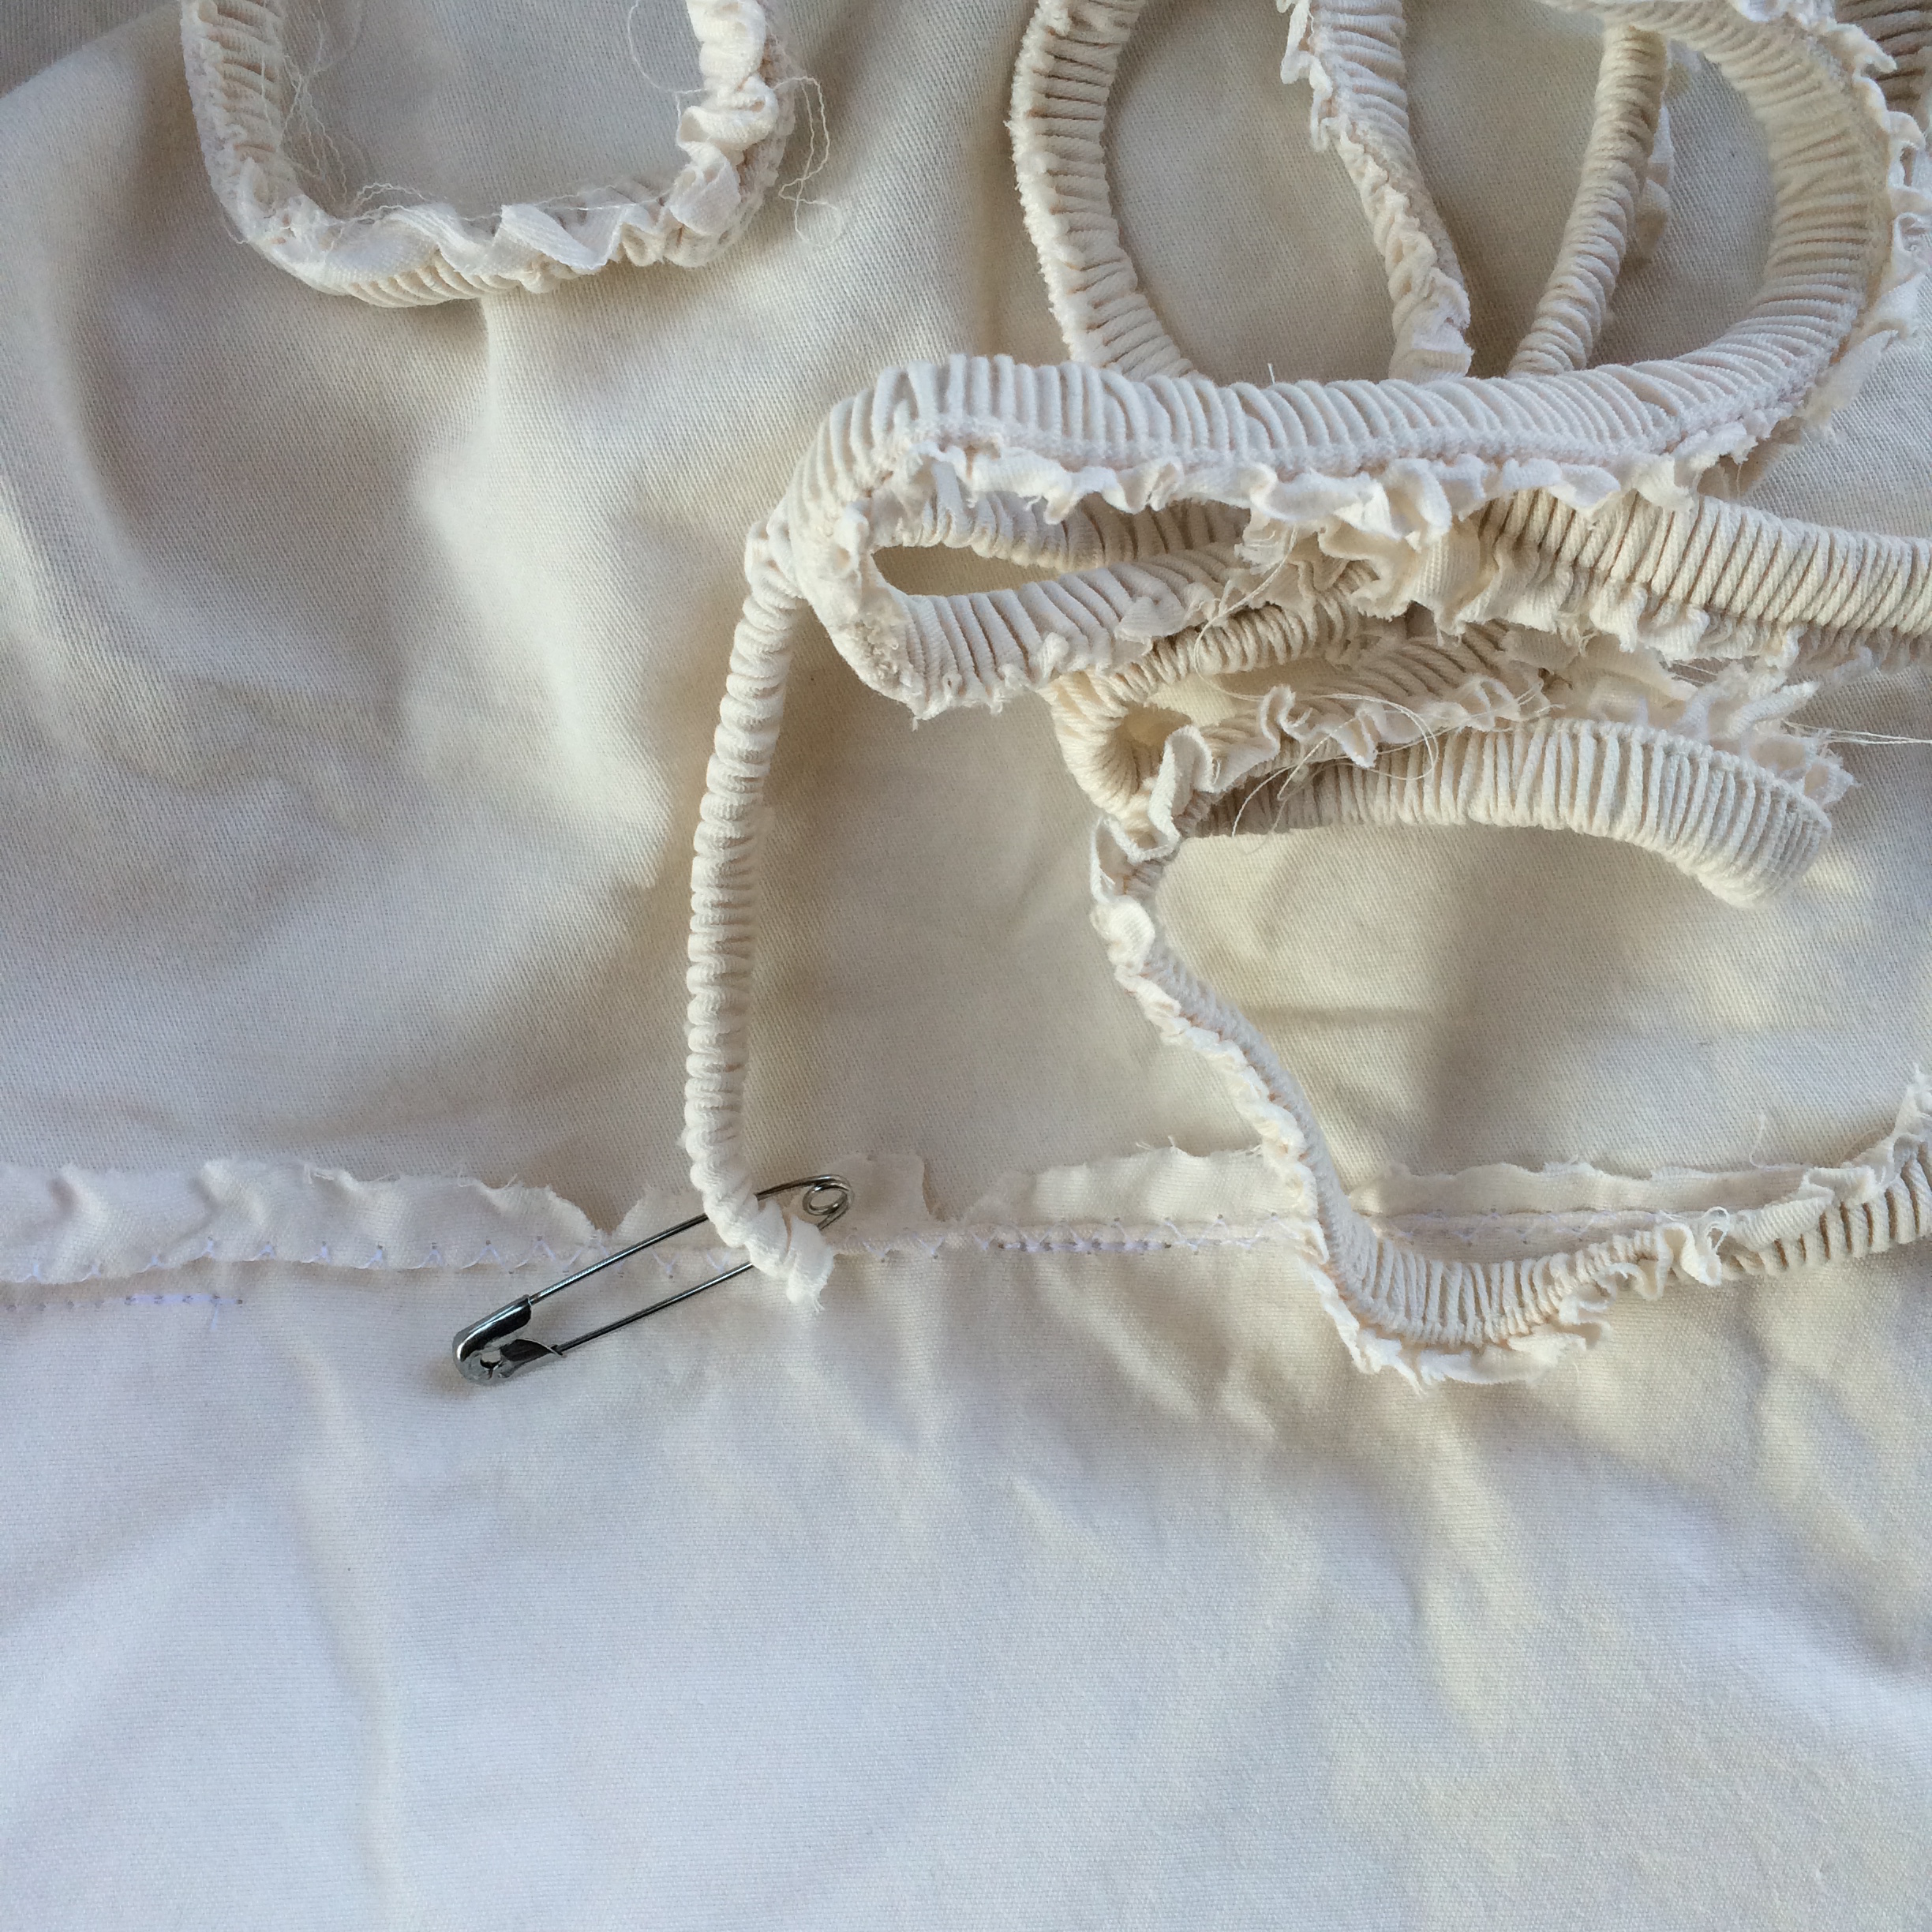
I made this little graphic to show how to measure your rectangle and what happens after you cut it out.

Print yours here!

CLICK TO PRINT!

Sew the four corner seams. I zigzagged my edges first because I anticipate having to wash my liners but you don’t have to. Hem all the way around the top edge and/or make a casing for elastic or ribbon or whatever cute idea you may have. Often, a hem is all you need for the liner to stay put. Then you are done and can organize shoes, toys, or whatever and be impressed with your own industry and thrift, Wildflowers!

MY basket liner was a little on the wonky side for several reasons. I reused the existing corner seam of this old fitted sheet for one of my corner seams which didn’t exactly (literally or figuratively) add up but I was running out of sheet and I’m not about to be deterred by a little funkiness. I cut the elastic free from the sheet and used that in the casing to elasticize the top of my liner. I knew my basket would be pulled in and out often, and I wanted to help the liner stay in place.

 DIY Basket Liner and Freezer Baskets: Organizing with Salvaged Materials
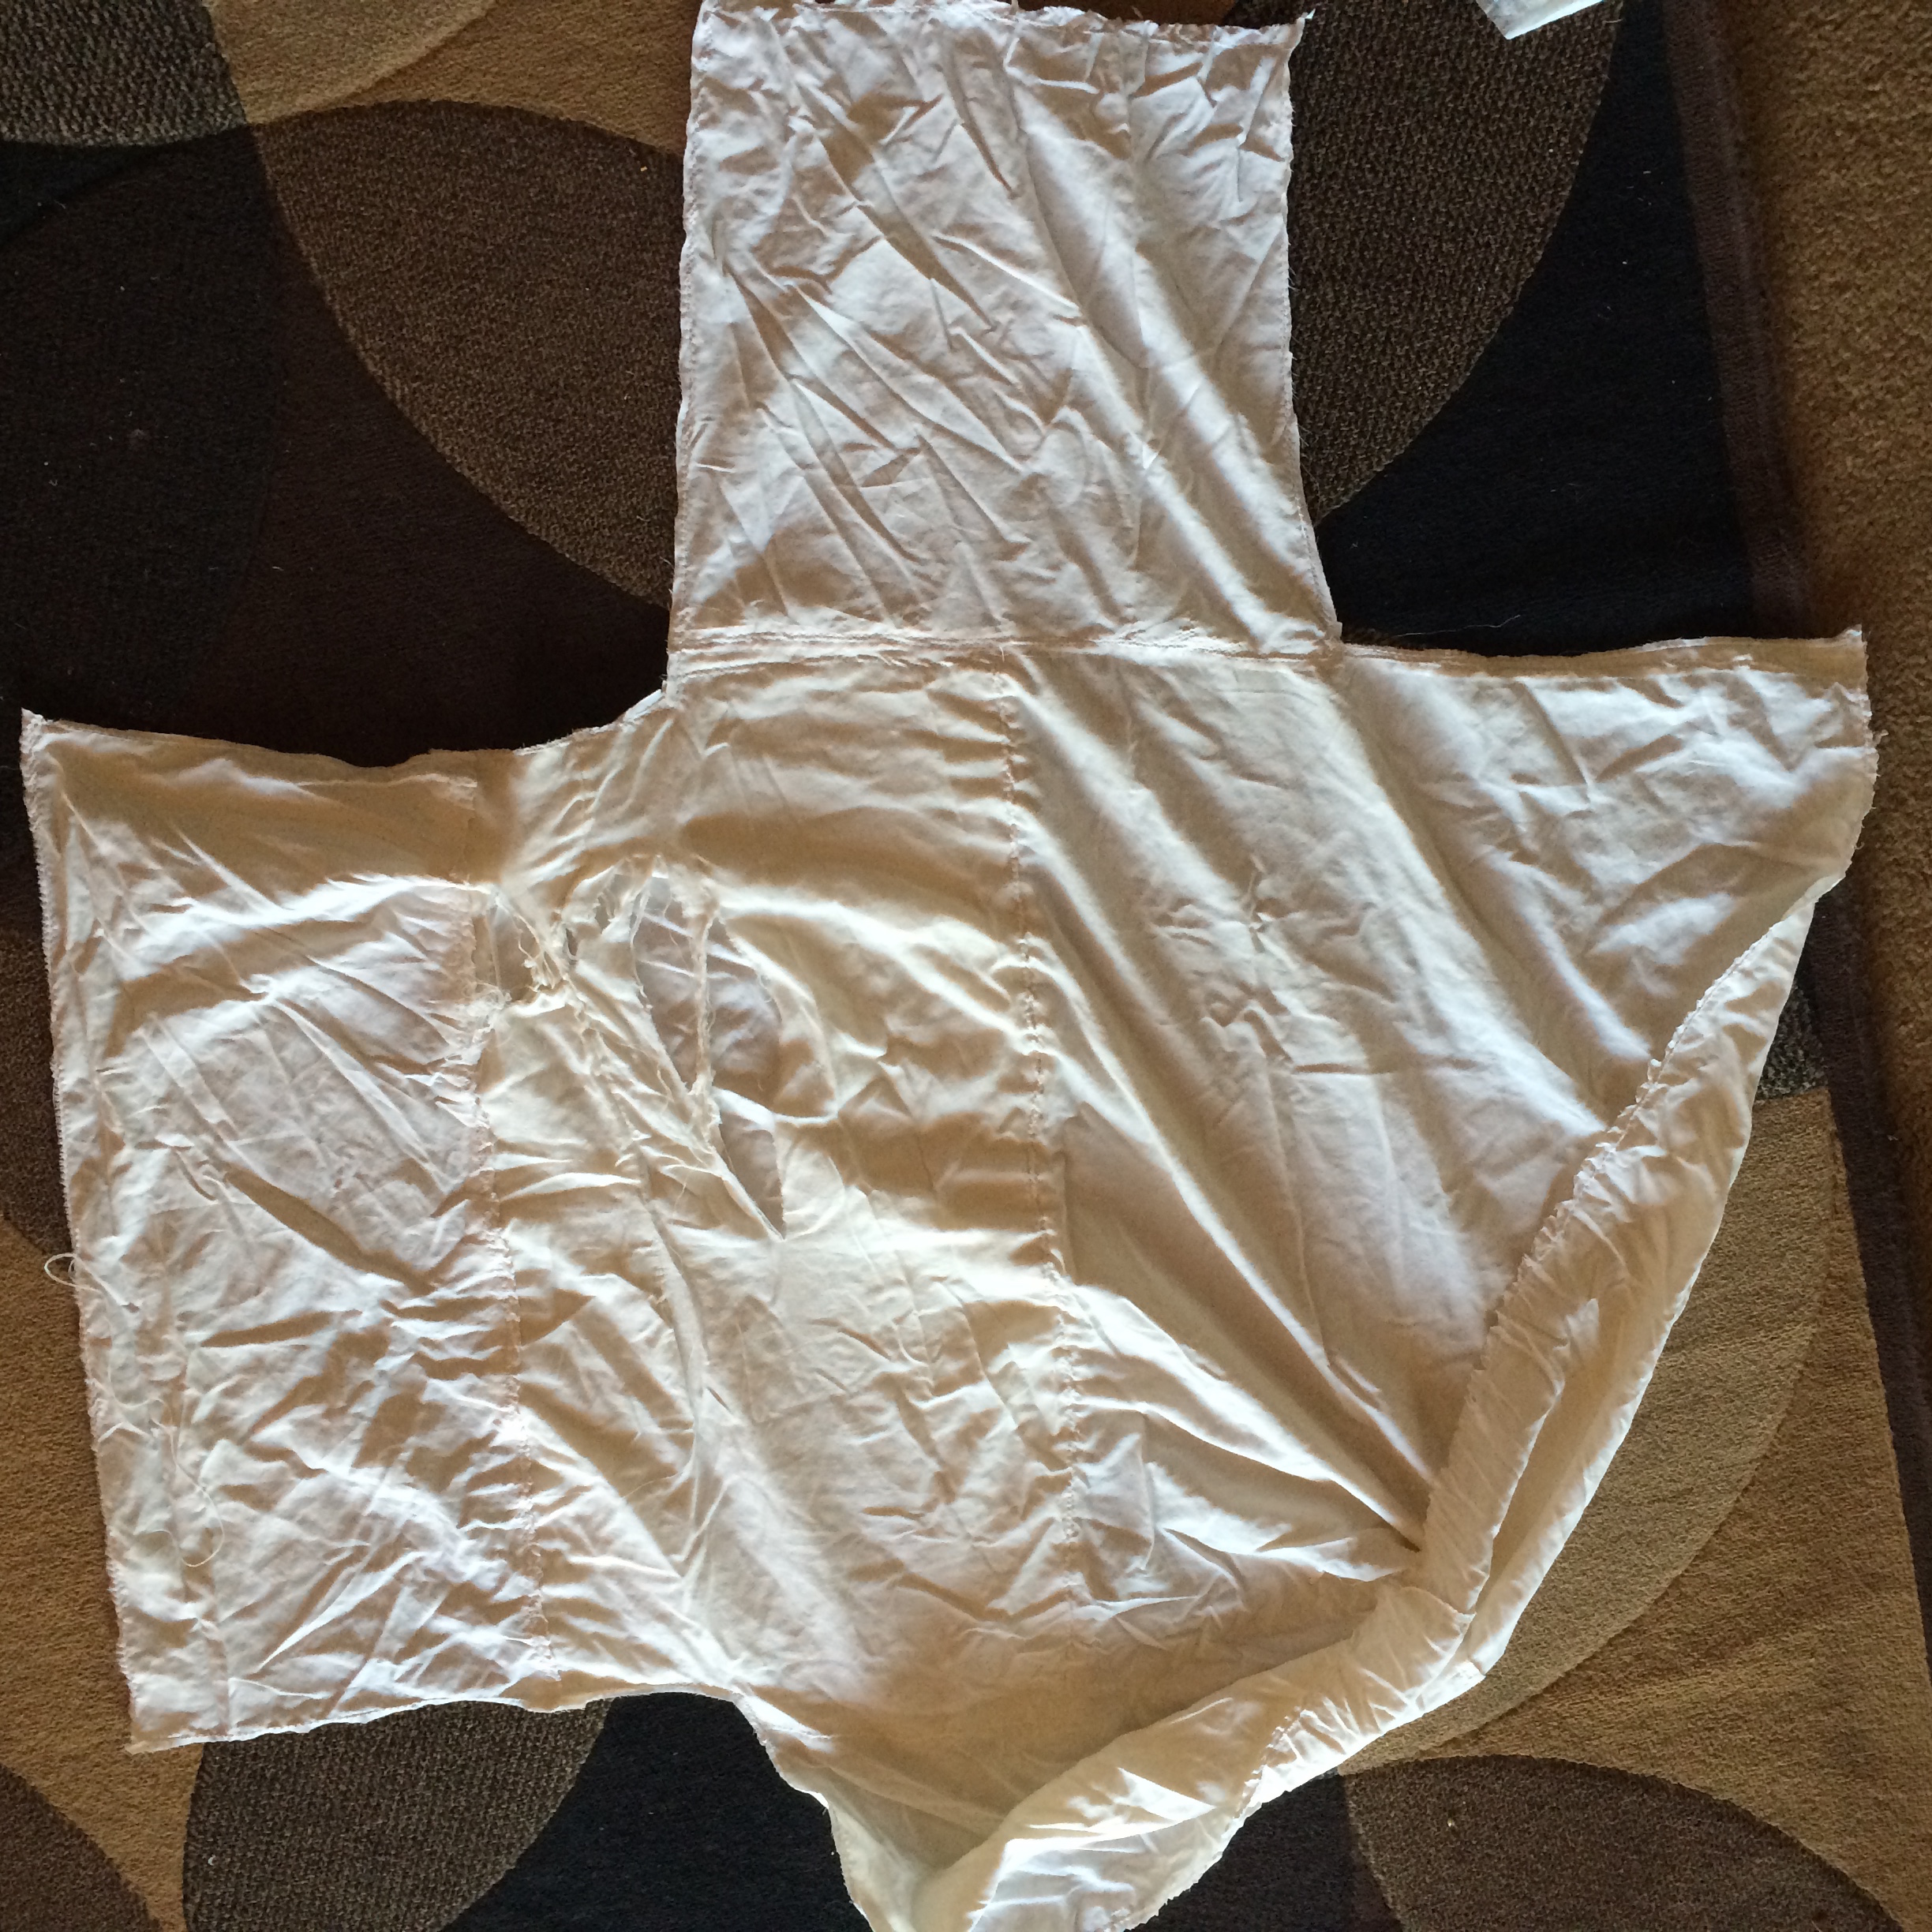
Notice my totally wonky corner? That’s where the corner of the mattress belonged. See all the crazy seams? That’s where I patched and re-patched the bedsheet when it was still a sheet. Yours will surely be prettier.
This is the elastic that used to keep the sheet on the bed now being used in the casing around the top of the basket liner.

DIY Basket Liner and Freezer Baskets: Organizing with Salvaged Materials

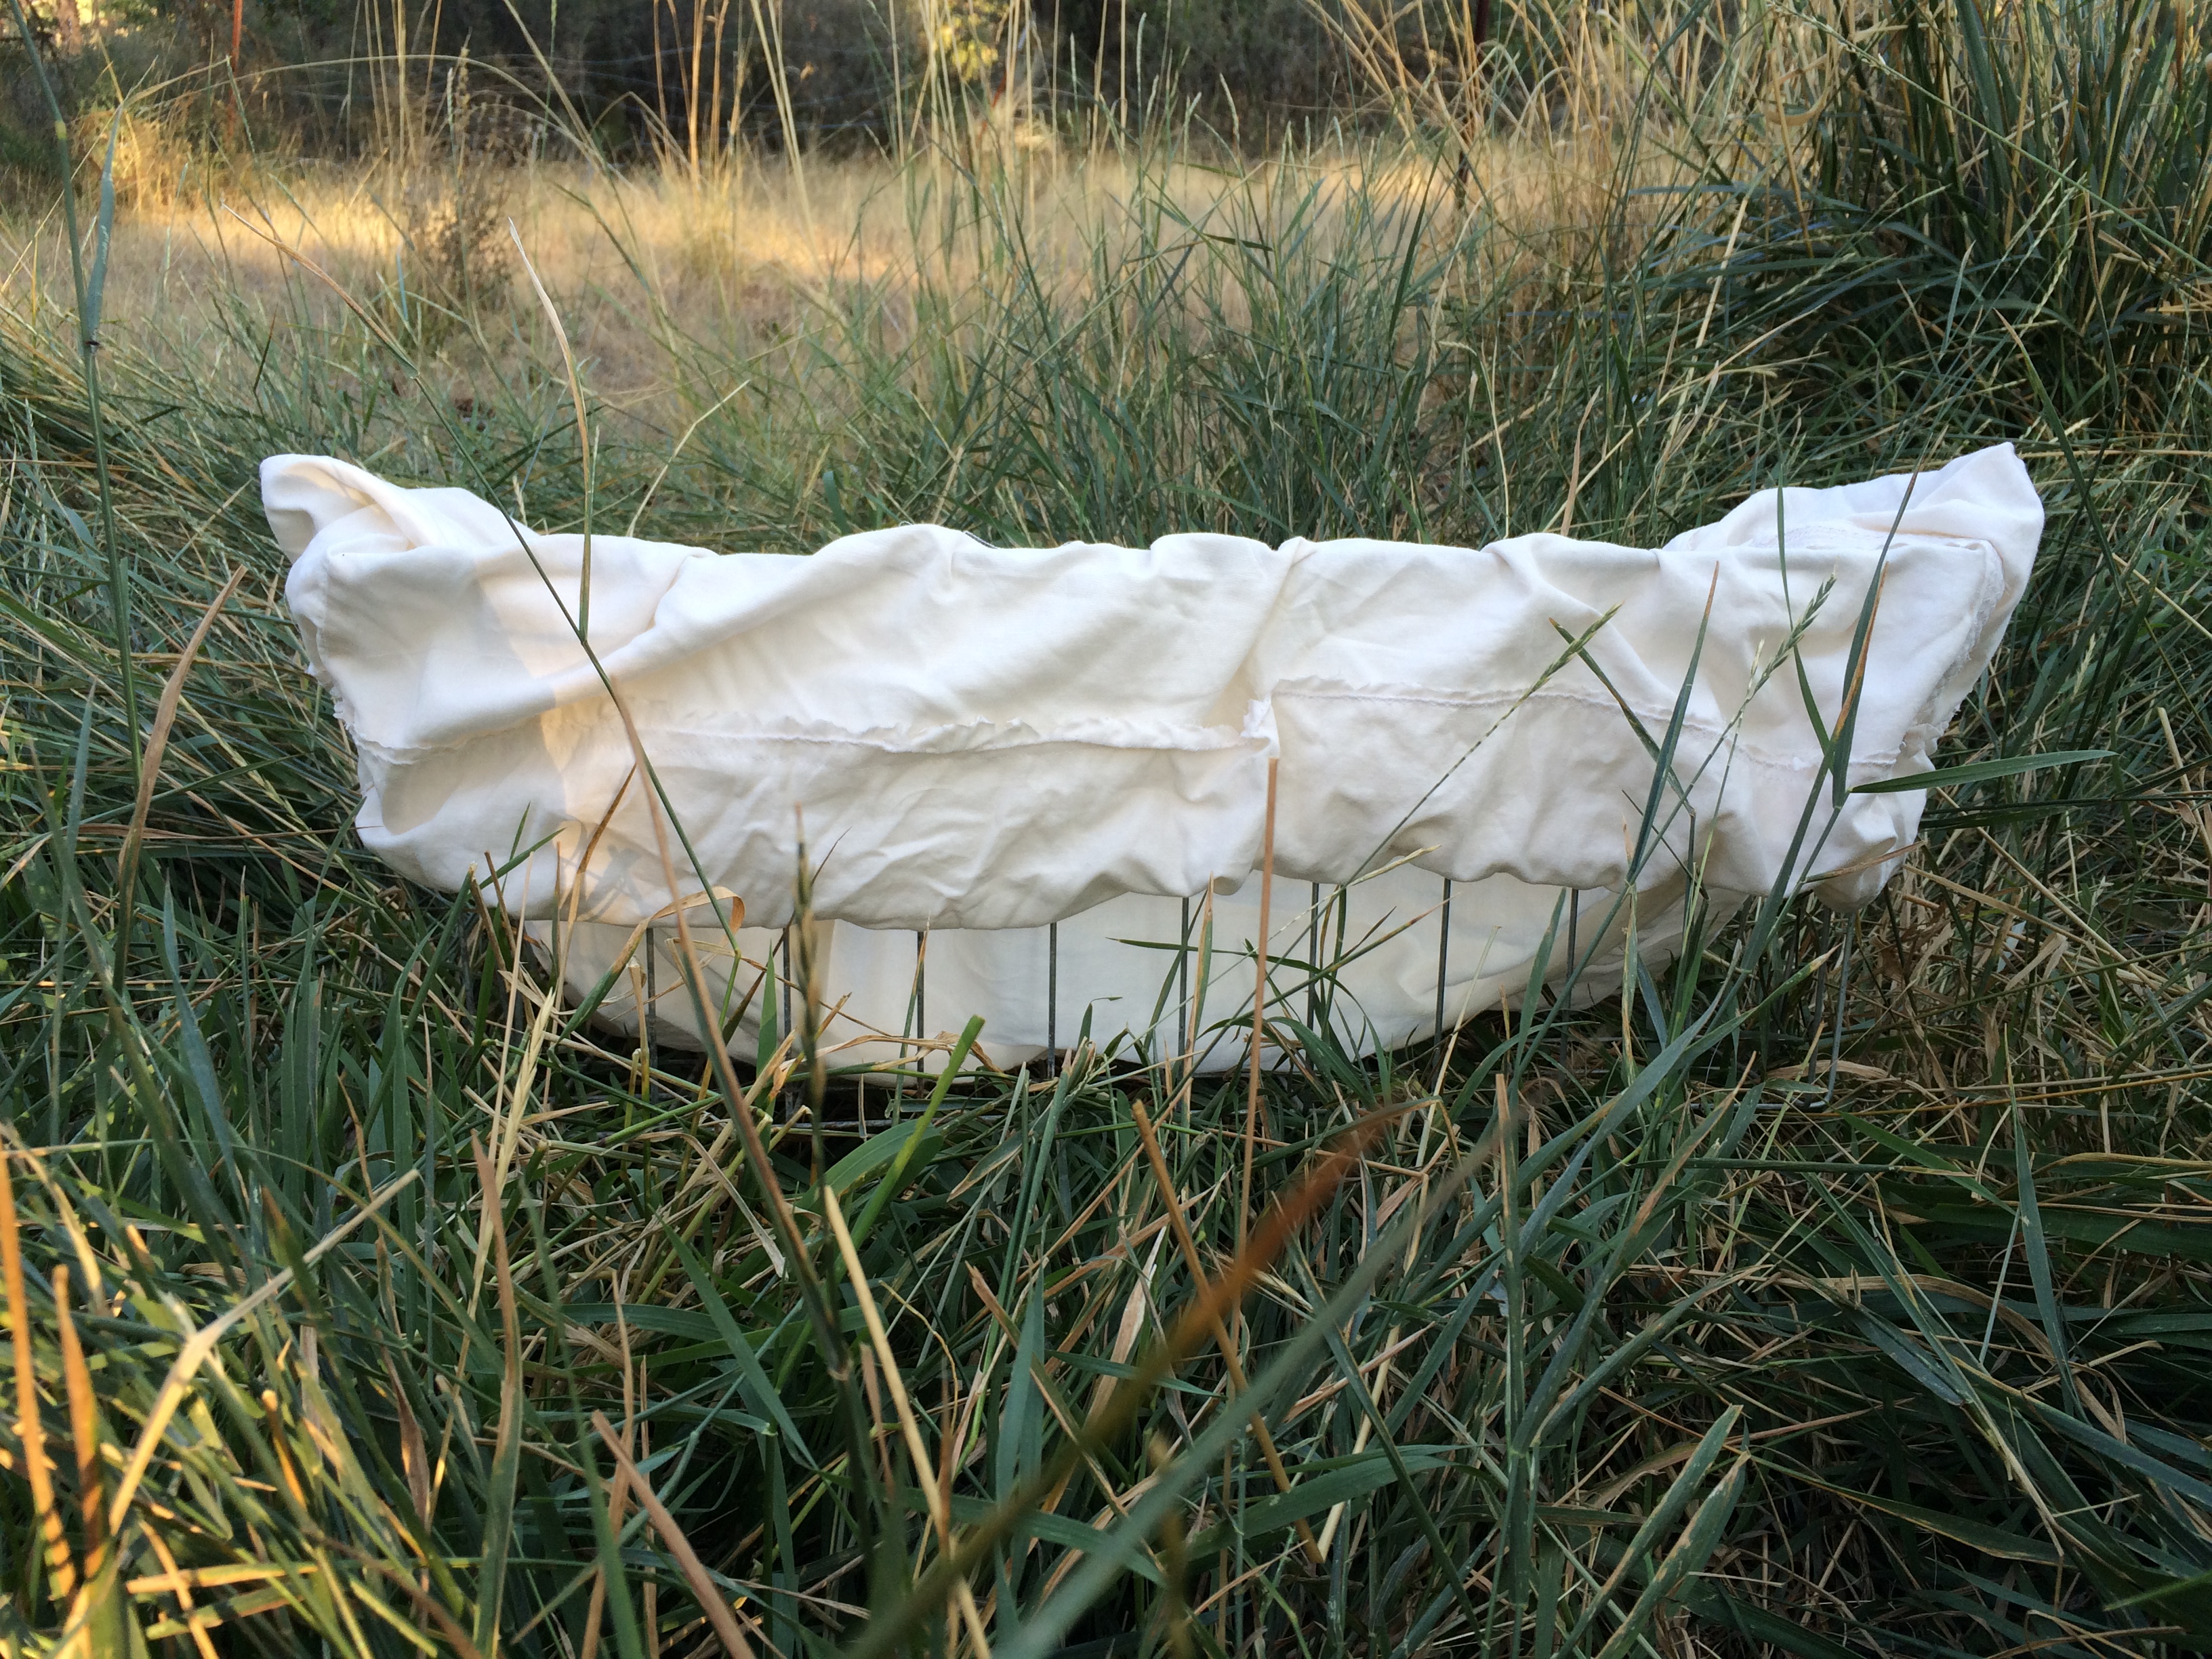
You don’t notice the weird corner of the liner because the basket now is filled with 47 pairs of toddler shoes.
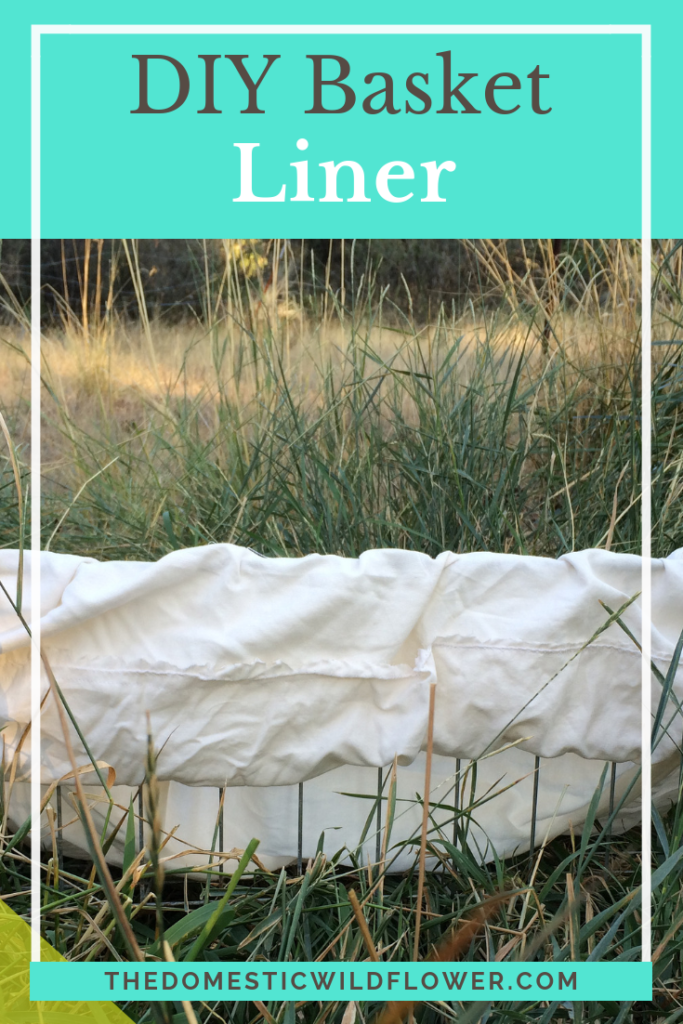
I love how this photo makes the basket look like something in which Moses would have floated down the Nile.
DIY Basket Liner and Freezer Baskets: Organizing with Salvaged Materials

There you have it, Wildflowers! What salvaged materials have you used for organizing? Share in the comments section below!

Filed Under: Sew

Salvaged Sewing: Unfinished Vest to Back Interest Tank

September 10, 2015 by Jenny Gomes Leave a Comment

Want to learn to sew? This is the course that I recommend and love!

My Gram, a continual source of sewing inspiration (mentioned here), found this half-finished vest in her fabric stash. I loved the fabric but didn’t need a vest. Because I have been on a back-interest tank kick (like these here) I immediately imagined cutting a deeper neckline and crossing the vest front into a flyaway back. Of course, unless you also stumble upon an unfinished vest in your sewing stash, this can’t really be considered a tutorial. It is really a demonstration of using creativity and bias tape to turn something unusable and undesirable (sorry, but I’m not rocking a vest to school…at least not a floral one…yet) into something cute.  Here’s how I did it:

I took out my pattern piece used (here) and cut (I eyeballed, but you should use a pencil. Do as I say, not as I do, as my mother always said 😉 the neckline and armholes to match. If you don’t have a pattern piece handy you could use a tank you already own in a similar fabric type if you are attempting a similar project. I didn’t slim down the sides because I planned on crossing the back into a flyaway back. This decision took a lot of trying on and off in front of the mirror and pinning the back at the base of the neck to figure out if that would work. It was fun to figure out, and if you think it would be too, then you’re a girl after my own heart for sure.

Because this is a woven fabric, the back of the vest, which I used as the front, was not about to provide a flattering shape to my front. I added darts about an inch from the top of the side seam. This gave the front a more structured and pleasing appearance.

The vest arrived in me with the side seams and the shoulder seams already are sewn. I pressed open the left side seam (ladies’ zippers, seams, etc, go on the left most of the time) and sewed in a salvaged black zipper (from you guessed it, my Gram). After the zipper was sewn in, I used a seam ripper to open the seam sewn by Heaven only knows who sometime in the ’80s. This isn’t a fancy way to put in a zipper but it is simple and effective. Because it is under my arm, in a dark color, and it was a salvaged (free!) project, I didn’t feel compelled to install an invisible zipper. A zipper also allows the garment to be more fitted, which is what I was going for.

Unfinished Vest to Tank Sewing Project | A Domestic Wildflower click through to see how she took an unfinished vest and turned it into a super cute top!

Unfinished Vest to Tank Sewing Project | A Domestic Wildflower click through to see how she took an unfinished vest and turned it into a super cute top!

Then came my first real roadblock. Once it was on, the front (the old back) was a bit too short. I had zero extra fabric except for the curve I cut from the neckline. Look closely- that’s what I attached to the bottom front of the top. Don’t look too closely- it’s not perfect but there were few options since the fabric is about as old as I am and at this point, I was super excited (read: impatient) to get it done. To finish the edges I used bias tape. Bias tape is very handy indeed and gave a smooth, professional finish to the edge of my project without adding bulk. FYI, bulk is nearly always a bad thing in sewing. My mom rustled up two packages of the white single fold for me (more free sewing notions= winning!) and I attached as shown in the photo. You stitch in the crease of the tape, right next to the edge of the garment. Once you sew all the way around, then you fold the tape over and create a smart looking topstitch around once again. This is one time to be careful with your stitching. It shows pretty easily if you were swerving all over the road if you know what I mean. I had to do the bias tape when my kids were napping and it looks pretty sharp as a result.

Bias tape is perfect for finishing the edge like this and is easy to use. A regular hem would have been bulky and nearly impossible to make smooth.

Finally, I sewed the top edges of the vest together in the back and sewed about ⅔ of the way down my back.

That’s it, Wildflowers! See how a little out-of-the-pattern-envelope thinking gave me a new school top? Share any similar successful project ideas in the comment section below!

If you want to learn how to sew, check out the courses HERE!

Filed Under: Sew

Typewriter 101: Tips for Purchasing a Vintage Typewriter

September 7, 2015 by Jenny Gomes Leave a Comment

Typewriter 101: Tips for Purchasing a Vintage Typewriter

 Typewriter 101: Tips for Buying a Used Typewriter

As an English major and teacher, there’s little cooler to me than a vintage typewriter. I have never owned one before now but finding mine and getting it repaired was very educational indeed. I’m in love with the satisfying racket of the type slug (that’s the part with the letters) and the warm hum of the little electric motor. I bet lots of you might feel the same, so read on, Wildflowers!

My dad brought me the sage green Smith-Corona electric typewriter (purchased years before at a yard sale) from a ranch outbuilding and after knocking some of the mud dobber nests free from the underside, he remarked that it probably still worked. Much like the automobiles of the same eras, vintage typewriters are built to last. They are heavy, metal, and often times made in America. I live for old stuff like this and promptly set to work figuring out how I’d get it in good working order.

Typewriter 101: Tips for Purchasing a Vintage Typewriter | A Domestic Wildflower click to read this super helpful post that explains what to look for and what to pass up when shopping for a vintage typewriter!

1950s Smith-Corona Vintage Typewriter- dirty, dried out the ribbon, mud dobber mud, and hay.

I couldn’t believe how difficult it was to find someone to fix the typewriter. Granted, I live very rurally, but even then I had to make several calls around to various computer and office stores to finally get the recommendation of the delightful Mr. Bill Skillman of www.selectric.com in Ashland, OR. Mr. Skillman has been repairing typewriters for years and is a professional and a gentleman. He repairs typewriters from all over the country and I’d recommend him to anyone. He and his lovely wife welcomed me and my sleepy toddler into their home when I quizzed him about what to look for in a used, found, garage sale, or otherwise rustled up the typewriter.

Here’s what the expert suggests when purchasing a vintage typewriter:

  • Look for inexpensive options because they all do the same thing. Mr. Skillman hesitated to ballpark it for me but he said that a very clean electric typewriter in great working condition should sell for about 35-40 bucks at a yard sale.
  • If you can, plug the machine into an outlet to see if the motor turns on. If it doesn’t that may indicate a more costly repair.
  • If the typewriter at hand is completely manual (not electric), type on it on the spot. Dim or faint letters simply mean the ribbon needs to be replaced and that is a simple fix. Try every key to see if the arms swing up and down.
  • Look down into the fan of little metal arms (typebars) and see if all the metal letters (type slugs) are still present. If they are not, they can be expensive or impossible for a repairman to replace.
  • Move the carriage (the big horizontal mechanism that slides left and right). It should feel smooth, with very little play. You shouldn’t be able to jiggle it around too much, nor should it be difficult to slide left to right and back again. If it feels like there’s gravel or dirt obstructing it deep inside (thus preventing it from sliding), or the carriage is completely jammed, you might be wise to pass it up.
  • Lift open the lid if there is one and look at the underside of the typewriter. If it looks like it was stored in a haystack, as Mr. Skillman explained, mice may have ruined the inner workings permanently. Typewriters that are really dirty, with lots of debris, may not be a wise choice for a purchase. If the lid is missing then it is very likely to be extra dirty deep inside and the lid itself might be difficult to replace.
Typewriter 101: Tips for Purchasing a Vintage Typewriter
If you want to see and hear this gem in action, here’s my casual Periscope broadcast that is available on my YouTube Channel.

Once you have either purchased or came into ownership of a typewriter, here’s a few things to keep in mind.

  • The ribbon (that is saturated with ink) is simply a nylon ribbon about 75 feet long. They can be purchased from the extensive selection on http://www.ribbonsunlimited.com/ and are simple to replace. My ribbon cost about 20 dollars. Inside your typewriter, you will see 2 spools (like a sewing bobbin, but bigger and probably black metal). That’s where the ribbon lives. In the same way, you wouldn’t throw away an empty sewing machine bobbin, don’t toss your old ribbon until your replacement is in place. I did not personally replace my ribbon but the customer service reviews from http://www.ribbonsunlimited.com/ are outstanding; I’d call for help if I had to change the ribbon myself.

Typewriter 101: Tips for Purchasing a Vintage Typewriter from A Domestic Wildflower click to read this super helpful post that explains what to look for-and what to leave behind-when shopping for a vintage typewriter.

  • When you are not hammering out brilliant text or clever notes, cover your typewriter with a cloth cover, NOT the vinyl covers many newer models feature. The vinyl keeps the typewriter warm, which causes the ribbon to dry out faster. You better believe I’ve added a fabric typewriter cover to my (very, very long) sewing project list. You’ll be the first to see the results when I whip one up, Dear Reader!

If you love practical guides like this one, subscribe to the mailing list and never miss one of my sewing, canning, & old fashioned DIY posts!

Yes, PLEASE!

Share your comments in the section below, Wildflowers! Will you be sprucing up that ol’ typewriter from the attic or seeking one out at the next yard sale?

Filed Under: Living

How to Support the Student in Your Life

September 3, 2015 by Jenny Gomes Leave a Comment

How to Support the Student in Your Life

You know the enthused feeling you have on January 1st (or 2nd or 3rd, depending on the degree of festivity you experienced on December 31st) when you are committed to losing weight, cleaning house, getting your life organized, quitting that bad habit, and generally being a lot more awesome? It is a terrific feeling with a lot of power. That feeling can drive you to lace up your tenny runners when temperatures are frigid and make grand plans of self-improvement and productivity with a vigor unseen in any other month. It’s a feeling of possibility, enthusiasm, and resolve.

As a teacher, my year revolves around the start of school. For the non-school going population, it is easy to forget how the start of the school year is the most important part of the year in many ways for students. For students, the new school year is like the new calendar year for the rest of the world. Some new clothes, fresh binder, unrumpled papers, recent haircut, and they are ready to rock the new school year. This is the year to nail that math class, talk to that girl, figure out what the heck to do with all the rumpled paper, and get one of those sparkly stars stuck to the top of a writing assignment. There’s a sense of bravery in the air as students consider trying out for that team, trying their hand at that instrument, and seeing what that club is all about. The new school year vibe is amplified by the buildup of summer vacation preceding it. There are lots of summer nights to imagine all the possibility ahead.

This feeling is not exclusive to the preppy or middle class. I teach lots of lower income kids from a wide variety of backgrounds and I think the air of positive possibility extends to nearly all students, even those who are disadvantaged and not sporting a closet full of new of the latest fashions or prescribing to mainstream culture.

This is all pretty powerful stuff. And yet, just like the rest of the enthusiastic New Year’s Resolvers, the enthusiasm wanes for many by about mid-March if you made a Resolution. In school time (which is not quite like dog time, but close) that is a by about October 1st. The backpack doesn’t organize itself, homework is hard, and parents are really good at putting the stop to an awful lot of fun. Classes are long, the seats are hard, and lunch break is never long enough. Just like those skipping workouts who were so committed to getting in shape in January, pupils are abbreviating their goals, and some are even preparing to throw up the white flag and beg for the mercy of Christmas Break.

This post is not for students and it is not for teachers. It is for the rest of you Wildflowers who know anyone going to school. 

Tell them that they can do it. They can get along with their peers, they can learn that hard subject, and they can give up texting and TV for a hour or so in the name of studying. They can succeed. You don’t need to comment on their height (save that for everyone else), you don’t need to regale students with how school was for you (because that was a 100 years ago), you just should reassure students that they have everything it takes to be successful.

Kids have heard a thousand times that they should do all the things they should. They know that part. The spring in their new shoes has lessened and their handouts are all mixed up and it takes a really long time for the bell to ring and they need to hear that they possess the fortitude to stay the course. 

You can also point out the positive. Ask about the classes, teachers, peers, and subjects they do like, the fun activities they might like to try and celebrate the relative successes. No big deal that they didn’t do well in the last unit, they can ask for help and do better this time around. Just as you might encourage your workout buddy that tomorrow is a new day, remind the student you care about that they can start fresh in the morning.

Relevant for nearly every kid is the need to be assured they look their best, they are bright and capable, and have clear strengths that all add up to a successful school year. Tell them they can do it, and remark on their height around the holidays instead.

How else can a Wildflower support student? Share in the comment section below!

Filed Under: Kids

Acid & Canning: pH Values of Various Foods

August 31, 2015 by Jenny Gomes 2 Comments

This post explains the role of acid in canning and how to can safely therein the bounds of the pH scale.

Acid & Canning Guide for Canners Get this great free acid and canning guide that lists the acid values of all the foods you might want to can! Such a genius post!
I think canning is a skill everyone should learn. To me, canning is cooking in advance, and in a way that is totally elevated from freezer meals and the clever use of leftovers. To preserve really good produce at home means you can have that really good produce 6 months later (you probably knew that) AND it can be totally delicious by itself. Because I can tomatoes, months later I open a jar, dump it on some pasta and I don’t have to add much if anything at all to make an awesome supper. A storebought jar of pasta sauce doesn’t come close to what you or anyone with a good canning recipe would want to measure; nutrition, taste, versatility, or satisfaction. Canning has improved my cooking (and thus eating) immeasurably. What you preserve in jars can be miles more delicious, more healthful, and more immediately useful than what you get at the grocery store. You don’t have to try canning because it is hip, green, or cool. Try it because it has to power to make your mealtimes infinitely more satisfying.

This post may contain affiliate links. All opinions are my own. 

Canning is a mysterious and amazing thing. This post will attempt to clarify one aspect of canning and hopefully my Dear Readers will feel more confident taking their first water bath plunge. As an English teacher, I hope to make a really science-y thing understandable to any eager water bath canner, regardless of the last time you saw a piece of litmus paper or read the introductory chapter of nearly any good canning cookbook. Here we go…

Foods have a pH value, denoted by a number. Low numbers mean higher acid (limes are a 1.8) and higher numbers mean less acid (spinach is a 6.5). An acidic environment (inside your canning jar) prohibits the growth of spoilers, which can make us sick and can cause our hard work to be wasted. To safely water bath can, one element that must be present is a safe acid level.

 We preserve foods that are naturally high in acid and/or we add ingredients to our recipes to bring the acid level up. For example, strawberries are a great choice for any canner because they naturally are acidic at a 3. Strawberry jam recipes often are very, very simple because you just need sugar and the berries to reach a safe acid level.

The important number that recipe creators and curious canners need to keep in mind is 4.5. Any number higher than that and the recipe will call for something to bring the acid level up (and the number down). Green beans are a 4.6 – not acidic enough all by themselves to safely water bath can, but, what about the old fashioned favorite Dilly Bean?! They are canned safely because of the addition of vinegar (quite acidic at about 2.0-3.4 depending on variety). This is why vegetables (generally lower in acid) are often pickled in vinegar, and fruit (generally higher acid) is practically foolproof and a great starting point for a new preserver.

Tomatoes are the perfect example of this pH scale and its importance. We tend to think of tomatoes as being really acidic but they are actually at about a 4.2- 4.9, depending on all kinds of things like where they were grown and their variety. Most recipes for canning tomatoes call for either lemon juice or citric acid to be certain that the acid level is safe. Unless you are going to measure the pH level of the tomatoes you haul home from the farmer’s market, you must follow the recipe even if the tiny bit of citric acid seems unnecessary or the whole lemon you have on hand seems just as good as a jug of store bought lemon juice. Store bought lemon juice is verified to be a specific acid level. You would have no way of knowing if your whole lemon happened to be a bit less acidic than need be. Thus, it is critical to follow the recipe to maintain safety in canning.

This science lesson is applicable to a canner who might feel inclined to step out of the recipe safe-zone and into lower acid territory. One should ALWAYS follow a recipe from a trusted source when preserving food in jars. However, it is important to understand the chemistry so you make wise canning decisions, Wildflowers. I confess; I am a corner cutter, rule breaker, and shortcut taker 9 times out of 10 but NOT with canning.

The pH values of various foods list is available on the FDA website in a very long and not so easy to read format, so I created a FREE downloadable PDF for my readers for your reference. The PDF is condensed and easier to read than the list on the site, and you can print it or read it on your phone while you’re canning away in the kitchen:)

The idea with this list is you can refer to it to check if it is safe to replace lemon juice with lime (probably safe because their acid levels are very similar) or replace apricots with figs (definitely NOT because apricots are in the safe zone of 3.3 and figs are a 4.6). This tool is meant to educate and inform. I mentioned apricots and figs purposely. You might think, hey, they are both sweet, about the same size, it won’t matter if I swap out some of the apricots for figs…but it matters a lot. Canning is not like regular cooking where you can make substitutions willy-nilly. You might also notice the wide range of acid values for some produce. That should also indicate to you the necessity  to check the list, or better yet, find a trusted recipe. 

Download the free Acid & Canning Chart here!

SaveSave

Filed Under: Can

  • « Go to Previous Page
  • Page 1
  • Interim pages omitted …
  • Page 56
  • Page 57
  • Page 58
  • Page 59
  • Page 60
  • Interim pages omitted …
  • Page 66
  • Go to Next Page »

Primary Sidebar

Categories

Follow me here, there, & everywhere!

  • Email
  • Facebook
  • Instagram
  • Pinterest
  • RSS
  • Twitter
  • YouTube

Search

Get The Pressure Canning Cookbook

Get 10 Free Recipes Now!

Best Chicken Coop

Footer

Get Started Pressure Canning

Shrubology Ebook

Shrubology: Refreshing Homemade Fruit and Vinegar Syrups for Cocktails
Make easy, no-cook fruit & vinegar syrups for cocktails & mocktails! This ebook shares crowd pleasing recipes and simple to understand ratios so you can make a shrub on your countertop any time- without a recipe. Dive into these Prohibition Era drinks today!

Copyright

Copyright 2019
The Domestic Wildflower
www.thedomesticwildflower.com.
All content created by Jennifer Gomes unless otherwise noted.

Copyright © 2025 · Lifestyle Pro on Genesis Framework · WordPress · Log in