• Skip to secondary menu
  • Skip to main content
  • Skip to primary sidebar
  • Skip to footer
  • Blog
    • Subscribe
    • Welcome!
  • Perfectly Preserved Podcast
  • About
    • ADW Manifesto
    • Work With Me
      • Read
  • Shop
    • My Account
    • Cart
    • Checkout

The Domestic Wildflower

Handmade Food & Craft Tutorials for Beginners

  • Courses
    • Free Canning Basics
    • Everything Canning Course
    • Steam Canning Workshop
    • Free Homemade Cocktail Mixers
    • Wildflower Mixology
    • Crochet Basket Workshop
  • Can & Preserve
    • Never Canned?
    • Steam Canner Equipment Bundle
    • Shrubs Course
  • Sew
  • Cook
  • Craft
    • Crochet Step-by-Step Guides
      • Crochet Basket
      • Giant Yarn Throw
      • Thick & Thin Throw
  • Living
    • Creativity Challenge
    • Clean
    • Kids
  • Rentals

Craft

How to Crochet a Thick and Thin Wool Throw Blanket

February 27, 2017 by Jenny Gomes 10 Comments

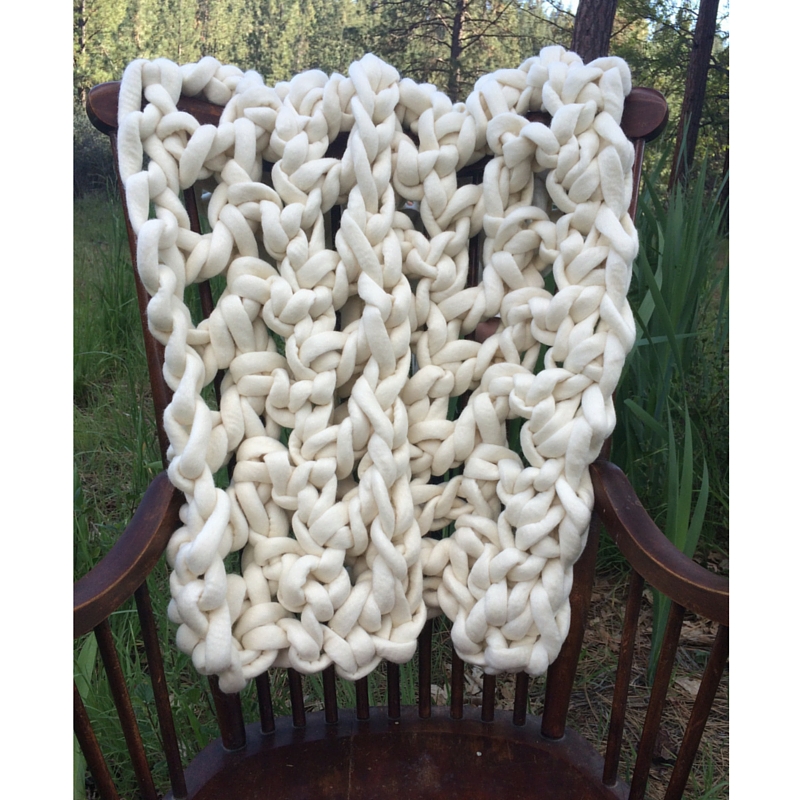
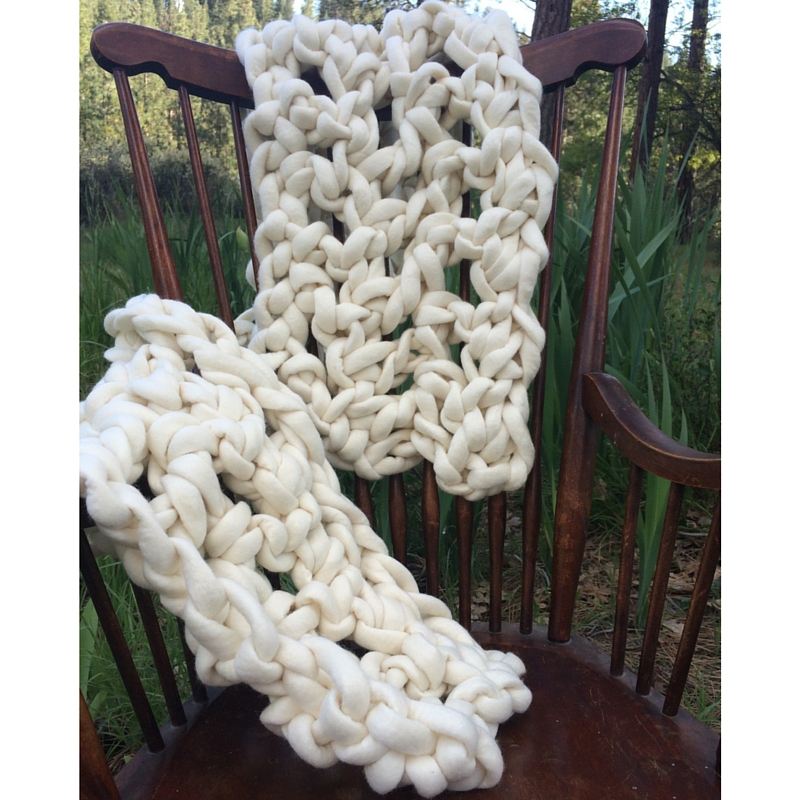
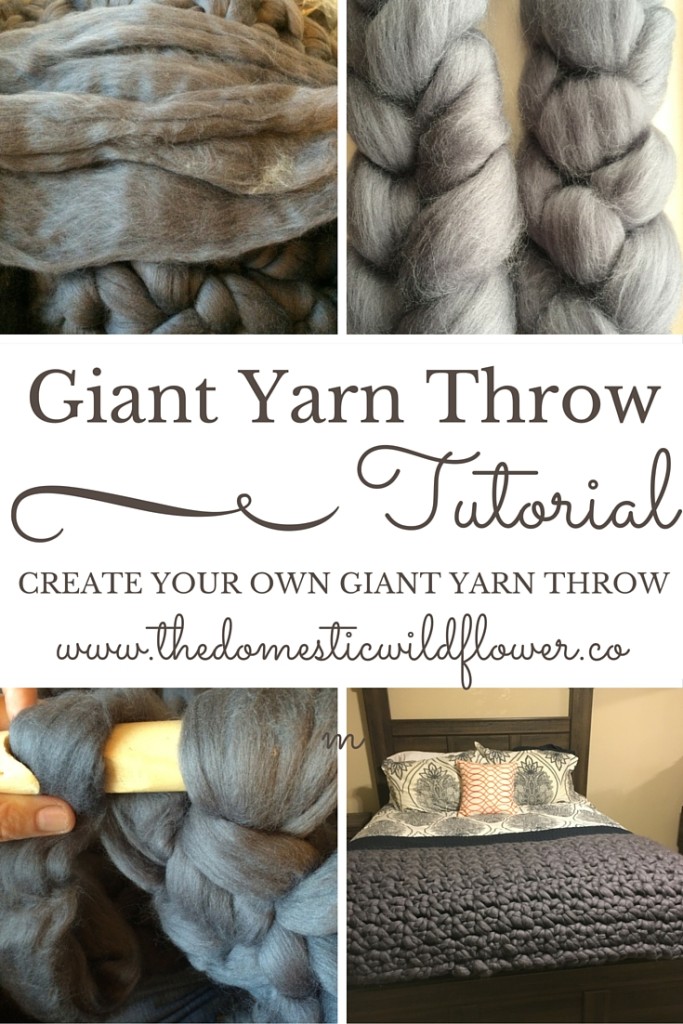
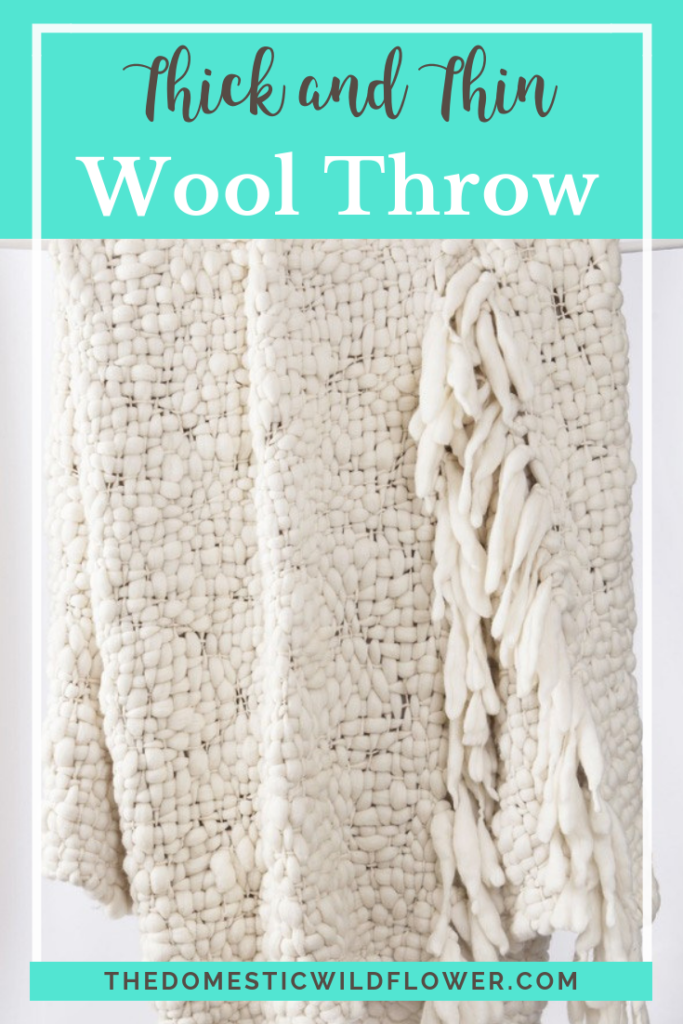
This tutorial will explain how thick and thin yarn is different from other yarns and why the resulting look can result in a beautifully textured throw blanket that far exceeds those of lower quality sold for far more in stores.

How to Crochet a Thick and Thin Wool Throw Blanket

While scrolling through Instagram, about 8 weeks ago, I found a more urban, more chic, but definitely equally money-savvy blogger, Reichel Broussard of Copy Cat Chic. We connected over a common love of textured textiles, swapped a few emails, and hatched a plan for me to figure out a way to mimic the look of a throw she loved but was sold for an obscene $1,000. Her focus is on finding less expensive but fabulous ways to furnish one’s home and my focus is on making less expensive but beautiful things resulted in a positively dreamy throw. Check out her Wildflower-approved site www.copycatchic.com here, and her swoon worthy Instagram here.

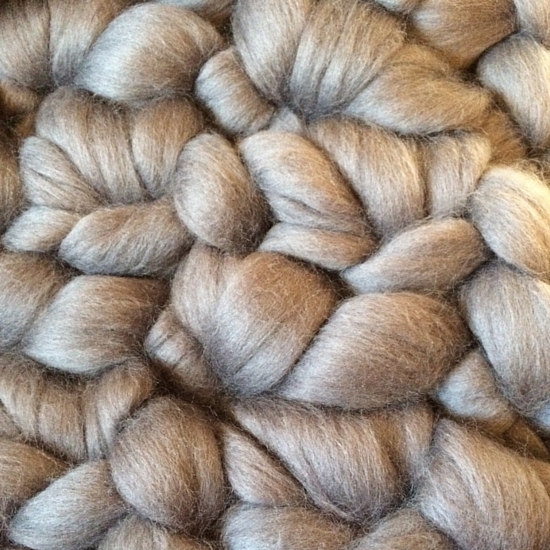
The first problem with her desired throw was that it appears to be woven (I never saw said blanket in person) from a very thin, to very thick yarn.

[Read more…] about How to Crochet a Thick and Thin Wool Throw Blanket

Filed Under: Craft

Learn to Crochet in 15 Minutes

February 20, 2017 by Jenny Gomes 4 Comments

This post will show you how to crochet in 15 minutes. It will demonstrate how to make a slip knot, how to chain, and how to crochet a versatile, simple stitch. The best part? You don’t even need a hook. Read on for the tutorial, beginner, and you’ll be crocheting in no time!

Learn How to Crochet in 15 Minutes | Tutorial from The Domestic Wildflower click to learn how to crochet with your fingers in just 15 minutes with this super simple tutorial. No abbreviations or complicated steps!

Crochet is typically done with a hook but when you use giant yarn, you can use your fingers with ease. Once you master crocheting with your fingers, you could choose to pick up a hook and make something with smaller scale yarn.

People often ask me why I don’t knit. The reason is that I just haven’t learned yet 🙂 Knitting and crocheting are different ways of doing the same thing. Crochet is faster, takes more yarn, and requires one hook. Knitting takes a bit more time, less yarn, and two needles.

The yarn I use in this video is from Love Fest Fiber’s and it is called Tough Love. It is felted, super strong, sturdy, easy to work with, and as you’ll see in the video, it is very clear for a beginner to see where they are supposed to create a new stitch. It is about as big around as a dime in diameter (that’s pretty big!) so you’ll be able to see clearly what to do when.

In the video I don’t use any terms or abbreviations that you might not be familiar with and I show you the simplest way to get started. The video is about 10 minutes is all- watch it newbie! 

***

If you want to take those new crochet skills to the next level, Wildflowers, I want you to grab this completely free downloadable step-by-step guide. I’m an English teacher in my “real” job (did I tell you that?) and I really pride myself on writing easy to understand instructions. This PDF will explain HOW to take a ball of giant yarn like the Tough Love yarn from Love Fest Fibers and make a chunky wool basket, like those below.

Download the step by step guide!

Felted Wool Basket | The Domestic Wildflower click through to read the full tutorial for how to crochet a felted wool basket in giant yarn in under 2 hours!

Felted Wool Basket | The Domestic Wildflower click through to read the full tutorial for how to crochet a felted wool basket in giant yarn in under 2 hours!

Felted Wool Basket | The Domestic Wildflower click through to read the full tutorial for how to crochet a felted wool basket in giant yarn in under 2 hours!
The basket fits 5 wide mouth pints just fine 🙂

Imagine how happy you’ll be gifting a homemade basket like this! To help you out, I made a super simple, printable PDF that you can grab for free 🙂

Download the basket step by step guide!

All signed up? Think your friends would want to join you? I’d LOVE it if you shared this post out with your friends on Twitter , Facebook, and Pinterest. The more the merrier, right, Wildflowers? This is going to be a party! B.Y.O.B of course…Bring Your Own Basket 😉 Can’t wait to see you all there!Learn to finger crochet in just 15 minutes with Jenny of The Domestic Wildflower | check out this blog post that teaches you HOW to crochet in minutes; no hook required!

Filed Under: Craft

Practical Giant Yarn: Extreme Yarn for Everyday Use

February 13, 2017 by Jenny Gomes Leave a Comment

This post shares the best yarn for a textile that you can use every day without fear of pilling, shedding, or dissolving. I’ll share how I crocheted with my fingers (hello extreme arm crochet!) and made a throw for my living area that I can just as easily wear as a chunky scarf when the snow returns. Read on for the tutorial!

The Best Giant Yarn for Everyday | The Domestic Wildflower click to read about the very best giant yarn that you can get to use for textiles. This post also shares other yarns in the same size range and their uses. This is such an informative post! Read it now guys!

I have been utterly in love with giant yarn and have made an effort to share what I know on the topic here on the blog. I made a gorgeous throw for a cousin’s wedding gift here and learned that the results of using that kind of unfelted yarn is a dramatic, hefty, but very delicate textile. It can’t be washed, and is prone to pilling and is best displayed on an accent chair or guest bed where it won’t get handled all that often. It isn’t like it will fall apart in your hands, but I think the pilling will age the item much faster and will look old before its time. It is a lot like cotton candy, in a sense. It is voluminous, delicate, and beautiful to look at, but lacking in the substance required for the every day. I got it from the Knitting Revolution Etsy shop and the product is stunning and service perfect.

Practical Giant Yarn: Extreme Yarn for Everyday Use | The Domestic Wildflower click through to read which giant yarn is the very best for a durability as well as beauty.

Get the pattern to make this giant throw here!

I made a thick and thin throw with great success and modeled it after a super expensive woven lust object shared on the savvy Copy Cat Chic site. This was a far more practical choice as the yarn is spun (and the fibers are hence connected much better together) and it made a wonderful gift for a friend. The big poofs, however cloudlike and dreamy they are, are prone to pilling a bit and if you have a cat, toddlers, or other critters like a messy mate, then it might not be as wise of a choice. If I didn’t have a cat that would knead it, or kids that would use it as a superhero cape the moment my back was turned, I might have kept it. I got the yarn from Hookaholics Handspun on Etsy, and their service and product was amazing.

Practical Giant Yarn: Extreme Yarn for Everyday Use | The Domestic Wildflower click through to read which giant yarn is the very best for a durability as well as beauty.

Get the step by step PDF guide for this thick and thin throw blanket for free right here, Wildflowers!

Enter Knit 1 Share 1 by Little Dandelion. This is the pinnacle of giant yarn; it is beautiful, very soft, and felted so it will NOT pill, not dissolve, and is actually quite durable. Jacqueline Fink is the mastermind behind these “bumps” (as the skeins are called) of woolen beauty, and if you want to see her in action, look on her YouTube. Not only is she sweet, clear, and devoted to her craft, she shared with me a little bump and shipped it all the way from Australia for me to try out.

I really struggled with what to make once I received the creamy yarn. It is SO soft, so much softer than you imagine it being, that I could NOT make a round basket with it. I worked up the base of a basket twice and took it out. It would have looked rad I’m sure but I hate the thought of wasting the softness on an item I’d rarely touch.

I also wrestled with what stitch to use. I only know how to crochet, not knit, and I have noticed that in the giant yarn world, there’s very little crochet represented. I don’t know why that is but I wanted to make something that LOOKED crocheted. The other items I have made this season didn’t necessarily look as if they were crocheted and I wanted this one to be different.

I decided against using a hook mostly because I gave the one giant hook I own to a student in the local FFA woodshop to copy for me. Out of necessity and for experiment’s sake, I crocheted by hand. This actually was fast and simple, and being able to use my pointer and middle fingers to pull the loops through made it a piece of cake.

I chained the width of my bed and mocked up a couple options. I decided (finally) that as the width of my bed would result in a bed runner or a scarf sized item, I’d proceed with that size. I chose a double crochet stitch created in every other stitch to get the most height I could with the limited amount of yarn.

Here’s my Periscope broadcast saved to YouTube where I show my struggle to decide and the beautiful yarn in motion.

Each row is about 5 inches tall and I was able to make it 3 rows plus one row of single crochet in every other stitch that ended about ¾ of the way from the end of the row. I just shorted each stitch manually a bit in this final row and you hardly notice that the row just sort of disappears rather than ends where it ought to at the end.

The end result is a soft, dramatic, very sturdy item that is gracing a vintage rocker in my living room. When the snow flies again, I’ll wear it as a show stopping scarf. Swoon-worthy, winter wonderland photographs forthcoming 😉

Practical Giant Yarn: Extreme Yarn for Everyday Use | The Domestic Wildflower click through to read which giant yarn is the very best for a durability as well as beauty.

The cost of this yarn is significant, there’s no denying it. However, for the weight of the yarn, the shipping distance, and the unparalleled quality, it is well worth it. I know it would be a significant investment for any crafter but giving a unique heirloom that will last forever is an awesome thing.

Practical Giant Yarn: Extreme Yarn for Everyday Use | The Domestic Wildflower click through to read which giant yarn is the very best for a durability as well as beauty.

A whole bump is enough to make a full size blanket for a bed, so you wouldn’t have to join (connect the ends of one skein to another) and you’d be sure to have enough for the project. For dreamy inspiration, check out Little Dandelion’s instagram here and see what I mean by “dramatic”.

Little Dandelion also sells giant knitting needles (if I owned them, I’d display them on a wall the way some people do fishing poles or oars) and her K1S1 yarn comes in a variety of dreamy colors.

This whole love affair that I have with giant yarn that can be whipped into something gorgeous in no time flat culminated in a basket that I created using Love Fest Fiber’s Tough Love felted wool yarn. This yarn is a bit scratchy, so you wouldn’t make a baby blanket out of it, but you definitely would make a basket, or a dog bed, or a rug, or a floor cushion.

The BEST part of this particular basket and yarn is you don’t need a hook. That’s right; NO HOOK. You can finger crochet the whole basket in about 2 hours.

Get the chunky crochet basket mini masterclass here from The Domestic Wildflower!

Does this pink dreaminess have you ready to make one yourself? Download my completely free step-by-step PDF guide to make one yourself! 

Get the chunky crochet basket mini masterclass here from The Domestic Wildflower!

Download the pattern to make this exact basket (in almost any color you want!) that’s written in super clear, plain English. For free. Right here 🙂 

What giant yarn projects have you tried, Wildflowers?

Filed Under: Craft

5 Giant Yarn Projects Ebook

January 31, 2017 by Jenny Gomes Leave a Comment

This post will share the 5 Giant Yarn Projects Ebook, the projects within, resources for scoring your own giant yarn (and giant hooks!) and inspiration to get started with giant crochet projects.

5 Giant Yarn Projects by Jenny Gomes of The Domestic Wildflower | This ebook is so helpful! It explains the different types of giant yarn out there, which kind you really need to be wary of, and gives great project ideas. Each project explains in plain English (no pattern lingo here!) how to make a variety of throw blankets, a felted wool basket, and a scarf. Grab this ebook today & happy crochet-ing!!

First of all, if you want to grab this ebook and don’t have time to read the rest of the post, get it here! 

So as some of you know I have been blogging about giant yarn and crocheting with giant yarn for the better part of a year and consistently, those posts and pins on Pinterest did really well. I decided to compile everything I have learned about giant fiber and crocheting it into an ebook.

In the ebook, that is about 30 easy to read pages, I share 5 main project ideas with links to where I got the yarn, what to look out for, which projects you might want to skip and why, where to get giant hooks, a couple companies I think you would love to support, and plain English, step by step guides for all 5 projects.

I teach you how to make a couple different throws, a scarf, a basket, and a bed runner.

If you haven’t crocheted before, I gotcha covered. Here’s my super simple video tutorial where I teach the stitches I use in most of my beginner-friendly projects. You can learn in only 15 minutes!


Need more inspiration? Here’s the projects you’ll learn how to make in the ebook!

Learn how to crochet this beautiful thick and thin rustic throw blanket!

This thick and thin throw is fast, easy, and DIFFERENT- it isn’t your run of the mill yarn or “look” …you’ll want to make it if you are into fluffy soft textiles, big texture, and creamy yarn.

Felted Wool Crochet Basket | The Domestic Wildflower click to see how you can finger crochet this gorgeous wool basket in under 2 hours, with NO HOOK, even if you've never crocheted before. Read the post now!

This project is one of my most popular because a basket is so USEFUL (mine held cloth diapers until very recently, since my son finally conquered the unfortunate falling in the toilet set back from a few months ago, and now it holds my daughter’s ballet clothes!) and it can be done in under 2 hours!

The Best Giant Yarn for Everyday | The Domestic Wildflower click to read about the very best giant yarn that you can get to use for textiles. This post also shares other yarns in the same size range and their uses. This is such an informative post! Read it now guys!

This projects explains exactly which yarn is the best of the best and why AND how to get your hands on your own.

Giant Yarn Throw Tutorial | A Domestic Wildflower click to read the full tutorial for how to make your own knitted or crocheted giant yarn throw including a pattern and sources for beautiful wool yarn!

Felted Wool Basket | The Domestic Wildflower click through to read the full tutorial for how to crochet a felted wool basket in giant yarn in under 2 hours!

Expect photos like this inside, so you can SEE what you are supposed to do, every stitch of the way.

Practical Giant Yarn: Extreme Yarn for Everyday Use | The Domestic Wildflower click through to read which giant yarn is the very best for a durability as well as beauty.


Want to make these beautiful projects?

Yes! I Want Instant Access!


Filed Under: Craft

How To Sew a Burlap Garland

January 28, 2017 by Jenny Gomes Leave a Comment

This post will teach you how to sew a super simple burlap garland that you can make yourself with jute webbing, hemp rope, and an hour of time.

How to Make a Burlap Garland | This DIY tutorial is so farmhouse adorable, and so easy to sew! Perfect for rustic DIY decor for the home, this fixer upper style banner is right at home in a kitchen or for Valentine's Day

This post may contain affiliate links which are a way for you to support your favorite blogger without any impact on your amazon checkout. I’d never recommend something I didn’t use and love myself.

This garland is truly simple to sew for a very beginner for several reasons. Jute webbing is easy to sew on, and requires  only a universal needle,  and basic sewing thread. Sewing on jute webbing (that characteristically is just striped burlap meant for supporting a chair cushion in a chair or sofa) is easy, and gives a good chance for a newbie to practice making a narrow seam allowance (sewing close to the edge) and pivoting at the point of the garland to make a nice, sharp point. Of course, if you are a seasoned seamstress, this project will be even faster and easy to customize further. Jute comes striped in a variety of colors (navy, black, and red being the most common) and a couple different widths. Mine in 4 inches wide.

You will need: 

4 yards jute webbing

5 yards hemp rope

Universal sewing needle

all purpose thread. 

Instructions: Cut jute into 12 inch lengths. Zigzag cut edges. You can skip this step, but be warned that this webbing will fray significantly, and not in the cute way.

How to Make a Burlap Garland | This DIY tutorial is so farmhouse adorable, and so easy to sew! Perfect for rustic DIY decor for the home, this fixer upper style banner is right at home in a kitchen or for Valentine's Day

Fold the end into a point. Sew from the side, to the point, lower the needle, lift the presser foot, pivot, and sew down the other side of the triangle. I prefer a narrow 1/8 inch seam allowance and since your stitches disappear readily in the jute webbing, this is a great time to practice sharpening your skills.

How to Make a Burlap Garland | This DIY tutorial is so farmhouse adorable, and so easy to sew! Perfect for rustic DIY decor for the home, this fixer upper style banner is right at home in a kitchen or for Valentine's Day

How to Make a Burlap Garland | This DIY tutorial is so farmhouse adorable, and so easy to sew! Perfect for rustic DIY decor for the home, this fixer upper style banner is right at home in a kitchen or for Valentine's Day

Repeat on all sections.

Measure about 20 inches from the end of the rope. This is where your first section will be sewed.

Lay the jute webbing sections around the hemp rope with the triangle points pointing to the right. The enveloped rope will be to the LEFT of the presser foot, which may feel contrary to your instinct but this worked best for the next step.

How to Make a Burlap Garland | This DIY tutorial is so farmhouse adorable, and so easy to sew! Perfect for rustic DIY decor for the home, this fixer upper style banner is right at home in a kitchen or for Valentine's Day

Use a sewing pin to secure the section however you’d like. Sew a straight line, remembering to backstitch at start and finish. Do your best to get as close to the rope as you can. This creates a tight casing so your garland sections aren’t sliding all over the rope. I like mine to be close to evenly spaced.

How to Make a Burlap Garland | This DIY tutorial is so farmhouse adorable, and so easy to sew! Perfect for rustic DIY decor for the home, this fixer upper style banner is right at home in a kitchen or for Valentine's Day

Continue to sew sections to the rope about fist-width, or 4 inches, apart, the length of the rope.

Knot ends of the rope.

Display with love!

How to Make a Burlap Garland | This DIY tutorial is so farmhouse adorable, and so easy to sew! Perfect for rustic DIY decor for the home, this fixer upper style banner is right at home in a kitchen or for Valentine's Day

That was a piece of cake, right? I know some of you are new to me so I wanted to say hi! I’m Jenny and I love helping newbies get started making homemade things for themselves. I used to work in a fabric store while I was in college and I will NEVER run out of killer good ideas for crafting for beginners. Never 🙂

Jenny of The Domestic Wildflower

That’s me! My photographer makes me look like I’m actually sorta in control of the two wild children and galumphing chocolate lab behind her. God bless her 🙂

If you want to learn how to sew, check out the courses HERE!

If you are loving this super simple tutorial AND want another gorgeous home decor project, I want you to check out what I made recently:

Learn how to crochet this beautiful thick and thin rustic throw blanket!

Beautiful, right? I want you to get the step-by-step guide for where to get the yarn, how to crochet it (only 1 stitch!) and how to make that creamy, cloud soft blanket yourself! It is completely free (not kidding!) and written in plain English; no crazy pattern lingo here!

Yes! Download Now!

Filed Under: Craft, Sew

  • « Go to Previous Page
  • Go to page 1
  • Go to page 2
  • Go to page 3
  • Go to page 4
  • Interim pages omitted …
  • Go to page 6
  • Go to Next Page »

Primary Sidebar

Categories

Follow me here, there, & everywhere!

  • Email
  • Facebook
  • Instagram
  • Pinterest
  • RSS
  • Twitter
  • YouTube

Search

Get 10 Free Recipes Now!

Best Chicken Coop

Footer

Start Canning Course

Start Canning Course | The Domestic Wildflower click to read this super helpful list of resources, tools, and gift ideas for the homemade and handmade enthusiast in your life!
This video course will invite you into my kitchen to watch me can a wide variety of recipes and use several beginner friendly techniques. It is the perfect course if you want to learn but have no idea where to start; even if you've never boiled a pot of water! Learn how you will know you are doing it right, safety best practices, simple recipes that are foolproof and guaranteed to impress, and skills to apply to any recipe.

Shrubology Ebook

Shrubology: Refreshing Homemade Fruit and Vinegar Syrups for Cocktails
Make easy, no-cook fruit & vinegar syrups for cocktails & mocktails! This ebook shares crowd pleasing recipes and simple to understand ratios so you can make a shrub on your countertop any time- without a recipe. Dive into these Prohibition Era drinks today!

Copyright

Copyright 2019
The Domestic Wildflower
www.thedomesticwildflower.com.
All content created by Jennifer Gomes unless otherwise noted.

Copyright © 2023 · Lifestyle Pro on Genesis Framework · WordPress · Log in