• Skip to secondary menu
  • Skip to main content
  • Skip to primary sidebar
  • Skip to footer
  • The Pressure Canning Cookbook
  • Blog
    • Subscribe
    • Welcome!
  • Perfectly Preserved Podcast
  • About
    • ADW Manifesto
    • Work With Me
      • Read
  • Shop
    • My Account
    • Cart
    • Checkout

The Domestic Wildflower

Handmade Food & Craft Tutorials for Beginners

  • Courses
    • Free Canning Basics
    • Everything Canning Course
    • Steam Canning Workshop
    • Free Homemade Cocktail Mixers
    • Wildflower Mixology
    • Crochet Basket Workshop
  • Can & Preserve
    • Never Canned?
    • Steam Canner Equipment Bundle
    • Shrubs Course
  • Sew
  • Cook
  • Craft
    • Crochet Step-by-Step Guides
      • Crochet Basket
      • Giant Yarn Throw
      • Thick & Thin Throw
  • Living
    • Creativity Challenge
    • Clean
    • Kids
  • Rentals

Craft

Distressed Metal Art Display

February 8, 2016 by Jenny Gomes Leave a Comment

Distressed Metal Art Display

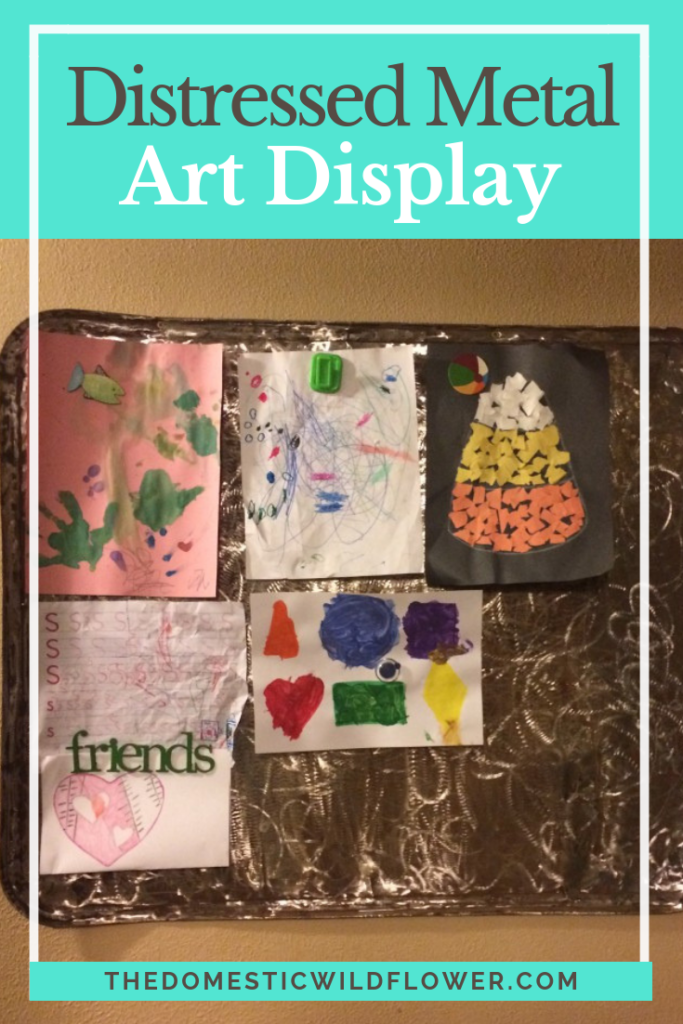
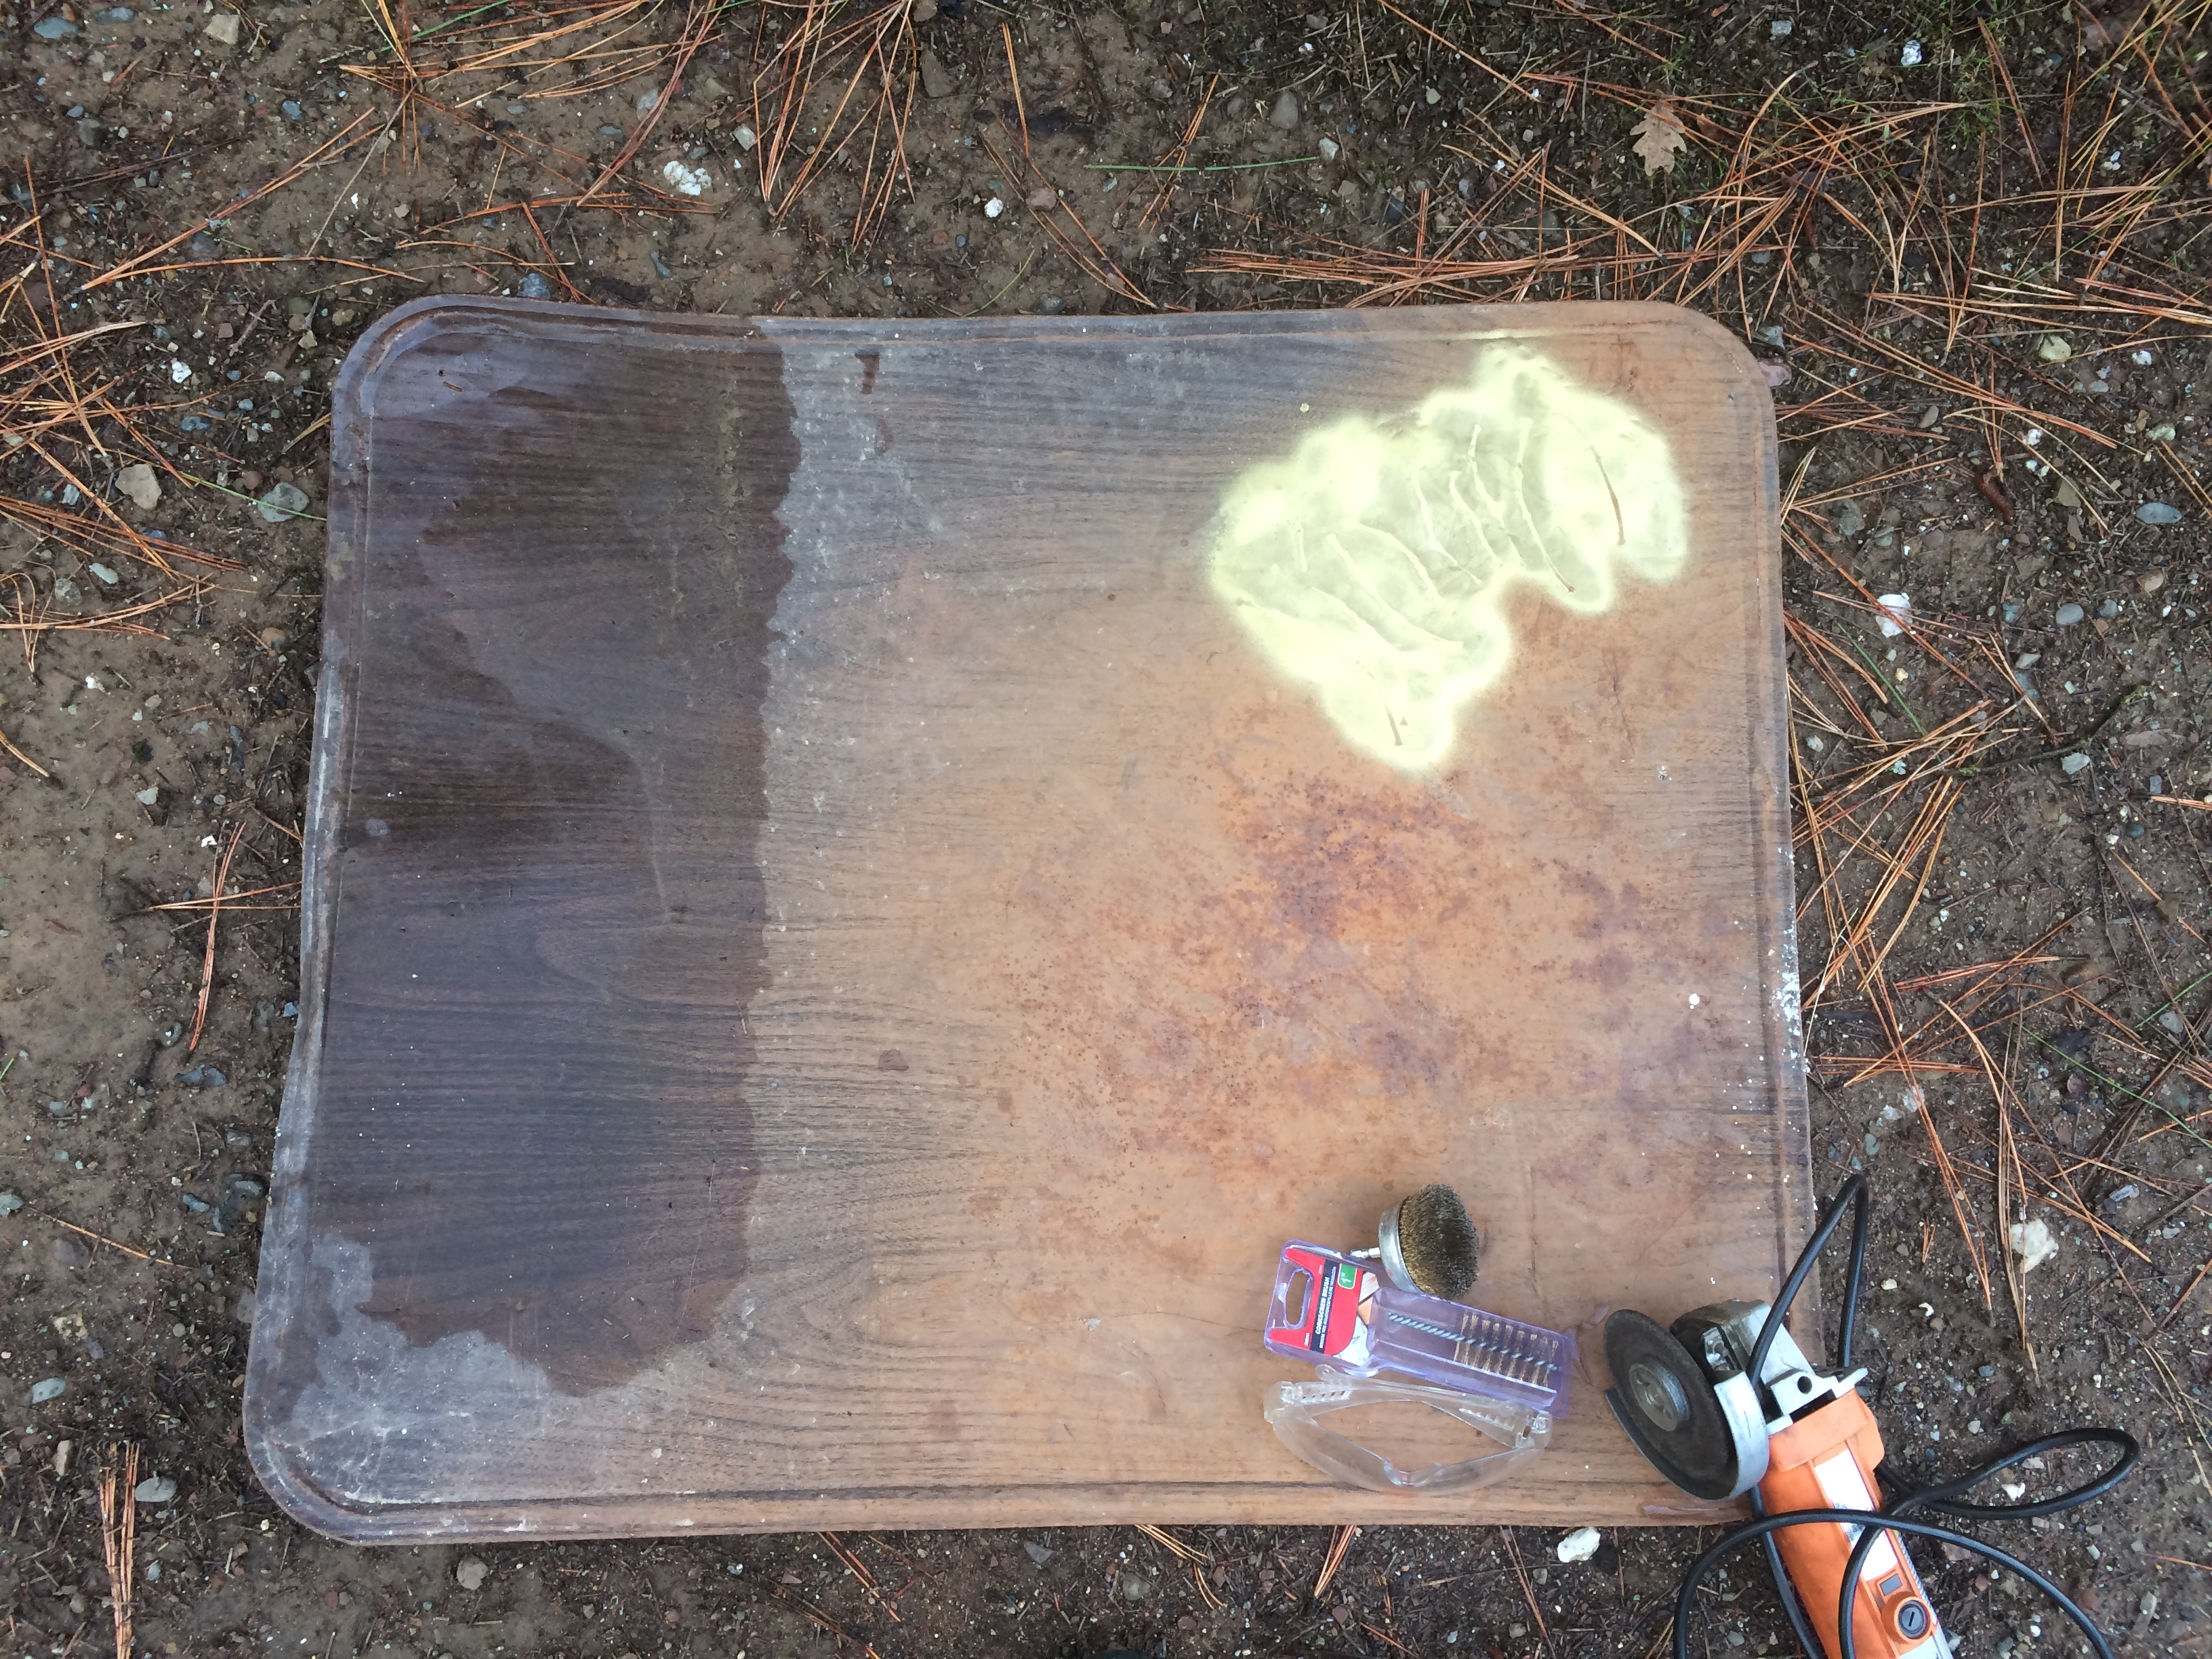
If you need a great way to display kid’s artwork or other papers that are not the standard cute but done chalkboard, this is a super cute, nearly free, and rustic DIY alternative. I’ll show you how to distress a piece of metal (salvaged, thrifted, repurposed) to transform it into a rustic and functional display.

Distressed Metal: Magnetic Children's Art Display Board | A Domestic Wildflower click through to read this helpful and thorough tutorial for how to take junk metal and make a beautiful display board!
I used this previously as a gold spray paint tester 🙂 Here you can see the brown faux bois layer…and some rust!

Now that I have a 4-year-old, the art creation and content level in our home have skyrocketed. My little darlings are creating more awesome construction paper gems than I ever thought possible and I want to display them for at least a little while before storing them to cry over in years to come.

[Read more…] about Distressed Metal Art Display

Filed Under: Craft

Giant Yarn Crochet Blanket Pattern

February 1, 2016 by Jenny Gomes 8 Comments

This post will explain how to create a giant yarn throw using the super thick wool yarn that is so popular right now. This is the giant yarn crochet blanket pattern you need! I’ll share the best places to get giant yarn and explain what you need to know to create a gorgeous knitted or crocheted blanket of your own. You can get the pattern for making your own throw too! Read on, Wildflowers!

Giant Yarn Throw Tutorial

So if you are reading this, I bet you have seen on Pinterest, somewhere else online, or in person, the super trendy gigantic yarn throws and thought how beautiful they are to then gasp at the price tag. The throws I have seen on Etsy are over $400 and some are sold for even over $1000. Alternatively, you might have seen some far lower quality, probably acrylic, smaller diameter yarn versions that won’t last a season even with occasional use nor cover your toes and tummy at the same time. The photos are very often of in cream or ivory, with yarn that is well over an inch in diameter. They are also the most popularly shown as knitted designs.

I crochet pretty well in that I can make anything that is either a rectangle or a circle (blanket, rug, scarf, hat, etc) but I’m not much for counting, keeping track, or following a pattern. I was asked by more than one friend (who knew my crafty inclination) if I thought I could make one of these giant yarn throws and I knew I could. With a little help from a friend, I made one and I think it turned out beautifully if I say so myself. The following is everything I learned so you can choose your own yarn and make your own.

Ready to grab your free giant yarn crochet blanket pattern?

Yarn choices: When you start looking for the giant yarn you will see there are many, many options to choose from. I had to call on a yarn expert friend to help me choose and I’ll share what she taught me here. Some giant yarn is not actually spun (or twisted) at all, which means the wool fibers are hanging out together, more or less in a row, sticking together but not twisted together. Some giant yarn as a little bit of a twist and some has none. The yarn I chose is slightly felted and that means that the fibers are connected better to one another than if the yarn is not felted. The reason I chose this is that I wanted to limit the future pilling of the yarn. Because the yarn isn’t twisted tightly together, the risk of the fibers coming free from one another is higher, so that concern is great. It would be a shame to spend the money and time and have the yarn have the same fate as a once awesome but now pilled and shabby sweater.

Giant Yarn Crochet Blanket Pattern by The Domestic Wildflower click to read the full tutorial for how to make your own knitted or crocheted giant yarn throw including a pattern and sources for beautiful wool yarn!

Micron is a term you might read when shopping for giant yarn and I know it threw me off. Microns refers to the softness (versus scratchiness) of the yarn. If you are making anything the skin will be touching, you want soft. Save the scratchy stuff for felted bowls or bags. The scratchiest wool often comes from the tastiest sheep so don’t let a lamb meat producer tell you to knit a bikini from their wool. Save that wool for a felted bowl or bag or other creation.

[Read more…] about Giant Yarn Crochet Blanket Pattern

Filed Under: Craft

How to Wrap Presents

December 23, 2015 by Jenny Gomes Leave a Comment


How to Wrap Presents
How To Wrap Gifts with Brown Bags: A Less Waste Idea

Gift wrap is one of the most wasteful parts of the holiday season that I have almost entirely given up. Here’s how I skip spending money on gift wrap that looks cute and then is promptly thrown away. I use brown grocery bags and tie by packages with thrift store yarn and label with a marker. Read on for this simple technique and give up wasteful gift wrap!I use brown grocery bags for a few reasons. I haven’t completely gotten with the bring-your-own tote to market program and lots of times I have to get bags from the store. I ask for brown bags because paper products literally grow on trees, can be reused for many, many things, composted, and are a renewable resource that supports American men and women. I use small ones for popping corn in this post here, and I use the trimmings from wrapping gifts to start fires in the woodstove and while it is not a no-waste method, it is a totally cute, much less waste method.
[Read more…] about How to Wrap Presents

Filed Under: Craft, Living Tagged With: brown bag, gift, holiday

How to Make Gold Antlers

November 16, 2015 by Jenny Gomes Leave a Comment


How to Make Gold Antlers


Gold antlers are all over the wild web and I wrote this post to bring the impossibly expensive (no thanks, retail!) or the impossible (um, those horn things are cute but where do I get them?) to the very possible for my Dear Readers. This post is your beginner’s guide to antler terminology and in person and online purchasing. It also will demonstrate the way I painted mine for Christmas, using one important paint in particular.

Antlers are the horns of the ruminant mammals cervidae. This includes deer, elk, moose, and caribou. The males of these species (and both female and male caribou) grow antlers that fall off in the wintertime. This is natural and normal and they grow back at a remarkable rate of about ¼ inch or more a day in the spring, to a size that is typically bigger than the year before. If creating a centerpiece, jewelry organizer, wreath or other rad decor is what you want, here is some size and shape info before you start searching or shopping.

Blacktail and whitetail deer horns are typically smaller than the following but would make a great centerpiece for a small or medium-sized table.

Mule deer horns are the biggest, probably, of the three species of deer discussed here. I would think they would be appropriately sized for a centerpiece of a large table, with a tall vase or candle in the middle, for example.

Moose horns are the ones that have wide palms (that’s really what they are called) that are smooth, flat, and sort of dish-like. On the moose, a big moose’s antlers can be 5 or more feet from side to side, meaning he would need a doorway of more than 5 feet wide to walk through. If you wanted a cool place to set tea lights or small objects on a long table, this would be the horn to seek out.

Elk antlers are very large, with large sharp tines (the pointy parts). I think they’d be gorgeous on a mantle, wall, or on a gate, where it would be out of the way of a rowdy child. They are pretty wicked when used as intended; in defending the original owner from attack.

Caribou antlers are large, with pointed tips and while I can’t say I have seen a shed in person, I’m sure they are beautiful.

An eye guard is the lowest point on the horn, toward the base, growing out over the cervidae eyebrow (they don’t really have eyebrows, just eyelashes).

‘Velvet’ refers to the fuzzy coating on the horns present in the spring as they grow.

These are some of the sites a person could peruse. Use the general information above to help guide your purchases.

The http://www.deerantlerstore.com is a wealth of information as well as horns for sale. I think their site is easy to use had lots of more in-depth information.

This site, http://www.antlers-for-sale.com also seemed great and offered a wide range of types and sizes of horns, including dog chews. Other than being a natural chew for Fido, they’d be good for experimenting on, if you wanted to try drilling, painting, screwing, etc.

Of course, you could acquire some horns another way. When out hiking about, you could find a shed. When you find one consider it’s color and condition. Darker color indicates it is a more recent shed while bleached white means it has been in the sun a while. The longer sun and weather have worn on the shed, the more porous and broken down the horn could be which would dictate which type of paint or craft you could use it for.

If you find one, keep an eye out for its mate. It may be nearby…or it may be miles away.

Finally, you could seek horns out via Craigslist or yard sales. This may be preferable so you could semi-arrange the horns on the spot for your intended project and feel with your fingers the surface and make paint purchases accordingly.

Typically, among those who hunt, the mantra “bigger is better” is paramount while symmetry, girth, and number of points (number of tines on either side) are also very important. What you might care about is if it will sit level on a table or flush against the wall, so you might be able to score some smaller, uneven horns for cheap. Don’t be afraid to tell the seller what you intend to use them for.

​
Here’s what I did. I found a primer that has stain guard because my horn’s color was uneven, some were really weathered, and I was painting them a light gold. This particular kind worked really well and is available by clicking the affiliate link below. I would highly recommend a primer for painting antlers.


gold antlers primer

Blacktail antlers ready for painting
Once they were really dry, I sprayed them with the metallic gold spray paint.  I liked the way this kind sprayed really evenly, the cap was easy to get off (don’t laugh, I hate it when I can’t get the cap off!), and had a beautiful, reflective finish. You can purchase the affordable can of gold goodness by clicking the link below!

And now, of course, the fun of arranging them on the boughs of my Christmas tree or on my holiday table can begin. I think mine turned out beautifully.
Gold Antler DIY | A Domestic Wildflower
Gold Antlers DIY: A Domestic Wildflower click to read this super helpful tutorial!

Filed Under: Craft

DIY Shaker Mason Jar: A Smart Way to Reuse Canning Lids

October 22, 2015 by Jenny Gomes Leave a Comment

DIY Shaker Mason Jar: A Smart Way to Reuse Canning Lids


DIY Shaker Jars: Reuse Canning Lids

Here is one way to reuse all those canning lids that are used once for canning now to dispense all kinds of DIY goodness. This little beginner-friendly project takes the shaker to the next level of practicality.

As you start canning a bit more, season from the season, you will soon arrive at a bit of a problem. You must use new canning lids for new canning projects. That is to say, you must use brand new, out of the box lids each time you fill them with jam, tomato sauce, or whatever is boiling in your pot. That means that when you open them, months later, that lid not safe to can with for your next batch. It is however plenty useful as a regular lid. Add four or five canning seasons under your belt and you will have oodles of used lids and if you are like me, you will hate to store and really hate to throw away these lids. I’m always looking for ways to reuse these lids and this particular project came about after seeing dozens of fun ideas on Pinterest and other places for DIY taco seasoning, cinnamon sugar mix, face scrub, etc. All these ideas are great, and money saving, and I love focusing on doing things yourself rather than relying on the grocery store or some other means of dubious merit to elevate your daily life. Here’s how you can take a used canning lid and create a simple shaker.

1. Identify a Used Canning Lid

I suppose you could use a brand new lid but I bet with very little effort you can come upon a used canning lid or two. In fact, on brand new jars sold in flats, very often their lids are “used” because of the heat and weight of transportation. Those lids have the tell-tale crease in the rubber flange and in a pinch, I’ll confess to using them but not without serious doubts as to their reliability to seal. It is best to can with new lids, and handy to reuse the used lids. Here’s the ridge you can see in lids that have been used in canning once before:


DIY Shaker Mason Jar | A Domestic Wildflower
Notice the ridge and also the little edge that is bent outwards, to the right, where the can opener pulled the edge back. This is a used canning lid.
2. Acquire the jar and ring: I like dispensing from smaller jars because you will use up the contents faster and you won’t have to worry about the contents becoming stale or absorbing moisture. These are some tiny jelly jars that I like for both jams for gifting and for dispensing baking soda to use in the shower as a face and elbow scrub. You can purchase them by clicking the link below if you haven’t seen them in stores near you. One of the many, many reasons I love canning jars is because they are either regular or wide mouth. It isn’t like plastic sandwich containers (the bane of my wifely existence) where each lid is specific to each make and model and warps further with every trip through the dishwasher. They always fit. Period.

DIY shaker jar mason jar project | A Domestic Wildflower click through for the easy tutorial for reusing canning lids to create a shaker jar!
3. Mark out a design: I used a permanent marker to dot out a simple grid of holes and a fun flower design.

DIY Shaker Mason Jar Project: A Smart Way to Reuse Canning Lids | A Domestic Wildflower

4. Find a tiny nail and a hammer. The smaller the nail, the better. I used the tiny nail that came in a kit of nails I bought ten years ago that are appropriate for hanging pictures on the wall. The nail will go through the lid with not a lot of effort, so a super heavy hammer is not necessary. Use what you have, Wildflowers.

5. Put the lid on the jar, screw on the ring, and start hammering. I am not particularly good at coloring inside the lines, in any way you want to interpret the metaphor, so you will see marks where I did not hammer through and holes where there are no marks. No matter to me. Keep your fingers clear of the hammer and go slowly and in no time you will have a super cute and functional shaker from which you can dispense:

¼ cup sugar mixed with 1 tablespoon cinnamon for cinnamon sugar mix

plain baking soda for a simple but effective scrub

Any other clever mixes like taco seasoning, cocoa and cinnamon mix, etc!

DIY Shaker Jar | A Domestic Wildflower click through to read the simple DIY tutorial that reuses canning lids!
I’d love to hear what you plan on filling your little shaker jars with, Wildflowers! Please share in the comment section below!

3 Comments

[Read more…] about DIY Shaker Mason Jar: A Smart Way to Reuse Canning Lids

Filed Under: Craft

  • « Go to Previous Page
  • Page 1
  • Page 2
  • Page 3
  • Page 4
  • Page 5
  • Page 6
  • Go to Next Page »

Primary Sidebar

Categories

Follow me here, there, & everywhere!

  • Email
  • Facebook
  • Instagram
  • Pinterest
  • RSS
  • Twitter
  • YouTube

Search

Get The Pressure Canning Cookbook

Get 10 Free Recipes Now!

Best Chicken Coop

Footer

Get Started Pressure Canning

Shrubology Ebook

Shrubology: Refreshing Homemade Fruit and Vinegar Syrups for Cocktails
Make easy, no-cook fruit & vinegar syrups for cocktails & mocktails! This ebook shares crowd pleasing recipes and simple to understand ratios so you can make a shrub on your countertop any time- without a recipe. Dive into these Prohibition Era drinks today!

Copyright

Copyright 2019
The Domestic Wildflower
www.thedomesticwildflower.com.
All content created by Jennifer Gomes unless otherwise noted.

Copyright © 2025 · Lifestyle Pro on Genesis Framework · WordPress · Log in