• Skip to secondary menu
  • Skip to main content
  • Skip to primary sidebar
  • Skip to footer
  • The Pressure Canning Cookbook
  • Blog
    • Subscribe
    • Welcome!
  • Perfectly Preserved Podcast
  • About
    • ADW Manifesto
    • Work With Me
      • Read
  • Shop
    • My Account
    • Cart
    • Checkout

The Domestic Wildflower

Handmade Food & Craft Tutorials for Beginners

  • Courses
    • Free Canning Basics
    • Everything Canning Course
    • Steam Canning Workshop
    • Free Homemade Cocktail Mixers
    • Wildflower Mixology
    • Crochet Basket Workshop
  • Can & Preserve
    • Never Canned?
    • Steam Canner Equipment Bundle
    • Shrubs Course
  • Sew
  • Cook
  • Craft
    • Crochet Step-by-Step Guides
      • Crochet Basket
      • Giant Yarn Throw
      • Thick & Thin Throw
  • Living
    • Creativity Challenge
    • Clean
    • Kids
  • Rentals

Sew

Sisters Outdoor Quilt Show

May 1, 2017 by Jenny Gomes 1 Comment

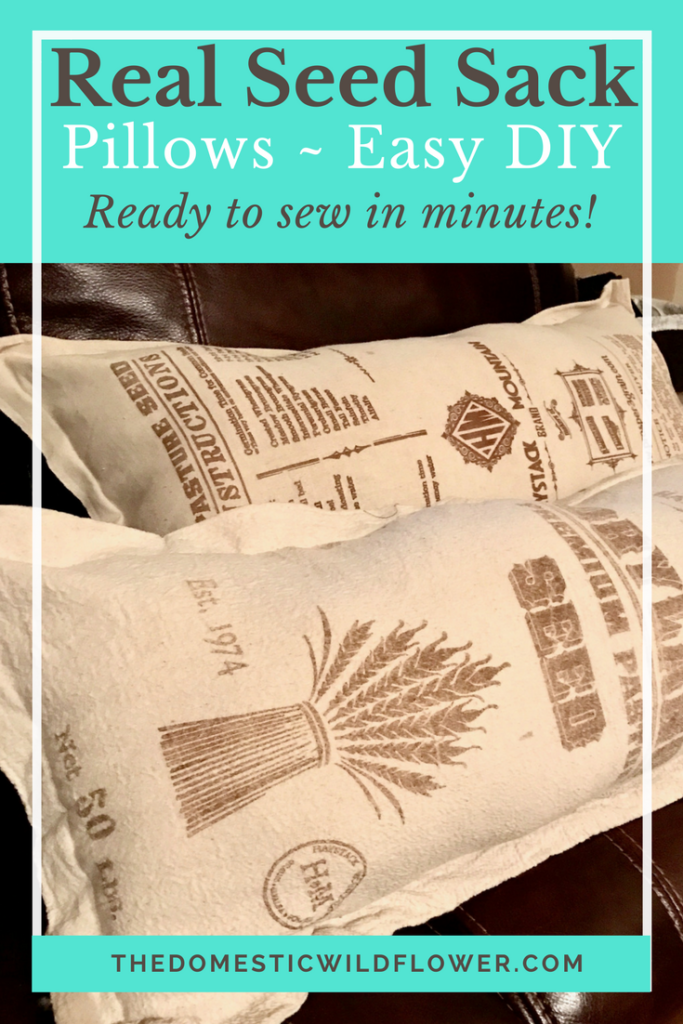
This post will share with you what the Sisters Outdoor Quilt Show is all about and encourage you to attend whatever your creative pursuit’s penultimate experience may be.

Sisters Outdoor Quilt Show

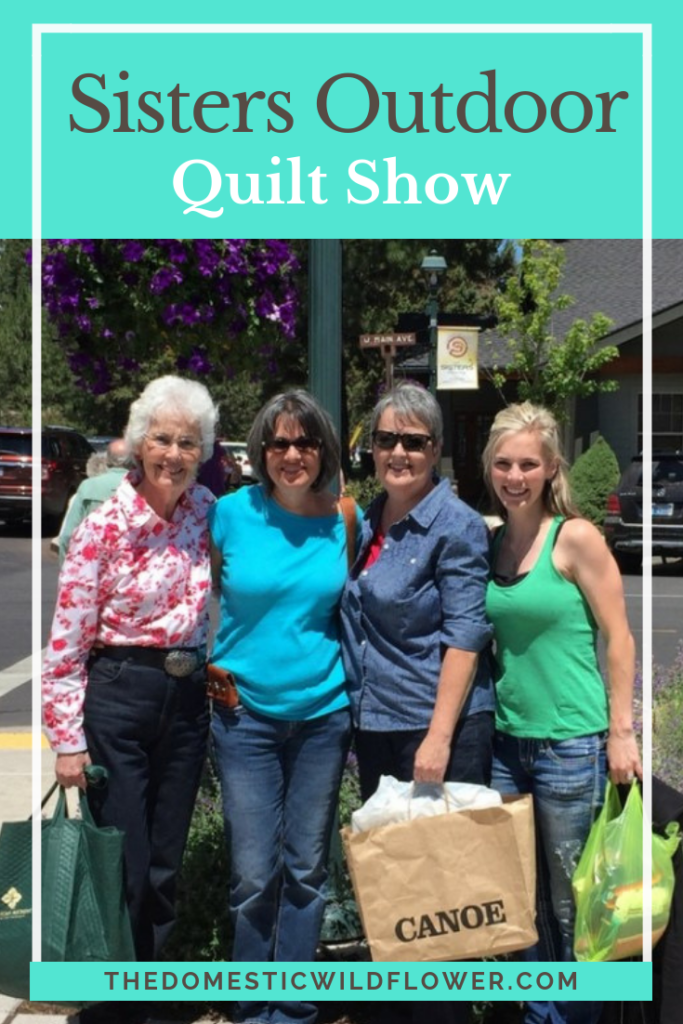
I had the distinct pleasure of attending for the first time  July 2016,  the Sisters Outdoor Quilt show in Sisters, Oregon. I have been hearing about this quilt show ever since I started working at my beloved college job at Joann’s. When I would say I grew up near the Oregon/California border, quilting enthusiasts would ask if I had attended this world famous outdoor quilt show. I had not, but as my sewing skill has grown it has been in the back of my mind that I should go to see what all the fuss was about.


My grandmother, 84 years young, and a combination of various aunts have been going every year for some time. My youngest child is 2 ½ now, so I felt like I could leave for a wild weekend of quilt showing.

Sisters Outdoor Quilt Show | The Domestic Wildflower click to read all about the largest outdoor quilt show in the world from someone who just attended! This inspiring post will have you eager to attend a show or workshop on your craft soon!

I went and am so glad I did. We lodged two nights in Bend, which is a lovely little city about 20 minutes drive from Sisters. Because this is THE quilt show, rooms all over the greater area have been booked up for this event for a year or more and truly, there were old ladies as far as the eye could see wherever we went. It was easy to spot other quilters who were mom-age or younger and it was fun to meet them in the crowds.


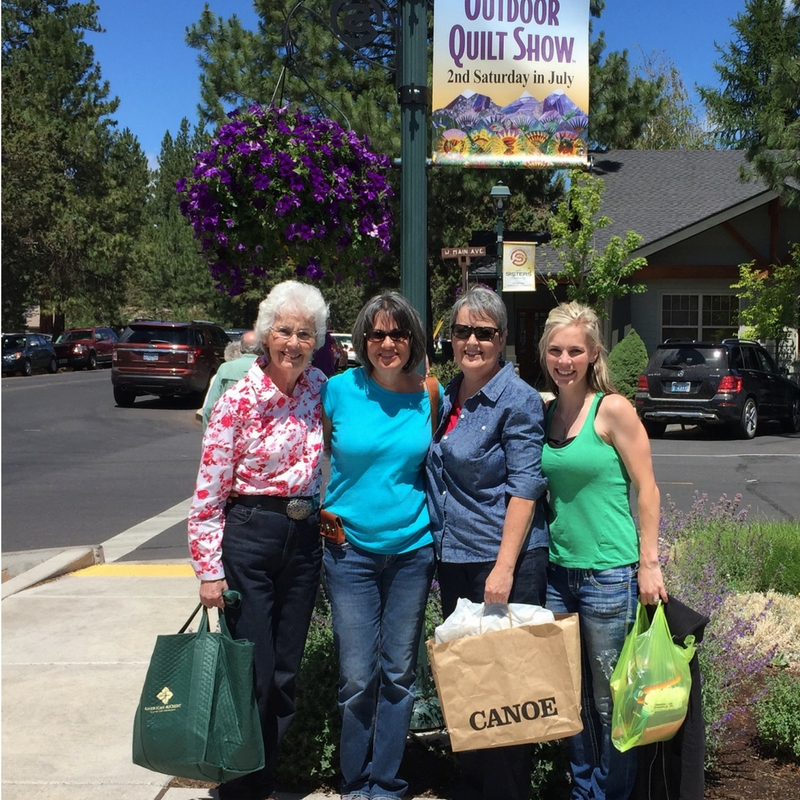
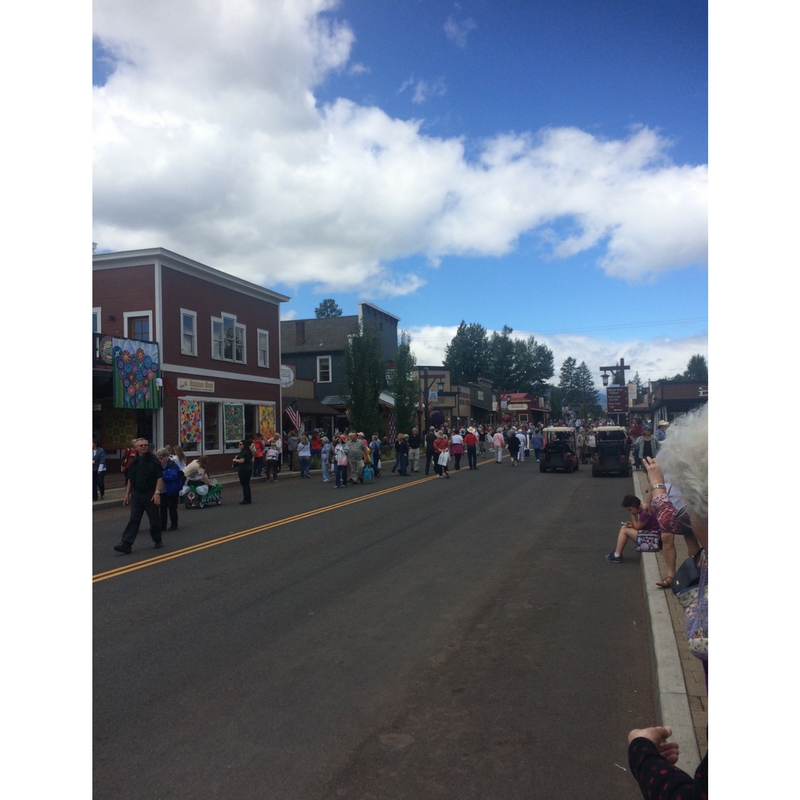
Sisters is a beautiful town, seated at the foot of 3 mountains, which are known as The Three Sisters. I was overwhelmingly impressed with the cleanliness of the streets, availability of bathrooms, walkways, the perceived safety due to well marked and lit roadways and parking lots, and the ease that which all these mostly older ladies could get around by car, bus, or on foot.


My family is a very routine oriented family. That is to say, we stayed in the same hotel they always stay in, ate at the same delicious Mexican place they always eat in, on the same night of the show as always, found parking on the same street as the year prior…and it all was delightful. Our trip routine was to arrive Friday afternoon, visit the quilt stores in the town of Sisters including The Stitching Post, dine on fish tacos and amazing margaritas at said Mexican place, sleep in Bend, wake at an ungodly early hour to be back to Sisters by 7am. When we have walked and taken in as much as we can stand, we drive back to Bend to fabric shop at a variety of quilt stores, stay one more night in Bend, and fabric shop on our way back to reality.  


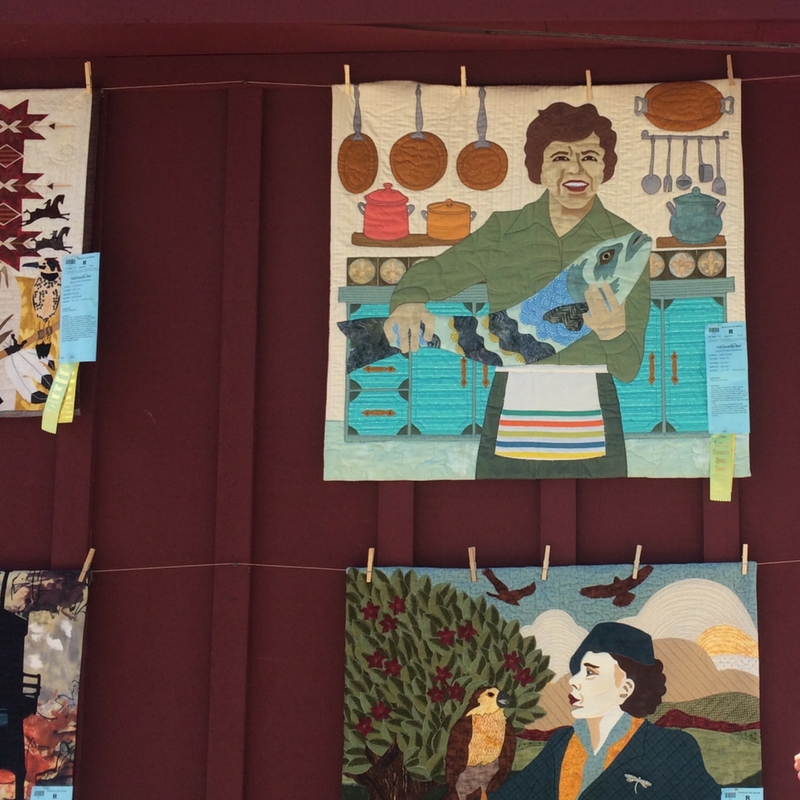
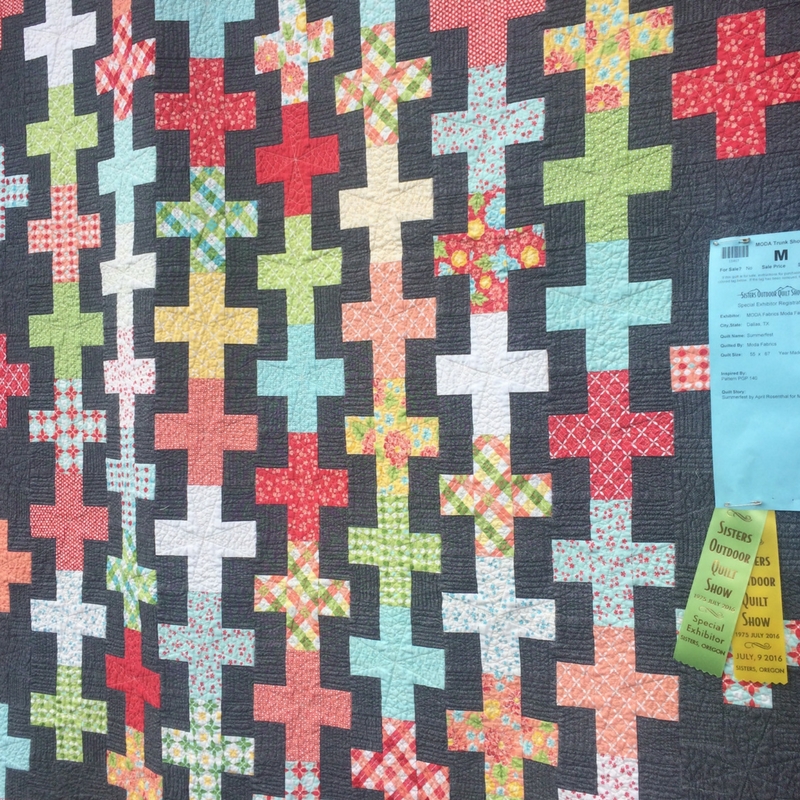
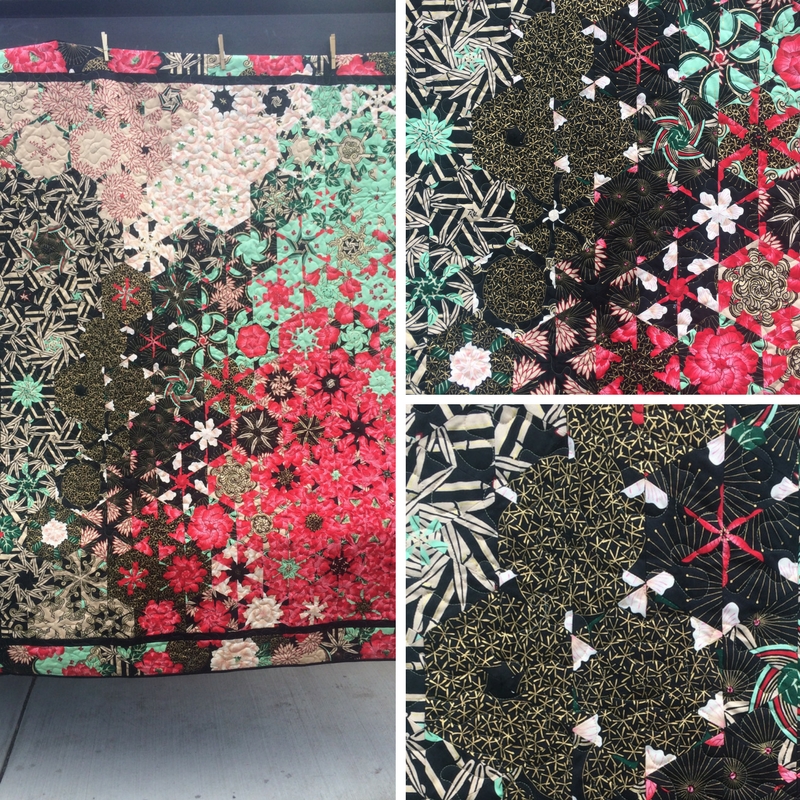
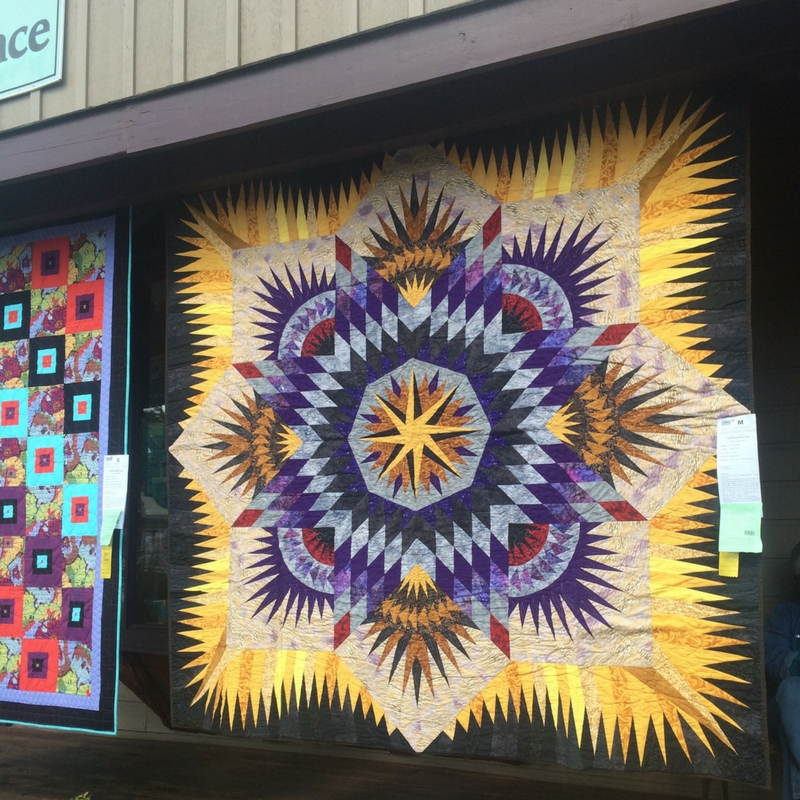
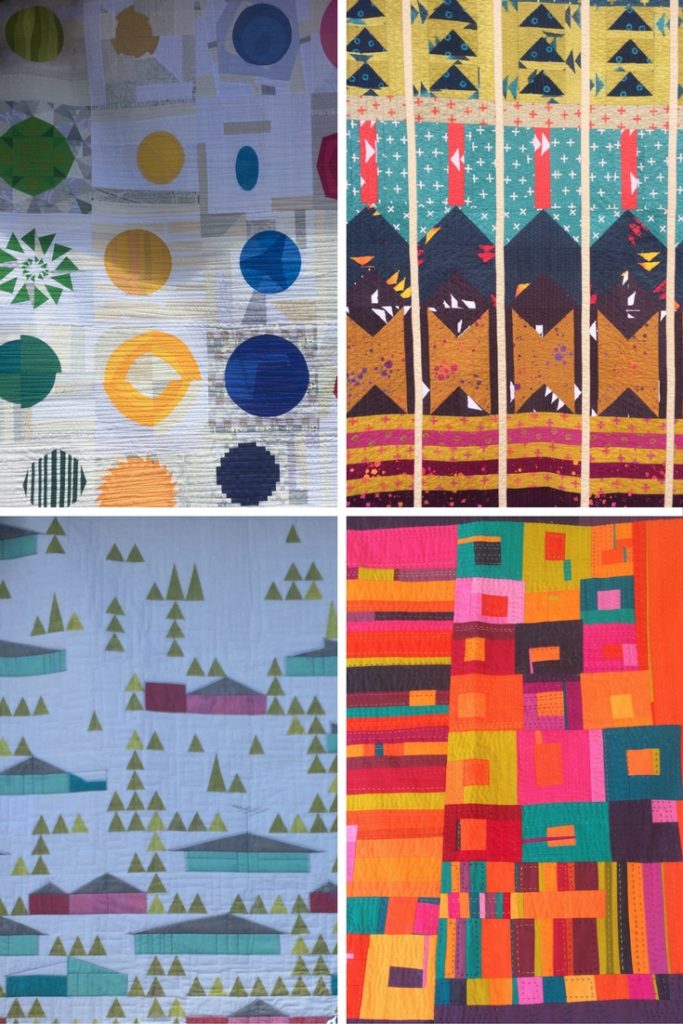
The basic arrangement at the quilt show is that street after street, storefront after storefront, is lined with master-level quilts. On the first street, I remarked to my aunt with a yawn that I felt so inadequate after seeing such astonishing skill. She laughed and told me to get used to feeling like that because I would feel that way all day long. And she was right in the best way. I felt inspired, enthused, and generally amazed at the skill, creativity, dedication, and technique on display. Over 1200 quilts were shown this year and I definitely didn’t see all of them.

Sisters Outdoor Quilt Show | The Domestic Wildflower click to read all about the largest outdoor quilt show in the world from someone who just attended! This inspiring post will have you eager to attend a show or workshop on your craft soon!

They are organized thematically on many streets so for example there was a whole street devoted to quilts featuring portraits of famous people like Julia Child. There were more than one street devoted to quilts sewn by men, streets of black and white, and hand quilted, and multi-dimensional, and landscape, and on and on. Some are for sale and at a wide range of price points. There were quilts that truly took my breath away and there were ones that I know I could make someday and others I know I could never.

Sisters Outdoor Quilt Show | The Domestic Wildflower click to read all about the largest outdoor quilt show in the world from someone who just attended! This inspiring post will have you eager to attend a show or workshop on your craft soon!

Sisters Outdoor Quilt Show | The Domestic Wildflower click to read all about the largest outdoor quilt show in the world from someone who just attended! This inspiring post will have you eager to attend a show or workshop on your craft soon!

One of the best parts of the trip was that because everyone there was attending for the same reason, for their love and interest in quilting, everyone was polite, kind, and happy to be there. The lines for the many, readily available portable toilets were pleasant, and strangers offered to hold one another’s bags while they used the facilities. A nursing mother was offered a shady spot to sit on a bench, everyone had a cheerful “oops, excuse me” when passing one another on the street, and it seriously felt like the happiest place on Earth. All the shops were open with seemingly happy shop owners behind the counter, readily answering questions about their antiques, gifts, food, Western wear, and of course fabric for sale.

Sisters Outdoor Quilt Show | The Domestic Wildflower click to read all about the largest outdoor quilt show in the world from someone who just attended! This inspiring post will have you eager to attend a show or workshop on your craft soon!

The lunch plan for my family is always to walk a few blocks to the local Lutheran church, where a feat of great organization and hospitality greets quilting enthusiasts. Upon entering you will see that you pay for your lunch, $10 I think, get a lunch tray and are served a homemade variety of salads, wraps, a selection of cold drinks, and the best part is the homemade pie and ice cream. The church was clean and very well organized, getting our food was very fast, and the outdoor seating was comfortable and inviting. Did I mention the homemade pie? Made by someone’s grandmother? It was so, so nice.


Show attendees can shop at various quilting-themed vendors, buy foods like kettle corn and hazelnut flavored vodka (just for an example 😉 and generally soak up the beauty created by both God and artist.

Sisters Outdoor Quilt Show | The Domestic Wildflower click to read all about the largest outdoor quilt show in the world from someone who just attended! This inspiring post will have you eager to attend a show or workshop on your craft soon!

modern quilt graphic image

I don’t usually write about “me, me, me” and what I do; I care to share what YOU can do, if that makes sense. However, I wanted to share this experience with you so that you felt inspired to make a pilgrimage to YOUR creative mecca, to your version of the Sisters Outdoor Quilt Show. Being surrounded by the best of the best of your craft makes you feel true awe, and that is a very powerful source of inspiration. To see what others create fuels your own creativity. To challenge one’s self to reach even greater creative heights is exciting and to marvel at the mastery of another’s technique is humbling.
I want to know, Wildflowers, what is YOUR version of the Sisters Outdoor Quilt Show? What creative mecca do you want to, or get to attend?

Filed Under: Sew

Seed Sack Pillows

April 28, 2017 by Jenny Gomes Leave a Comment

This post will show you how to create simple, homemade seed sack pillows from real seed sacks.

Real Seed Sack Pillows Easy DIY This post explains exactly how to sew with just one seam these rustic pillows from real seed sacks! The post has links to the cutest seed sacks too!

My dear friend saved these seed sacks from a garden project and asked me to make them into pillows for their living area. I waited for months and months because I wanted to find pillow forms for the project; pillow forms are like a plain, muslin covered pillow that remains in pillow shape so you can remove the cover and wash it easily. They are handy, but they don’t come in every shape and size imaginable, and they don’t come in real seed sack size.
These seed sacks are from Great Basin Seed and you can find them on Amazon, through this and the following affiliate links, and you should definitely check out these high quality seed options that come in ADORABLE seed sacks:

Click over to buy the right seeds for your area but they all come in adorable sacks. Win win, Wildflowers 🙂

To make the pillows, I simply stuffed each of the two sacks with this polyester stuffing.

And I sewed up the ends using my trusty Janome machine (mine is a bit older than this one but it is similar)

And I used these standard machine needles to complete the sewing project

And this oatmeal-y, eggshell Guttermann thread was a perfect match.

Be sure to stuff the pillows very full- they will de-poof with regular use.

Before I sewed, I washed and dried these seed sacks on warm to preshrink and now, they are machine washable. Which is pretty important, as she has two very handsome sons that just might dirty them from time to time.

Real Seed Sack Pillows Easy DIY This post explains exactly how to sew with just one seam these rustic pillows from real seed sacks! The post has links to the cutest seed sacks too!

Real Seed Sack Pillows Easy DIY This post explains exactly how to sew with just one seam these rustic pillows from real seed sacks! The post has links to the cutest seed sacks too!

I sewed a flange of 1 inch all the way around, which was super simple and made for a really cute look and prevented a floppy, underfilled corner look which sometimes happens with homemade pillows- especially the ones made without a pillow form. These corners are sharp!

Real Seed Sack Pillows Easy DIY This post explains exactly how to sew with just one seam these rustic pillows from real seed sacks! The post has links to the cutest seed sacks too!

These seed sacks are very soft too!

What do you think, Wildflowers? Super cute, right? I’d love to hear what other adorable things you can do with a seed sack in the comments below and be sure to pin this project to Pinterest!

If you want to learn how to sew, check out the courses HERE!

xo Jenny

Filed Under: Sew

How to Make a Shower Curtain with a Vintage Tablecloth

March 6, 2017 by Jenny Gomes 3 Comments

This post will share how you can transform a vintage tablecloth with a few simple sewing steps into a farmhouse style, completely unique shower curtain.

How to Sew a Shower Curtain with a Vintage Tablecloth | This farmhouse style DIY sewing hack shows you exactly how to craft a unique shower curtain from a vintage tablecloth. This is a super simple, easy sew tutorial and it is super clear! Click through to read it now!

This post may contain affiliate links, which means that purchasing through those links is a way for you to help support your favorite blogger with no impact on your checkout price. I’d never recommended a product I didn’t use and love myself. 

The thing that you have to know about vintage tablecloths is that they are often roughly showered curtain size. You also need to know that because you’ll be sewing the tabs (those fabric loops that connect to the rod) at whatever interval you want, you can make a tablecloth fit a shower.

You may have to hem, and that is ok.

The advantage of using a vintage tablecloth is that they are pre-washed and thus preshrunk, they are often inexpensive (though I have passed up many a gem printed with giant roses that were just a bit too much for my budget), and they are probably not being used as a tablecloth. Also, a tablecloth is already hemmed, most likely, which means your sewing project will be completed in no time.

In addition to a vintage tablecloth, you need double fold bias tape (which you probably can score for not that much at a second-hand store, or new via Amazon. This is a long strip of fabric that is folded hot-dog style twice, and the edges are treated so they won’t fray. It is a small price to pay for a really easy tab solution. You could absolutely use something like a hemp rope, gingham ribbon (melt the cut edges with a lighter carefully, just a touch) or you could make your own fabric tabs.

You will need:

Vintage tablecloth (that links to new and used ones on Amazon)

bias tape

universal sewing needles

all-purpose sewing thread

Use a shower curtain as a simple guide for marking where you will sew your tabs. If your table cloth is really wide, you might mark your marks 9 inches apart while the standard, store-bought shower curtain is probably spaced 6 inches. IT IS OKAY IF THIS HAPPENS. Your curtain will just be a bit more “ruffle-y” than standard. Who wants to be standard, anyway? Not me.

Use a pen or pencil to mark where you will sew your tabs.

How to Sew a Shower Curtain with a Vintage Tablecloth | This farmhouse style DIY sewing hack shows you exactly how to craft a unique shower curtain from a vintage tablecloth. This is a super simple, easy sew tutorial and it is super clear! Click through to read it now!

My shower curtain was actually a bit narrow, as compared to standard, but I have a clear plastic shower curtain on the inside and it doesn’t make any difference.

How to Sew a Shower Curtain with a Vintage Tablecloth | This farmhouse style DIY sewing hack shows you exactly how to craft a unique shower curtain from a vintage tablecloth. This is a super simple, easy sew tutorial and it is super clear! Click through to read it now!

The length of the tabs you cut from the double fold bias tape will be determined by how long you want/need the shower curtain to be, which of course is determined by the size of your tablecloth. I cut my tabs 8 inches, which made a 4-inch space between the shower rod and the hooks to the top the shower curtain. You could do twice that or more- think cafe curtain but in shower curtain form- and if you have a great tablecloth to use, I bet it would look amazing!

How to Sew a Shower Curtain with a Vintage Tablecloth | This farmhouse style DIY sewing hack shows you exactly how to craft a unique shower curtain from a vintage tablecloth. This is a super simple, easy sew tutorial and it is super clear! Click through to read it now!

Use matching thread and a universal needle and remember to back stitch. Sew tabs along the top of your vintage shower curtain. Hang and admire!

How to Sew a Shower Curtain with a Vintage Tablecloth | This farmhouse style DIY sewing hack shows you exactly how to craft a unique shower curtain from a vintage tablecloth. This is a super simple, easy sew tutorial and it is super clear! Click through to read it now!

See how mine is a touch narrow? Also, see how it doesn’t matter at all? Easy peasy, right?

Happy sewing, Wildflowers!

I know lots of you might be new to me; I’m Jenny and I am a huge fan of saving time and money by creating things at home for yourself.

Jenny of The Domestic Wildflower

I wanted to show you another super cute, lightening fast home decor project I created recently! How adorable is this burlap garland?

How to Make a Burlap Garland | This DIY tutorial is so farmhouse adorable, and so easy to sew! Perfect for rustic DIY decor for the home, this fixer upper style banner is right at home in a kitchen or for Valentine's Day

Read that post here!

If you want to learn how to sew, check out the courses HERE!

How to Sew a Shower Curtain with a Vintage Tablecloth | This farmhouse style DIY sewing hack shows you exactly how to craft a unique shower curtain from a vintage tablecloth. This is a super simple, easy sew tutorial and it is super clear! Click through to read it now!

Filed Under: Sew

How To Sew a Burlap Garland

January 28, 2017 by Jenny Gomes Leave a Comment

This post will teach you how to sew a super simple burlap garland that you can make yourself with jute webbing, hemp rope, and an hour of time.

How to Make a Burlap Garland | This DIY tutorial is so farmhouse adorable, and so easy to sew! Perfect for rustic DIY decor for the home, this fixer upper style banner is right at home in a kitchen or for Valentine's Day

This post may contain affiliate links which are a way for you to support your favorite blogger without any impact on your amazon checkout. I’d never recommend something I didn’t use and love myself.

This garland is truly simple to sew for a very beginner for several reasons. Jute webbing is easy to sew on, and requires  only a universal needle,  and basic sewing thread. Sewing on jute webbing (that characteristically is just striped burlap meant for supporting a chair cushion in a chair or sofa) is easy, and gives a good chance for a newbie to practice making a narrow seam allowance (sewing close to the edge) and pivoting at the point of the garland to make a nice, sharp point. Of course, if you are a seasoned seamstress, this project will be even faster and easy to customize further. Jute comes striped in a variety of colors (navy, black, and red being the most common) and a couple different widths. Mine in 4 inches wide.

You will need: 

4 yards jute webbing

5 yards hemp rope

Universal sewing needle

all purpose thread. 

Instructions: Cut jute into 12 inch lengths. Zigzag cut edges. You can skip this step, but be warned that this webbing will fray significantly, and not in the cute way.

How to Make a Burlap Garland | This DIY tutorial is so farmhouse adorable, and so easy to sew! Perfect for rustic DIY decor for the home, this fixer upper style banner is right at home in a kitchen or for Valentine's Day

Fold the end into a point. Sew from the side, to the point, lower the needle, lift the presser foot, pivot, and sew down the other side of the triangle. I prefer a narrow 1/8 inch seam allowance and since your stitches disappear readily in the jute webbing, this is a great time to practice sharpening your skills.

How to Make a Burlap Garland | This DIY tutorial is so farmhouse adorable, and so easy to sew! Perfect for rustic DIY decor for the home, this fixer upper style banner is right at home in a kitchen or for Valentine's Day

How to Make a Burlap Garland | This DIY tutorial is so farmhouse adorable, and so easy to sew! Perfect for rustic DIY decor for the home, this fixer upper style banner is right at home in a kitchen or for Valentine's Day

Repeat on all sections.

Measure about 20 inches from the end of the rope. This is where your first section will be sewed.

Lay the jute webbing sections around the hemp rope with the triangle points pointing to the right. The enveloped rope will be to the LEFT of the presser foot, which may feel contrary to your instinct but this worked best for the next step.

How to Make a Burlap Garland | This DIY tutorial is so farmhouse adorable, and so easy to sew! Perfect for rustic DIY decor for the home, this fixer upper style banner is right at home in a kitchen or for Valentine's Day

Use a sewing pin to secure the section however you’d like. Sew a straight line, remembering to backstitch at start and finish. Do your best to get as close to the rope as you can. This creates a tight casing so your garland sections aren’t sliding all over the rope. I like mine to be close to evenly spaced.

How to Make a Burlap Garland | This DIY tutorial is so farmhouse adorable, and so easy to sew! Perfect for rustic DIY decor for the home, this fixer upper style banner is right at home in a kitchen or for Valentine's Day

Continue to sew sections to the rope about fist-width, or 4 inches, apart, the length of the rope.

Knot ends of the rope.

Display with love!

How to Make a Burlap Garland | This DIY tutorial is so farmhouse adorable, and so easy to sew! Perfect for rustic DIY decor for the home, this fixer upper style banner is right at home in a kitchen or for Valentine's Day

That was a piece of cake, right? I know some of you are new to me so I wanted to say hi! I’m Jenny and I love helping newbies get started making homemade things for themselves. I used to work in a fabric store while I was in college and I will NEVER run out of killer good ideas for crafting for beginners. Never 🙂

Jenny of The Domestic Wildflower

That’s me! My photographer makes me look like I’m actually sorta in control of the two wild children and galumphing chocolate lab behind her. God bless her 🙂

If you want to learn how to sew, check out the courses HERE!

If you are loving this super simple tutorial AND want another gorgeous home decor project, I want you to check out what I made recently:

Learn how to crochet this beautiful thick and thin rustic throw blanket!

Beautiful, right? I want you to get the step-by-step guide for where to get the yarn, how to crochet it (only 1 stitch!) and how to make that creamy, cloud soft blanket yourself! It is completely free (not kidding!) and written in plain English; no crazy pattern lingo here!

Yes! Download Now!

Filed Under: Craft, Sew

How to Replace a Lost Button on Your Jeans

September 26, 2016 by Jenny Gomes 2 Comments

This post will show you a smart, simple way of fixing jeans that have lost a button.

How to Replace a Lost Button on Your Jeans

Fixing a broken button from a beloved pair of jeans isn’t as easy as it seems. You can buy replacement buttons but they often require a special tool to clamp them to the waistband. If the button pulled it’s way completely through the waistband, you are left with a hole that is larger than the shank of most replacement buttons…and then what? Add in a zipper that doesn’t prefer to stay up all on its own, and your jeans are ready for demotion to the rag pile.

I have a good way of mending the hole where the button pulled through that leaves you without having to buy a replacement button and tool that may or may not work that is difficult to use. It also makes your mending job last so you won’t be sewing the button back on every time you want to wear the jeans.

Read on for the full mending tutorial + video!

The first thing you need is a regular button that slides in and out of the factory buttonhole in the waistband of your jeans. You have a few stylistic choices when it comes to the color and style of button. You could find a metal button that closely resembled the button that originally was on the jeans, you could find a neutral colored plastic button, or you could choose a bright, colorful, or otherwise really fun button that would be meant to stand out. For jeans, I usually wear each pair with a variety of outfits so I choose my replacement buttons to be as neutral as possible.

You will need thread that matches the button, a sewing needle with an eye large enough to accommodate the thread, a pair of sharp scissors, a pair of tweezers, and a scrap of denim that is at least 2 inches x 2 inches.

Take the tweezers and insert them in between the layers of the waistband. Your waistband is made from at least 2 layers of fabric, almost certainly, if not more, and you’ll be able to feel with the tweezers that there’s space for a flat, smooth, denim square to be inserted.

How to Replace a Lost Button on Your Jeans | The Domestic Wildflower click to read this super helpful mending tutorial for fixing your jeans when you lose the factory button. This tutorial even has a clear video to walk you through the process. Watch it here!

The extra fabric that you will insert will become a strong anchor onto which you will sew the new button without making the waistband of the jeans look mended. It will be completely invisible within the waistband and will give you something sturdy to sew on.

Trim the denim patch to be just a bit smaller than the height of the waistband. When mending, always make the patch bigger than you think. You can always pull it out and trim a little more.

Using the tweezers, pinch the edge of your denim anchor patch and slide it into the hole (that used to house the shank of the original jeans button). Use the tweezers to wiggle and shimmy the patch between the layers so it is flat. Imagine opening up a sandwich that’s already prepared to slide in one more piece of cheese. It’s like that. Sort of 🙂

Use your fingers, the tweezers, a ball point pen, the tines of a fork, or any other small tool to patiently wiggle the fabric into place.

After the fabric is flat within the layers, begin sewing the button exactly over the same hole that the original button was in. As you sew, you’ll feel that you are sewing through several layers of fabric which will firmly anchor the button in place. Try to stab through layers of the original waistband also, but because you’d added the extra layer, you shouldn’t end up with a button that separates from the waistband at all.

How to Replace a Lost Button on Your Jeans | The Domestic Wildflower click to read this super helpful mending tutorial for fixing your jeans when you lose the factory button. This tutorial even has a clear video to walk you through the process. Watch it here!

This video should show you exactly how to mend this way; be sure to pin it for reference later!

After making about 8 passes (on a 4 hole button I like to do 4 one way, 4 the other), knot the thread on the backside (by your tummy) and snip the thread. You could add a dot of Fray Check or clear nail polish, but I usually don’t find it necessary.

Now, your jeans can remain in the regular line up instead of lingering in the purgatory of unwearables.

If you want to learn how to sew, check out the courses HERE!

Happy Mending, Wildflowers!

Filed Under: Sew

  • « Go to Previous Page
  • Page 1
  • Page 2
  • Page 3
  • Page 4
  • Interim pages omitted …
  • Page 7
  • Go to Next Page »

Primary Sidebar

Categories

Follow me here, there, & everywhere!

  • Email
  • Facebook
  • Instagram
  • Pinterest
  • RSS
  • Twitter
  • YouTube

Search

Get The Pressure Canning Cookbook

Get 10 Free Recipes Now!

Best Chicken Coop

Footer

Get Started Pressure Canning

Shrubology Ebook

Shrubology: Refreshing Homemade Fruit and Vinegar Syrups for Cocktails
Make easy, no-cook fruit & vinegar syrups for cocktails & mocktails! This ebook shares crowd pleasing recipes and simple to understand ratios so you can make a shrub on your countertop any time- without a recipe. Dive into these Prohibition Era drinks today!

Copyright

Copyright 2019
The Domestic Wildflower
www.thedomesticwildflower.com.
All content created by Jennifer Gomes unless otherwise noted.

Copyright © 2025 · Lifestyle Pro on Genesis Framework · WordPress · Log in